iOS: Repositioning UIViews - A Step By Step Guide


While developing one of our iPad applications, we came across a scenario where we needed a way to simply reposition UIView objects on the screen.
The Problem
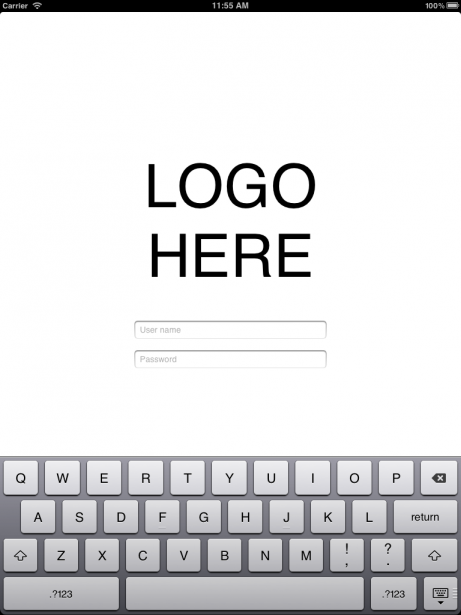
You have a View that has a big logo in the center towards the top, and two UITextFields right below it: one to enter your user name, another to enter your password.
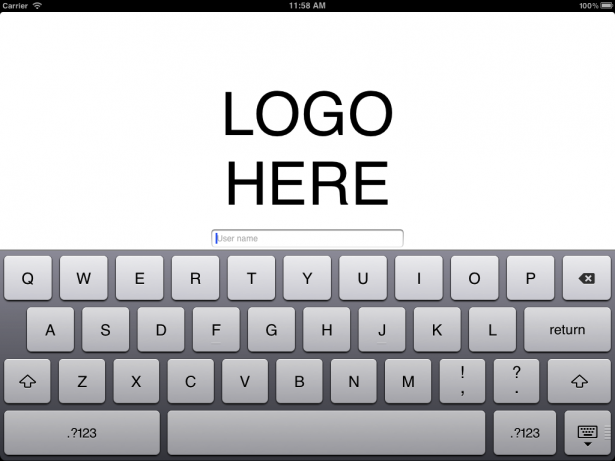
While in portrait mode, this makes perfect sense. When you tap on the user name UITextField, the keyboard comes up and you can still clearly see the other UITextField where you need to enter your password in next. However, in landscape mode, because we have less vertical space, if we leave both UITextFields in the middle of the view (right below the logo), when we select the user name UITextField, the virtual keyboard will popup and will cover up the password box. In other words, because there is less vertical space in landscape orientation, the keyboard will come up and cover approximately half the screen's height, which means the password text box will be under the keyboard.
This seems like a pretty straightforward problem. We want to be able to see both UITextFields when the virtual keyboard is on the screen. We could go about creating a separate landscape view, and in some cases, especially where the view is complicated, this might be the better approach. However, it seems like if we just are concerned about the positioning of the UITextFields, instead of created an entirely new landscape view, we should just be able to easily move them when the screen orientation changes.
Repositioning
What would be the best way to reposition the UITextFields? Should I simply just write all of the code out in my ViewController? I didn't think this was the appropriate place to put this logic. Suppose there are other ViewControllers that need to reposition items. Would all of these view controllers need to contain the repositioning methods? What if we have compound views, and the view itself needs to reposition a subview?
If we take this approach, we are going to have the repositioning logic all throughout our application. As a developer, having the same code block in several files is bad news bears. Isn't there a way we can do put most of the logic in one place to use throughout the app?
Solution
We can achieve this by creating a new category on UIView which will contain all of our repositioning logic.
In Xcode, go to File > New and select "File...". Under Cocoa Touch, select "Objective-C category".
On the next screen, name your Category Positioning, and in the "Category on" text box, enter UIView. This will add the category on ALL classes that have UIView as one of their parent classes. Click "Next" and save the files. This process will create two files "UIView+Positioning.h" and "UIView+Positioning.m".
In UIView+Positioning.h, add the following methods
- (void)shiftVertically:(int)points;
- (void)shiftHorizontally:(int)points;
In UIView+Positioning.m add the following code
- (void)shiftVertically:(int)points
{
     CGRect frame = self.frame;
     frame.origin.y = self.frame.origin.y + points;
     [self setFrame:frame];
}

- (void)shiftHorizontally:(int)points
{
     CGRect frame = self.frame;
     frame.origin.x = self.frame.origin.x + points;
     [self setFrame:frame];
}
It is that simple. Now that we have this category complete, we can easily shift any UIView vertically or horizontally on the screen.
For example, for the problem I described above, you might have something like the following in your ViewController class:
/*
 * At the top of our class where we are adding our logic,
 * we need to import the category.
*/
#import "UIView+Positioning.h"

#define VERTICAL_SHIFT 50
#define HORIZONTAL_SHIFT 20
- (void)willRotateToInterfaceOrientation:(UIInterfaceOrientation)toInterfaceOrientation duration:(NSTimeInterval)duration
{
    if (UIInterfaceOrientationIsLandscape(toInterfaceOrientation)) {
        // shift the login and password box upwards by 50 points
        [_userNameBox shiftVertically:-VERTICAL_SHIFT];
        [_passwordBox shiftVertically:-VERTICAL_SHIFT];
        // shift both boxes to the right by 20 pixels
        [_userNameBox shiftHorizontally:HORIZONTAL_SHIFT];
        [_passwordBox shiftHorizontally:HORIZONTAL_SHIFT];
    } else {
        // shift the login and password box downward by 50 points
        [_userNameBox shiftVertically:VERTICAL_SHIFT];
        [_passwordBox shiftVertically:VERTICAL_SHIFT];
        // shift both boxes to the left by 20 pixels
        [_userNameBox shiftHorizontally:-HORIZONTAL_SHIFT];
        [_passwordBox shiftHorizontally:-HORIZONTAL_SHIFT];
    }
}
An important thing to note here is that if we want to shift a UIView upward, vertically, we need to shift the view by negative pixels. The y-coordinate 0 is at the top of the screen. Likewise, if we want to shift a UIView to the left, horizontally, we need to shift the view by negative pixels. The x-coordinate 0 is at the left edge of the screen.
We did it!
By creating this objective-c category on UIView, we can easily shift UI elements around the screen in ANY of our ViewControllers. All of the logic to move the elements is located in one central file instead of in each separate ViewController.
4 Comments
Leave a Reply
Meet the Author

Jonathan Nalewajek
Jonathan is a Senior Software Engineer who joined Cypress North in 2012 and works out of our Buffalo office. He brings more than 13 years of experience to our development team.
Jon, known to our team and clients as J2, works closely with our clients to develop strategic solutions for their problems that will fit their internal infrastructure. He specializes in full-stack development using C#, PHP, HTML, CSS, and JavaScript.
The Buffalo native graduated from SUNY Fredonia with a Bachelor of Science in computer science. Jon later returned to Fredonia to teach a mobile software development course.
When he’s not at work, Jon loves being active and enjoying the outdoors - whether it’s climbing, hiking, camping, or snowboarding. He also likes woodworking and baking different breads and pizzas. Jon and his wife have a dachshund named Charlie, who Jon considers his best friend.
That's one way to do it. I for one like to use constraints or even the oldskool 'autoResizingMask' for positioning elements without individually addressing them. Just resize (animated) its view container and you're done.
Bas van Kuijck,
I use the auto-resizing mask on every other screen, but in this one case, we wanted our view to look different in landscape mode and had to move UI elements around on the screen.
In our case, we didn't only move the UITextFields, but we also moved the position of the logo. There was so much more horizontal space in landscape mode, that we thought we could utilize this space better if UI elements were rearranged.
But you bring up an excellent point: the auto-resizing mask feature can be very useful!
Can you not simply embed it inside a UIScrollView and adjust bottom edge inset to the height of a keyboard ?
Robert,
You can definitely do that in the case I mention above. However, suppose you have a background that is a static, non-repeating image, and adjusting the offset messes up the background. In my case, due to the static image, when the view was offset, the key components of the background would either be covered up by UI elements, or the background would shift off of the screen. In the app I was originally writing that inspired this post, it didn't make any sense to wrap the view in a scroll view.
This is an optional way for anyone who finds themselves in a similar situation. They can just use these categories to shift elements around on the screen.
It all comes down to what problem you are trying to solve, and which solution is acceptable for the situation you are in.