How to Sync HubSpot Audiences with Ad Platforms: A Step-by-Step Guide


As marketers, we’re always looking for better, more efficient ways to enhance our ad campaigns. But did you know a key strategy for achieving this might involve a tool you’re already using for other purposes?
Enter HubSpot. Syncing your audiences directly from the Customer Relationship Management (CRM) platform makes it easier to align your ads, craft targeted audiences, and use data to reach new leads.
In this blog, I’ll cover the benefits of syncing your HubSpot audiences with ad platforms and walk you through how to set it up.
Table of Contents:
- The Benefits of Syncing Your HubSpot Audiences
- What You Need to Get Started
- How to Sync Your Audiences
- Best Practices for Managing Audiences
- Using HubSpot to Drive Results
The Benefits of Syncing Your HubSpot Audiences
Before we talk about how to sync your audiences, let's go over the positive impacts this can have on your campaigns.
A quick note before we get too far: At this point, you can only sync audiences with Google Ads, Facebook Ads, and LinkedIn Ads. Unfortunately, Microsoft Ads is NOT supported yet.
Use Your Audience Lists for Campaign Targeting
First and foremost, syncing your audiences lets you tailor your lists to your ad campaigns. We should call out that you may now see lists referred to as "segments (lists)" in your HubSpot account. HubSpot is currently in the process of changing its name, which we've already seen in our own CRM.
Syncing your audiences also means you can apply filters to automatically compile and push your lists, ensuring your ads are targeting the correct audience – right from HubSpot.
Example Use Case:
Let’s say you’re a company in the electronics manufacturing industry. You can use HubSpot filters to target your campaigns to the right audience — like electrical engineers or supply chain managers — so your message lands exactly where it matters.
At the same time, you don’t want your ads showing up for people who aren’t likely to convert, like web developers or graphic designers. A little targeting goes a long way in making sure your campaigns are seen by the right audience and achieve the results you’re after.
Reduced Manual Work
Syncing your lists takes the manual work out of routinely uploading customer data to ad platforms. Keeping that data updated is crucial, but doing it manually can be time-consuming and keep you from more pressing tasks.
But with HubSpot, you can let the platform do the heavy lifting by using active lists to automatically update your audiences. This way, as new visitors arrive and contacts are added or removed, it will sync directly with the supported ad platforms. No more manual uploads required!
Example Use Case:
Imagine you’re getting ready for your biggest sale of the year. You’re looking to be more strategic with your ad spend, so you decide you don’t want to target your existing customers since they’re already aware of your brand and are more likely to purchase again, regardless of the sale.
When you have your HubSpot audiences synced with your ad platforms, you can create a list of past purchasers in your CRM and then exclude that list from seeing your ads. That way, you’re only spending money to reach customers who may not be aware of your brand and could become first-time buyers.
Automatically Sync Data
With HubSpot, your data sync is bidirectional. That means each time a contact or company meets your filter criteria, they’re automatically added to your ad network and HubSpot list.
Simply put, what makes it into the HubSpot list makes it to the ad platforms, and vice versa. This ensures accurate and up-to-date targeting for your campaigns.
Example Use Case:
Maybe you’ve decided to run your ads on LinkedIn, but want to make the most of your budget. In that case, you may just want to target a specific company – but only the contacts in your CRM. That’s where your synced HubSpot lists come in.
In LinkedIn, you can target the company and specific job titles – but HubSpot lets you narrow down your reach to only those in your CRM who meet that criteria. If you only want to target people in your CRM, you can create an active list with those filter criteria in the HubSpot platform.
More Ways You Can Leverage HubSpot Lists
In addition to those use cases we just described, here are some other situations where syncing your HubSpot lists to ad platforms is beneficial.
Product Segmentation
HubSpot enables you to segment your products or services and group contacts based on shared properties or interests. For example, if you track which product or service each contact is interested in, you can easily create a list of individuals who have expressed interest in a specific offering. This allows you to target them with personalized marketing campaigns, promote relevant upgrades, or cross-sell complementary products, all from within your HubSpot CRM.
Account-Based Marketing (ABM)
You may choose to use an ABM strategy to focus on certain companies or industries. HubSpot lists let you target your ads and messaging to them specifically.
Predictive Audiences Based on Valued Customers
Once they’re synced with HubSpot, your ad platforms can use lists in your account to create predictive or lookalike audiences. Lookalike audiences identify contacts who share traits with your existing customers, while predictive audiences use behaviors to predict future behaviors. So if you create a list of your most valued customers in HubSpot, your ad platforms can use that list to create new audiences you can target who may be interested in your offerings.
Sync Top-Of-Funnel Leads for More Nurturing With Campaign Ads
In HubSpot, you can create lists of just your top-of-funnel leads, or those who may be just entering their buyer’s journey and seeking out information on potential products, services, or solutions. You can curate specific ads to target that audience list and nurture them down the funnel.
What You Need to Get Started
Before you start syncing your HubSpot audiences with your advertising platforms, it’s important to make sure you have everything you need ready to go. Having everything that’s listed below properly set up will ensure your data flows smoothly and your campaigns target the right contacts.
A HubSpot Account
A HubSpot account is obviously the first thing you'll need. It doesn't matter what subscription you have, but keep in mind an enterprise or professional account gives you premium insights, more marketing contacts, and enhanced automation through workflows (which we'll get into later!)
Once you have your account ready to go, you should ensure all actions comply with applicable privacy requirements before syncing customer audiences with advertising networks. We recommend consulting your legal or compliance team to confirm the proper handling of customer data and any required consent for marketing activities.
Platform Connections
Before you start syncing your audiences, you’ll need to make sure your Facebook Ads, Google Ads, and LinkedIn Ads accounts are all properly connected to HubSpot. Those connections let HubSpot send audience data directly to your ad platforms for focused targeting. If you don’t have your ad platforms connected yet, no worries! We have instructions below that you can follow.
You’ll also want to make sure your HubSpot tracking code is installed on your website – this is essential for building website-based audiences. If you're using HubSpot’s CMS, the tracking code is already installed by default.
Proper Audience Sizes
Ad platforms typically have a minimum requirement for the number of visitors or users in your audience before ads can be served in a campaign. You should keep those requirements in mind when connecting platforms with your HubSpot account.
Here are the minimum audience requirements for each platform:
- Google Search: 1,000 visitors/users
- Google Display: 100 visitors/users
- YouTube: 1,000 visitors/users
- Gmail: 100 visitors/users in the Display Network
- Facebook Ads: 20 users
- LinkedIn Ads: 300 contacts
Keep in mind, ad networks use cookies, so their audience size is generally lower than the number you see in HubSpot.
How to Sync Your Audiences
Now that you’ve decided to automate your audiences, I have some good news for you. It’s actually really easy to get set up!
Just follow these steps:
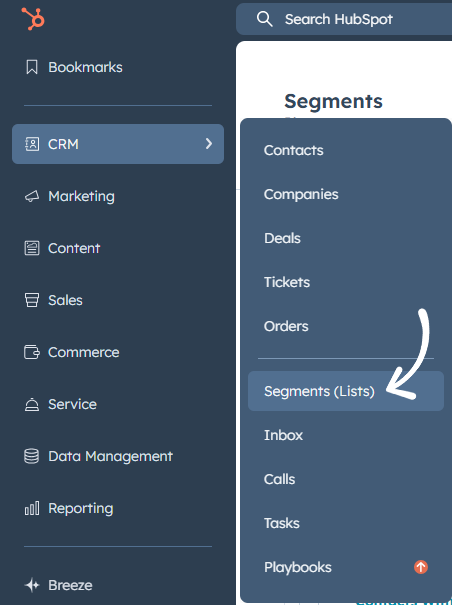
Step 1: Create a Contact Segment (List)
First, you need to create a contact list:
- Navigate to “CRM” in the left side panel of HubSpot, select “Segments (Lists)” and then click “Create segment”
- Set your filter criteria
- Identifiable characteristics like industry, company name, or job title can help determine the criteria.
- Choose either an active or static segment (list)
- Name your list clearly
- Save
Step 2: Connect Your Accounts
Before you create an audience in HubSpot, you have to connect your account with the ad platforms:
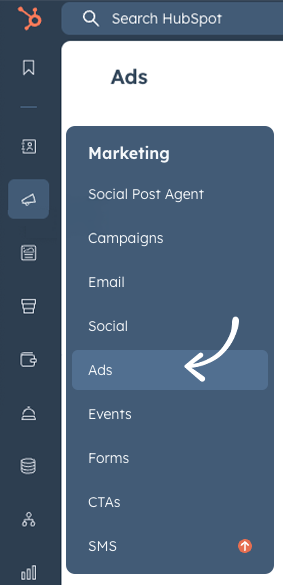
- Go to your settings by clicking the gear icon in the top navigation bar in HubSpot
- Within the settings panel, scroll down to “Marketing” and then select “Ads”
- Click “Connect account”
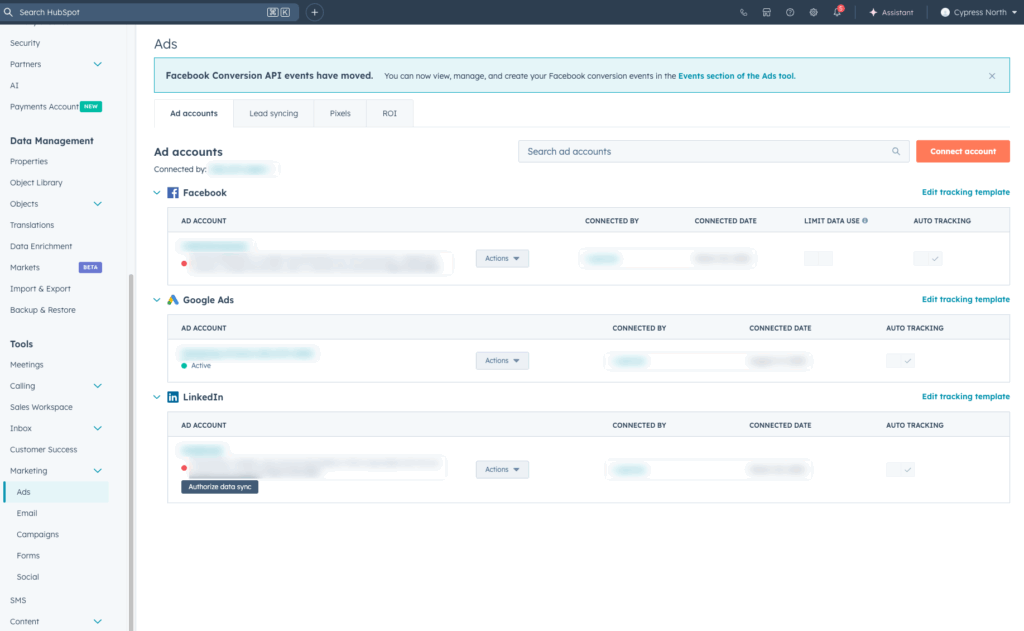
- Select your desired platform (Facebook, LinkedIn, or Google)
- Sign in if you have an existing ad network account, or create an account if you don’t
- After connecting your ad accounts, click the “Lead Syncing” tab at the top
- Lead syncing in HubSpot is the process of automatically syncing leads from your connected ad accounts into your HubSpot CRM.
- Any existing lead ad campaigns for the connected accounts will automatically appear – just select the checkbox next to the pages or accounts you’d like to sync
- Click the “Pixels” Tab
- Click the “Add Pixels” button to set up tracking through a code snippet
- This will detect visits to your pages from external ad networks.
- Select your ad network
- Select your pixel from the dropdown
- Click “Add Pixel”
You have connected and set up your ad accounts!
Step 3: Create an Audience
After you’ve connected your ad accounts to HubSpot:
- Go to “Marketing,” then “Ads”
- In the top right corner, click the “Create” button and select “Audience” in the dropdown menu
- Select the audience type you want to create
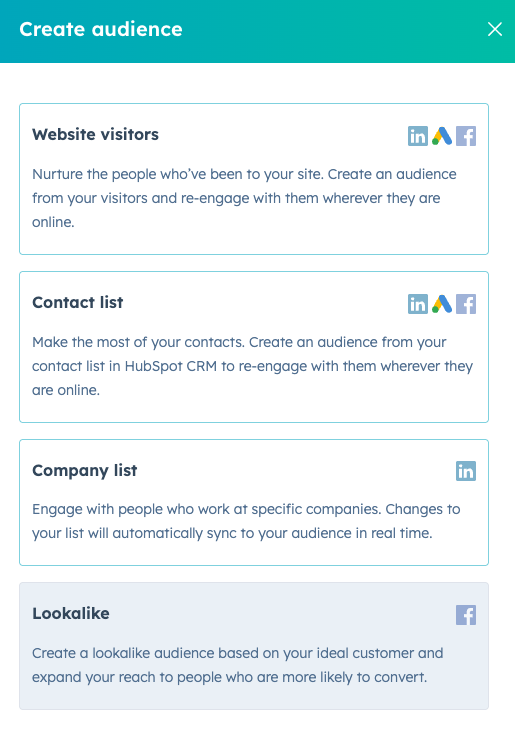
- Choose the list you just created
- Select the ad account (Facebook, Google, or LinkedIn)
- Click "Create audience"
By default, the audience name will be what the list name is in HubSpot. Your audience will appear in the audiences tab with a syncing status while it’s synced to Facebook, Google, and/or LinkedIn. Your audience may take as long as 24 to 48 hours to sync.
You should also keep in mind that the audience will only include marketing contacts. Any non-marketing contacts will not be synced to the ad network.
Step 4: Select Your Audience
After creating an audience, you can select it when creating new campaigns in your ad platform accounts.
Once synced:
- Go to your ad platform
- The synced audience will show up as a custom audience or matched list
- Use it to target, exclude, or create lookalike or predictive audiences
Best Practices for Managing Audiences
We don’t want to stop at just audience syncing. We can use business data and strategic insights to really ramp up effectiveness.
Here are some best practices to follow once you’re all set up:
Keep Your Audience Lists Accurate and Relevant
First and foremost, start by keeping your audience lists clean and up to date. Regularly remove inactive contacts, duplicate entries, or contacts and companies that no longer match your target criteria to ensure you're reaching the right people at the right time.
If you don’t do this, you run the risk of your campaign being inefficient and ineffective.
A/B Testing
An added benefit of syncing your audiences in HubSpot is the ability to easily conduct A/B testing. You can test different messages for each audience group you’re showing ads to, helping you refine messaging and maximize impact.
The results of these tests can be seen directly in HubSpot and ad platforms, making it easy to determine what’s working and what’s not for different audiences.
Use Workflows
HubSpot uses workflows to add users to lists automatically. You can set up workflows with different enrollment triggers, meaning a user will be added to a list automatically based on specific filters, events, and more. This allows you to get even more granular with your targeting.
To set up workflows that will automatically add contacts to lists in HubSpot based on different enrollment criteria, follow these steps:
- Create a new workflow by navigating to “Automation” > “Workflows”
- Select “Start from Scratch”
- Set the enrollment trigger for your workflow
- Use the “+” icon and type in “List” to add an action
- Select the target list from the dropdown menu in “Add to Static List”
- Customize the workflow’s settings
- Activate
Using HubSpot to Drive Results
Everyone knows HubSpot is critical to customer nurturing, tracking, organization, and overall management. But when you combine the quality of your HubSpot data with your ad platform targeting, you unlock an automated option that gives you precise targeting while saving you time and effort.
Goodbye to outdated lists, constant exporting and importing, and poor targeting.
Hello to pristine list hygiene, more precise audience creation, and tons of extra time back in your day!
Need help optimizing your ad campaigns using rich CRM data, like HubSpot audiences, for smarter targeting and improved ROI? Get in touch!
Meet the Author

Elizabeth Sarro
Elizabeth is a Senior Digital Marketing Manager who works out of our Buffalo office. She started her career with Cypress North in October 2021 as a Digital Marketing Intern before moving into a full-time position.
Elizabeth works directly with our clients and collaborates internally with other digital marketing team members to support performance-based initiatives. She has experience with paid search, paid social, display advertising, and content and email marketing efforts. Elizabeth also supports clients and our agency with marketing automation strategies and implementation.
Since joining our team, Elizabeth has become one of our HubSpot specialists. She's earned her HubSpot Marketing Hub Implementation certification and Google Ads Search certification.
A Buffalo native, Elizabeth attended the University of Buffalo, where she graduated with a Bachelor of Science in business administration with a concentration in marketing. Throughout college, she gained business and marketing experience through internships, marketing clubs, and more.
When she’s not at work, Elizabeth likes spending time with her family and friends, going on trips and adventures, and trying new places to eat. She also enjoys making clothing designs on her Cricut machine and seeing cover bands - specifically ones that play 80s rock!
Related Resources

When to Gate Your Content
Are you incorporating gated content in your organic strategy? Learn when you should gate your content and how to do it with HubSpot.
How to Create a High-Quality Email Sending List in HubSpot
The HubSpot lists tool allows you to create and edit lists of contacts, companies, or deals based on specific property values and attributes. This blog post will review the ins and outs of HubSpot lists and the different components of using and optimizing them for email marketing that works.