What Are PMax Page Feed Campaigns & Why Should You Use Them?


Does your website have a lot of pages? Maybe it’s filled with products or information about the services you offer. Whatever the case may be, did you know you can leverage those existing pages to increase your ad relevancy and net more conversions?
This can be done by creating a Performance Max (PMax) campaign with a page feed. The best part is you’re not letting your content go to waste. You already have the pages – so why not put them to good use?
In this guide, I’ll walk you through how to create and implement a page feed in your PMax campaign. I’ll also share the ways you can structure your campaign and explain how you can further improve your PMax page feed campaign once you have some data.
Table of Contents
- What is Performance Max?
- What is a Page Feed?
- Why You Should Use a PMax Page Feed Campaign
- How to Create a Page Feed
- How to Upload a Page Feed to Google Ads
- How to Implement a Page Feed in a Campaign
- Reviewing Performance & Optimizations
- Download Our Free Page Feed Template
What is Performance Max?
First, let’s start with the basics. Performance Max (or PMax for short) is an AI and machine learning-driven campaign type that leverages smart bid strategies like “Maximize conversions” or “Maximize conversion value” to meet your goals. It runs across all Google channels, including:
- Search
- Display
- YouTube
- Gmail
- Discover
- Maps
I’d say this is the most unique aspect of a PMax campaign because no other campaign type covers as many channels. That alone makes it an appealing option if you want to run fewer campaigns but still maintain a presence across multiple channels.
For better or worse, PMax offers less control than other campaign types. For example, you can’t exclude any of those aforementioned channels from your campaign. They’ll run across all of Google’s inventory.
You also can’t target a specific audience with a PMax campaign. The best you can do is use an “Audience Signal” to help guide machine learning toward the right people. But it doesn’t actually limit your campaign’s reach to a specific audience.
Now while all that may not be ideal, PMax is a goal-oriented campaign type and (from my experience) does a good job of optimizing for users who will convert.
Final URL Expansion
PMax has a feature called Final URL Expansion, which is enabled by default. With Final URL Expansion turned on, your PMax campaign will send users who click on your ad to any page on your site that Google thinks will result in better performance.
This can be a good feature because it allows Google to analyze search queries in an attempt to send people to the most relevant page on your site.
However, with this setting enabled, Google can end up sending traffic to less relevant pages. Instead of sending users to product pages or demo request pages, it could send them to an “About Us” page or even a login page for existing customers. This leads to wasteful spending and a worse performance.
While there are ways to exclude pages from Final URL Expansion, it can require more manual work than setting up a page feed and is more of a reactive approach for campaign optimization.
Final URL Expansion also makes it difficult to structure campaigns. When you send people to every page on your site with one campaign, you cast a wide net and sacrifice some control. For example, you may want to dedicate more spend to certain product pages with higher margins.
Using a page feed solves both of these problems. It gives you more control over where traffic is sent on your site, and account structure.
What is a Page Feed?
A page feed is a data file that contains a list of web pages on your site. When you add a page feed to your PMax campaign with the right settings, it will only send users who click on your ads to the pages listed in the feed.
The file, usually formatted as a CSV, requires one column for all your included web pages.
You can also add columns with optional custom labels, which can be used to filter your page feed. Custom labels are used to filter your page feed, so you can use it across multiple campaigns if needed instead of creating a separate feed for each campaign. Just keep in mind, the maximum number of custom labels you can assign to a page URL is 20.
Here's an example of how an ecommerce page feed could be structured:
| Page URL | (Optional) Custom Label | (Optional) Custom Label 2 |
|---|---|---|
| https://www.example.com/1,SINGLE_PRODUCT | CREW_NECK | |
| https://www.example.com/2,CATEGORY_PAGE | SHORT_SLEEVE | CATEGORY |
| https://www.example.com/3,SINGLE_PRODUCT | SHORT_SLEEVE | RED |
| https://www.example.com/4,SINGLE_PRODUCT | LONG_SLEEVE | COTTON |
(Note: The headers in the example above are for visual reference only. They do not reflect how they should be configured in the actual file.)
If you need a page feed template, you can download ours for free! If you use it, just make sure you don’t change the headers in Row 1. Only change Rows 2 and below.
Why You Should Use a PMax Page Feed Campaign
It’s time to get to the meat and potatoes: Let's talk about what makes a PMax page feed campaign so appealing, especially if you have a lot of web pages.
First, a PMax page feed campaign can be configured to scrape text from all the pages in your page feed and use it in ad copy.
Let’s say, for example, you’re selling furniture and have a feed of your product pages. If those product pages include dimensions, your ad could be served to a user searching for those specific dimensions. When that user clicks on the ad, it would send them right to the product page with those dimensions.
The same could be said if your page feed contains pages about your services. A user searching for a service you offer could be shown an ad with content from your page that speaks to the specific service, and then be sent right to that page.
The most valuable aspect of a page feed campaign is the increased relevancy it provides. Using the pages included in your feed, these campaigns adapt your ad copy to better match a user’s search intent. This also increases your coverage, as all pages in the feed can be leveraged.
Segmenting
A huge benefit of using PMax page feed campaigns is all the different ways you can segment them to better accomplish your goals. Segmenting these campaigns allows you to create a hierarchy of page feed campaigns layered on top of each other, increasing cost efficiency and ultimately, performance.
Here’s one example of how you could do this using a lead gen page feed:
| Page URL | (Optional) Custom Label 1 | (Optional) Custom Label 2 |
|---|---|---|
| https://www.example.com/1,SERVICE_PAGE | MOST_PROFITABLE | |
| https://www.example.com/2,SERVICE_PAGE | MOST_PROFITABLE | |
| https://www.example.com/3,SERVICE_PAGE | SEASONAL | SUMMER |
| https://www.example.com/4,SERVICE_PAGE | LOW_PRIORITY |
We could create two campaigns using the same page feed and a bidding strategy of “Maximize conversions” with a target Cost-Per-Action. Then we’d segment one campaign to only use the web pages associated with the “MOST_PROFITABLE” label. The second campaign could then use only the “LOW_PRIORITY” web pages.
Once that’s set up, the campaign using our “MOST_PROFITABLE” web pages could be configured to have a higher tCPA – let’s say $10. Then we could set our other campaign using web pages tied to the “LOW_PRIORITY” custom label to a tCPA of $5. This would make it easier for Google to serve our more profitable products because Google has more spend to use for each of them.
Compare that to our second campaign, where Google will try to hit a $5 CPA. Google will spend less and work harder to get a conversion. That’s exactly what we’d want it to do because these products aren’t as profitable as our others.
This is just one way you could segment your campaigns to push for better results.
How to Create a Page Feed
As mentioned earlier, the one requirement for a page feed is a list of web page URLs. Depending on your use cases, I’ll quickly explain two different ways you can get a list of URLs.
Pulling URLs Using Google Merchant Center
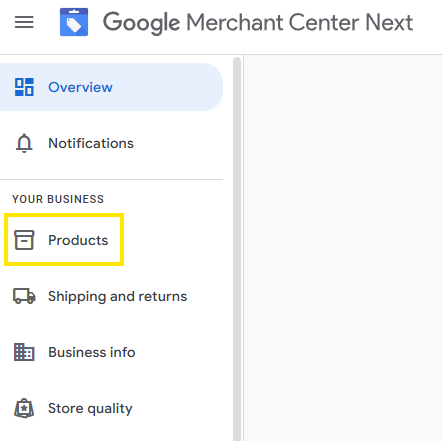
The first method will be for those of you who use Google Merchant Center for ecommerce.
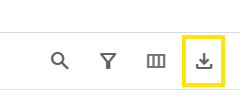
To get a list of product web pages, just navigate to the “Products” section on the left-hand side of the platform, and then click the “Download products” button. If you want specific products, you can filter them before downloading.
Pulling URLs Using a Scraper Tool
The second way is best if you want all the pages from your website. Using a scraper tool will be the easiest way to do this.
There are a lot out there, but the one I like to use is ScreamingFrog. It’s mainly an SEO tool, but works well for PPC tasks like this. ScreamingFrog offers a free version that you can use for up to 500 pages. Anything more than that will require the paid version.
If you use ScreamingFrog, the process is simple. All you do is enter your website in the main input field and click the “Start” button. ScreamingFrog will then begin crawling your website and recording all the web pages. When the crawl is finished, just go to “File” in the top left and click export.
Once you have your exported files, whether from GMC or a scraper tool, you’ll need to edit them to only include the URLs you want, along with any custom labels. All other columns should be removed.
And now your page feed is ready to be used!
How to Upload a Page Feed to Google Ads
Now that you have your page feed, I’ll walk you through how to import it into Google Ads.
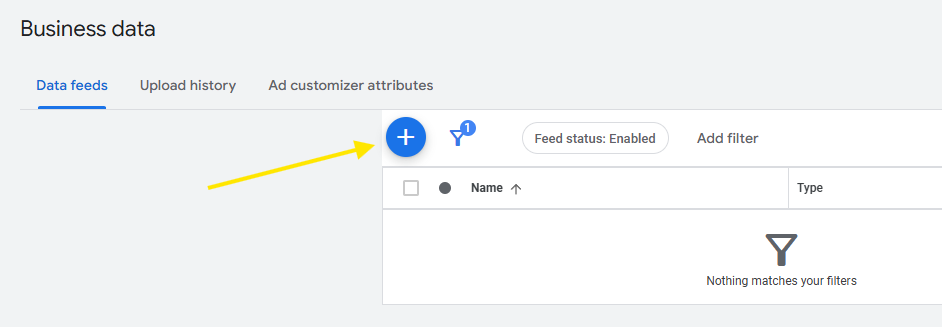
First, navigate to the left-hand side and hover over the “Tools” icon.
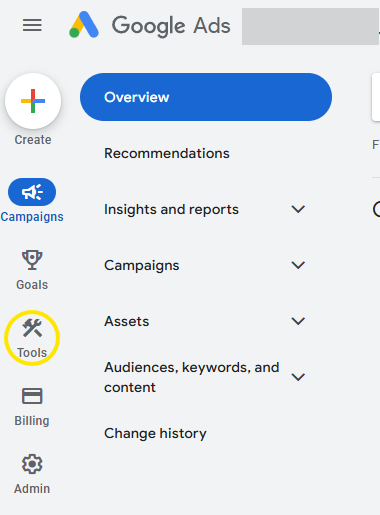
From there, you’ll want to select “Business data” at the very bottom of the menu.
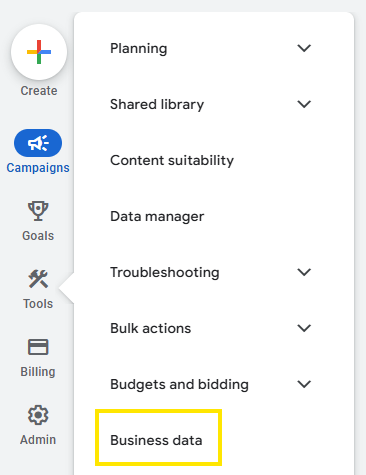
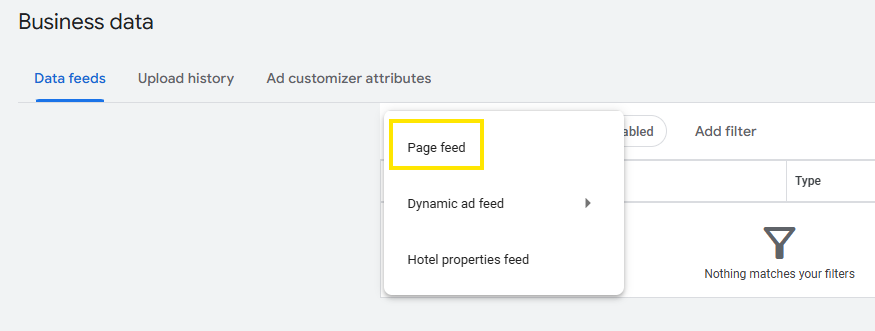
Next you’ll click the blue plus icon in the default “Data feeds” tab, and select “Page feed.”
Enter a name for it, then select the source of your page feed. If the page feed file you’re uploading is locally stored on your computer, choose the “Upload a file” option and select the file from your computer.
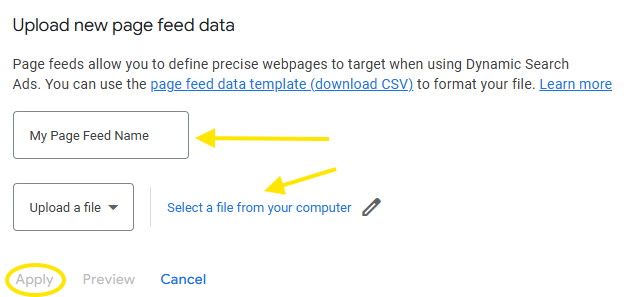
If the file is a Google Sheet, click the dropdown menu and select “Google Sheets.”

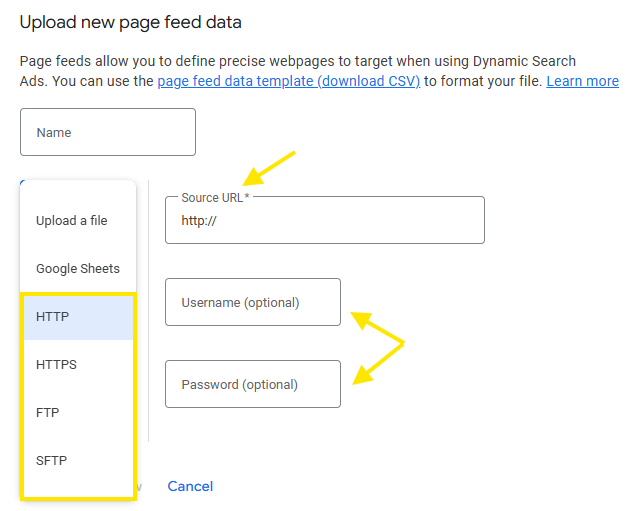
Other sources for pulling in your page feed include:
- HTTP
- HTTPS
- FTP
- SFTP
For these options, you’ll need to enter the “Source URL” field for where your page feed is located, along with any necessary information like a username or password (depending on how your site is set up.)
Finally, click apply and your list will upload to Google!
How to Implement a Page Feed in a Campaign
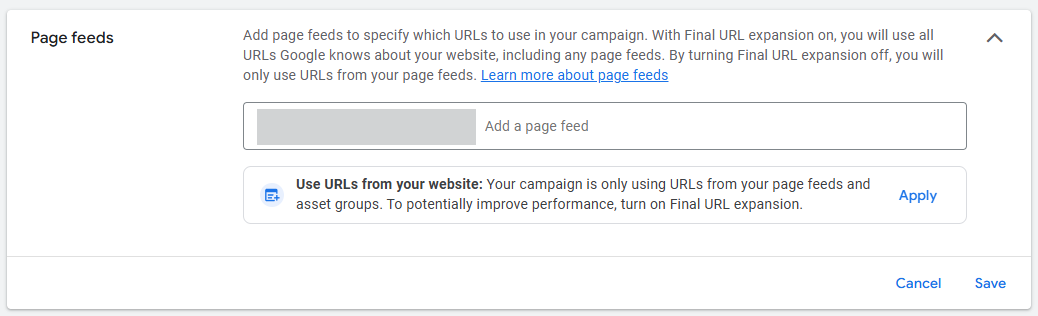
Once your page feed has been processed and is ready in Google, find the campaign you want to add it to and click into the campaign settings. Your page feed options will be under “Additional settings” all the way at the bottom.
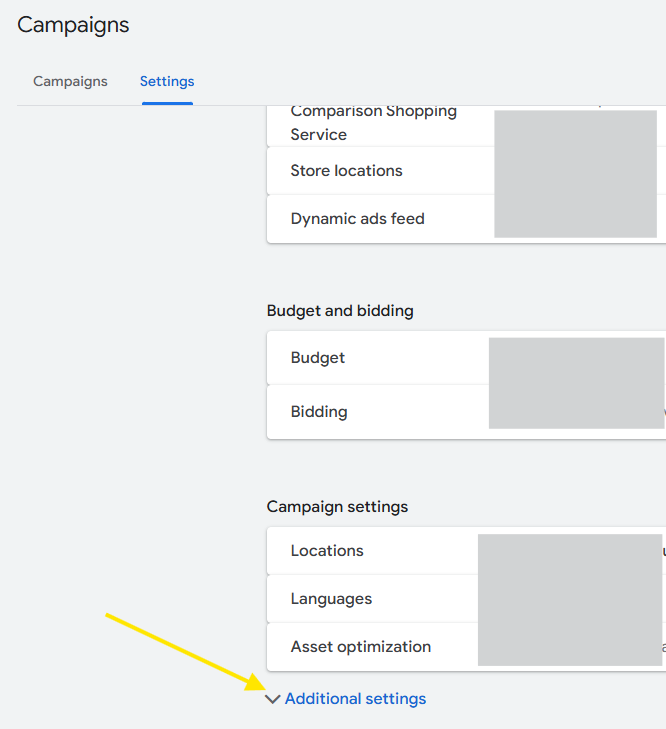
Now all you have to do is click the “Page feeds” dropdown box and select the page feed(s) you want to use in your campaign. Just be sure to click save before leaving the menu.
Make Sure Final URL Expansion is Off
As we mentioned previously, Final URL Expansion lets Google send users to what it believes will be the most relevant page on your site. So once you implement your page feed, you want to make sure the “Final URL Expansion” setting is off.
If you have it turned on, Google can override your page feed and send users anywhere it wants, defeating the whole purpose of this process.
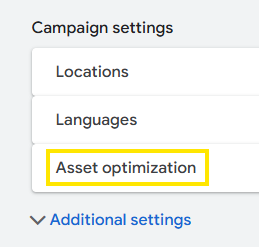
You can check to make sure this setting is off under the “Asset optimization” tab right above “Additional settings” in your campaign settings.
Once you’re in that tab, click into the “Text” dropdown menu.
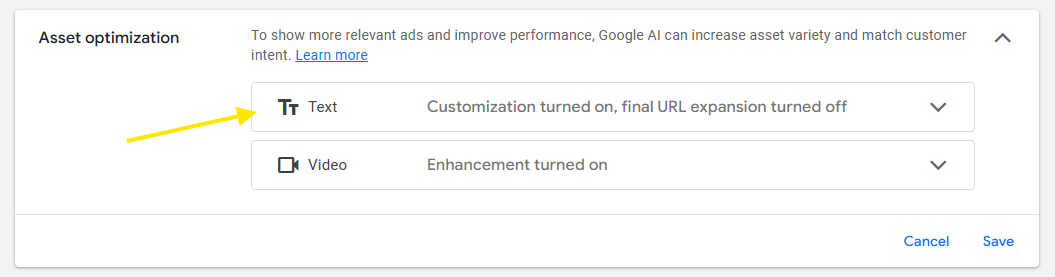
Make sure the “Final URL” box is unchecked here.

Then be sure to save your settings. With that, your PMax page feed campaign is ready to go live!
Filtering Your Page Feed at the Asset Group Level
If you include custom labels or want to use URL rules to filter your page feed, there’s an additional step required.
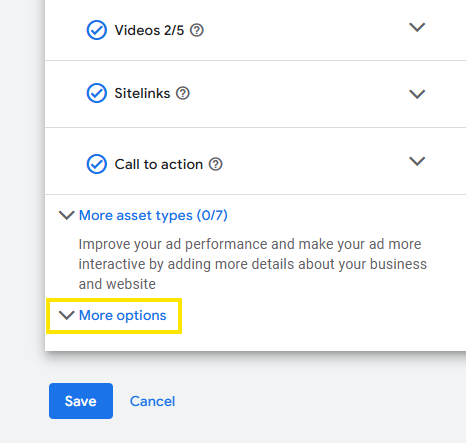
While in your PMax page feed campaign view, navigate to the “Asset groups” tab and click the “Edit assets” button. Once in your asset group, scroll to the very bottom and click the “More options” dropdown menu.
Find the “URL rules” menu near the bottom, then click the blue “+ URL rules.”

Once you’re in there, select “Create URL rules” or “Add custom labels” – depending on what you want to do for your asset group.
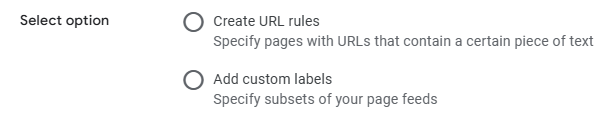
Choose the option most relevant to you and add the filter you want. If you select the custom label option, make sure you enter the exact same custom label that’s included in your page feed.
Finally, click the blue “Apply” button at the bottom left and your filtered asset group is ready to go!
Reviewing Performance & Optimizations
Once your PMax page feed campaign is set up, it's important to monitor its performance and adjust for improvements.
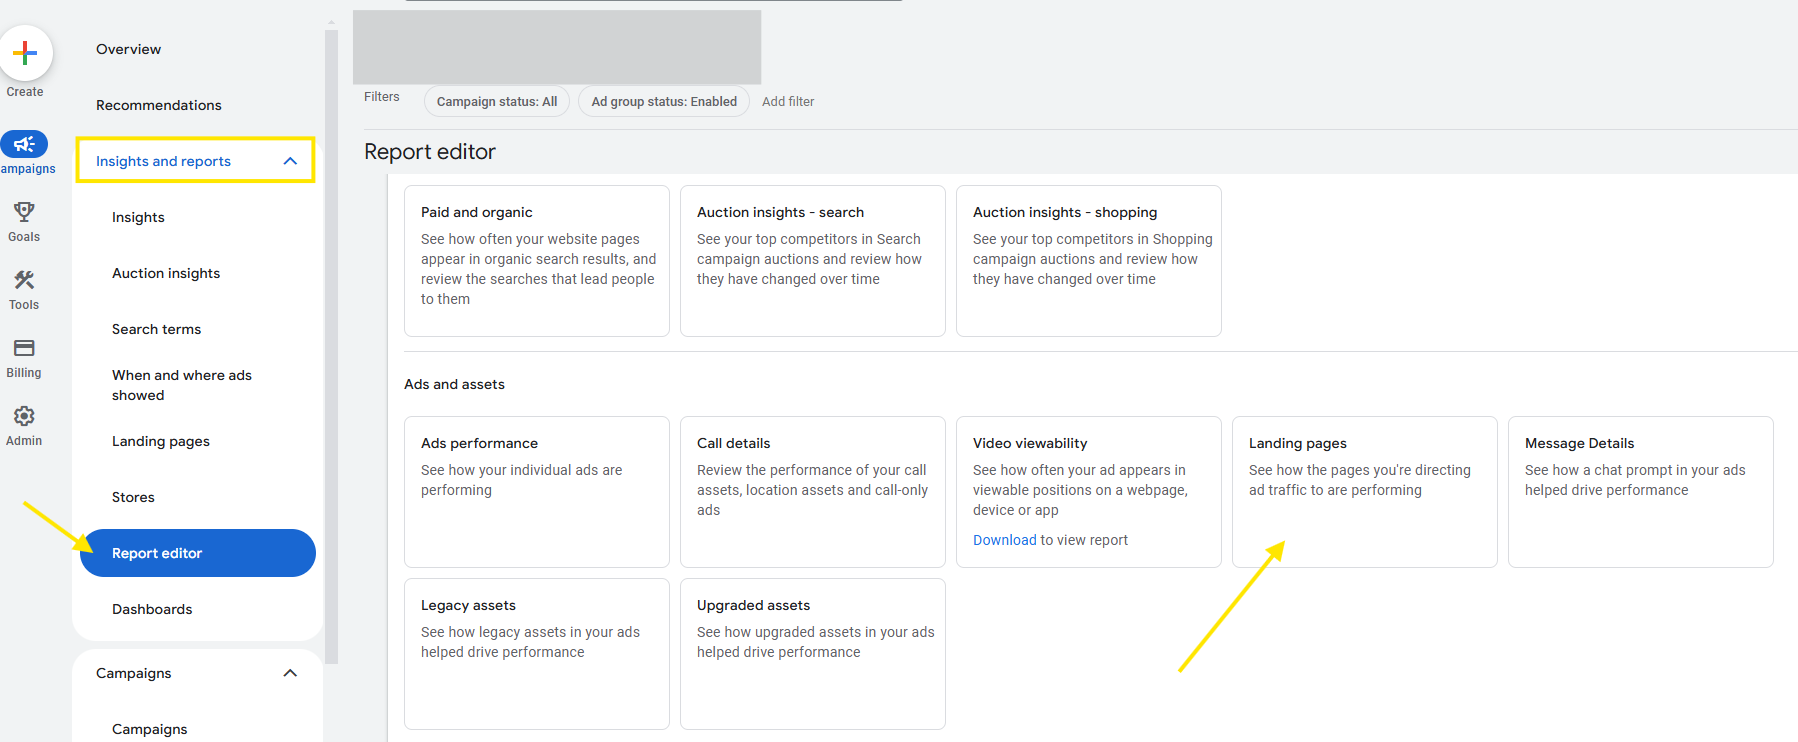
A great way to review performance at the URL level will be to create a report within Google. To do this, click the “Insights and reports” dropdown menu on the left-hand side of the Google Ads menu and find “Report editor.”
Once there, scroll down to the “Ads and assets” category and click into “Landing pages.”
This will create a basic report you can use and customize further to your liking.
In the top left, you can select the campaign or type of campaigns you want to include in the report. You can also sort by relevant metrics and add filters to your data. Once everything is set up, you can see the selected metrics for each page included.
Use your report to determine which pages are doing the best and which are doing the worst. From there, you can look to build upon successful landing pages by creating other campaigns or asset groups focused around those successes.
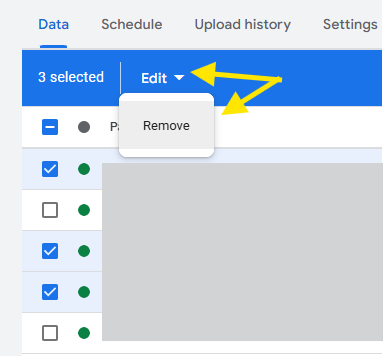
You can remove specific landing pages that aren’t performing well by accessing your page feed from the business data tab, clicking into your page feed, and clicking the checkbox for any pages you want to remove. Once you’ve selected a page, you can click the “Edit” button at the top and click “Remove.”
This is a great way to optimize your page feed.
These reports can also be saved in the top right by either clicking “Save as” or “Add to dashboard” for future use.
Get Started!
Performance Max page feed campaigns can be a fantastic way to increase efficiency within your account by leveraging the content you have already created. But this is just one of the many ways you can build a campaign.
If you're ready to get started building a page feed campaign, download our free page feed template below!
1 Comment
Leave a Reply
Meet the Author

Harrison Worden
Harrison is a Senior Digital Marketing Strategist who works out of the Cypress North Rochester office. He joined us in April 2024 and brings two years of experience to our digital marketing team.
With a focus on PPC, Harrison spends his days in the office working with clients to optimize their accounts and develop ad strategies. He is certified in Google Ads Search, Google Ads Display, and Google Ads Video.
Before joining Cypress North, Harrison spent two years working for a digital advertising company as a digital specialist. In that role, he created, managed, and optimized Google Ad campaigns and worked on social media platforms like Meta and X. Harrison also has experience creating Looker Studio reports, setting up Google Tag Manager tags for tracking, breaking down data in Google Analytics, and working on conversion rate optimization for client web pages.
Harrison is from Rochester and spent a few semesters studying cybersecurity at the Rochester Institute of Technology before transferring to Monroe Community College to study graphic design. He graduated from SUNY Fredonia with a Bachelor of Fine Arts degree in graphic design.
When he’s not at work, you might find Harrison at local rock climbing gyms. Though he’s afraid of heights, he enjoys bouldering, which involves climbing at lower heights without ropes and harnesses! Harrison also loves all things art – from photography and foil prints to working with resin.
Harrison is a black belt in Taekwondo and has a large cat named Onix – named after his favorite Pokemon as a kid.
This article is what I was looking for. Thank you for explaining in such a great detail. I have set up my campaign, was wondering if I have set it up correctly. Your article helped me to put my mind at ease.