How To Use Custom Labels In Google Merchant Center For Shopping Campaigns


Product segmentation is key to a well-organized Shopping account, something you likely already know if you're in ecommerce.
That’s where custom labels come in. They’re a simple way to categorize products based on specific criteria, allowing you to properly segment your products within your Google Ads account. Using custom labels allows you to fine-tune your campaigns, adjust bids strategically, and get better insights into how different product groups perform.
In this post, I’ll break down why custom labels are essential and how you can start using them effectively in Google Merchant Center Next to supercharge your shopping campaigns.
Table of Contents
- What Are Custom Labels in Google Merchant Center?
- Why use Custom Labels for Google Shopping?
- How to Set Up Custom Labels in Google Merchant Center
- Manually Label Products Using Merchant Center
- Product Feed Rules in Google Merchant Center
- Content API for Shopping
- Product Feed Management Tools
- So, Why Choose A Feed Management Tool?
- Best Practices for Using Custom Labels in Google Merchant Center
What Are Custom Labels in Google Merchant Center?
Custom labels in Google Merchant Center allow advertisers to group products together based on specific details, giving us greater control over segmentation in shopping campaigns.
These product details can be based on anything related to your product feed, but are not included as a standard field in Merchant Center. Some common use cases include:
- Profit Margin – Grouping products by high, medium, or low margin to adjust bids accordingly
- Seasonality – Labeling products as "Holiday," "Back to School," or "Summer Collection" to manage promotions
- Clearance – Tagging items as "Clearance" or "Best Seller" for strategic bidding
- Product Type - Product type (e.g., size - single, bulk, etc), warehouse location (stocked, dropship), custom categories (e.g., office, industrial, gardening)
- Price Ranges – Categorizing products into price tiers (e.g., "$0-$50," "$51-$100")
There are hundreds of different ways you can define your custom labels. The key is aligning them with your marketing goals and segmenting your products to achieve them.
While the options to define your custom labels are endless, the labels themselves are not.
You can only assign up to five custom labels (0-4) per product, and each label can have different values. So, if you have maxed out all five custom labels for a product, you’ll have to find another way to filter the feed or clear up an occupied label.
Why Use Custom Labels for Google Shopping?
Now that we know what custom labels are, let’s talk about why, as advertisers, we benefit from them within our accounts.
Using custom labels offers greater control over campaign structure, allowing you to tailor your shopping campaigns to align with your specific marketing goals, maximize efficiency, and improve overall performance. It’s important to have a clear understanding of your marketing objectives so you can leverage your custom labels effectively.
Here’s why they’re valuable:
1. Improved Bidding Strategy
As mentioned above, using custom labels lets you group products based on profit margins, price tiers, or even discount pricing. In turn, you can adjust your bids accordingly. For example, you can bid higher on high-margin products and lower on discounted items.
Best yet, you can spend money where you actually want to, and allocate different targets based on the product attributes you’re sending through.
2. Better Campaign Segmentation
Those refined product groups we’ve been talking about – based on seasonality, promotions, or product performance – also allow you to target specific audiences more effectively.
For example, if I want to promote clearance products, I can use a custom label to filter the product feed and run a campaign exclusively featuring those items.
3. Enhanced Reporting
Custom labels provide deeper insights by allowing you to track campaign performance by product segmentation. Using my example above, you can now see how well your clearance campaign is performing compared to your full-priced items.
4. Smarter Budget Allocation
Segmenting products based on your marketing objectives means you can allocate your budget more efficiently. By grouping like-minded products together using custom labels, you can limit spends, or work to ramp those up for products that are more desirable for you to sell (e.g., a single product vs. a box or case of products).
5. Greater Flexibility for Promotions
Custom labels make it easy to adjust your strategy based on promotional periods, like labeling holiday-specific products such as Black Friday or grouping slow-moving inventory for sales.
In short, custom labels help you organize your product catalog in a way that aligns with your business goals, leading to smarter bidding, improved performance, and greater profitability.
How to Set Up Custom Labels in Google Merchant Center
Next, let’s walk through the process of setting up your custom labels. There are a few different methods depending on your needs.
When setting up custom labels in Google Merchant Center, there are several approaches you can take depending on the size of your product catalog.
If you have a large number of SKUs, it would be more efficient to automate the process by defining custom labels using logic. You can do one of two ways. The first is setting up the Content API within your e-commerce platform. Alternatively, you could use a feed management tool like Feedonomics or DateFeedWatch.
These methods allow you to dynamically assign labels based on specific product attributes, saving you time and ensuring your product feed remains up-to-date. I’ll cover this more in-depth in a future section.
I’ve outlined both manual and automated methods for assigning custom labels, so you can choose which approach works best for your needs and the size of your product catalog.
Manually Label Products Using Merchant Center
You can manually add custom labels to your product feed within Google Merchant Center Next. You can do this in two ways:
1. Assigning Custom Labels Directly Within The Product Tab
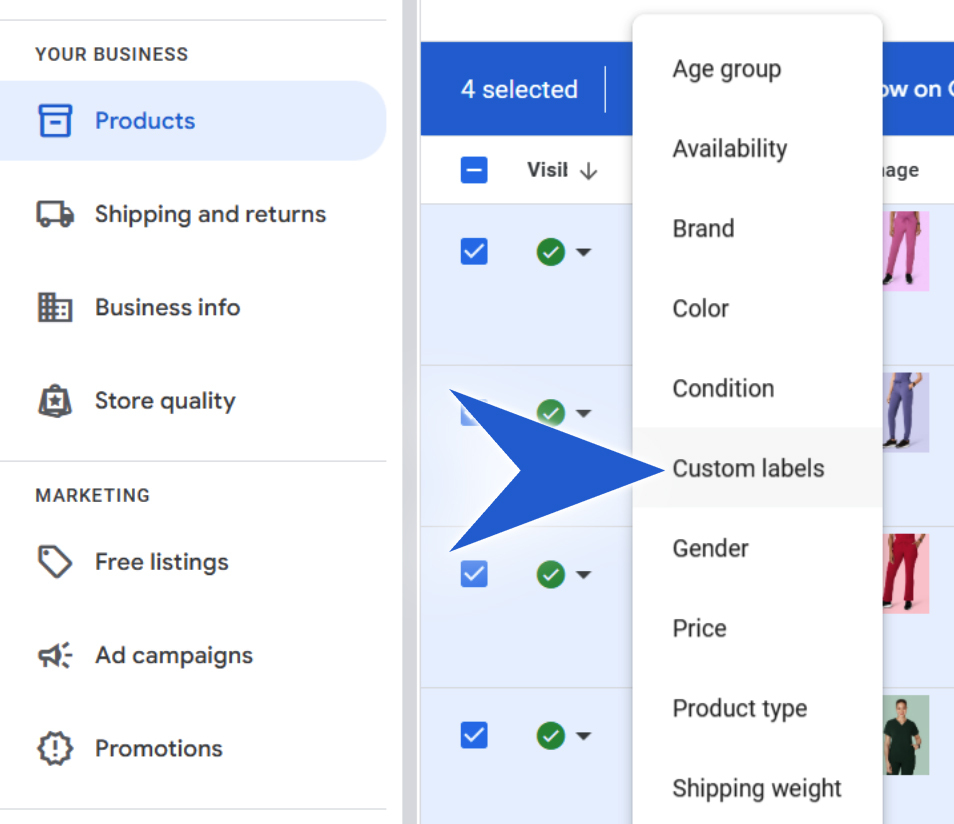
To access, navigate to Products > Select the product you want to assign > Select Edit > Custom Labels
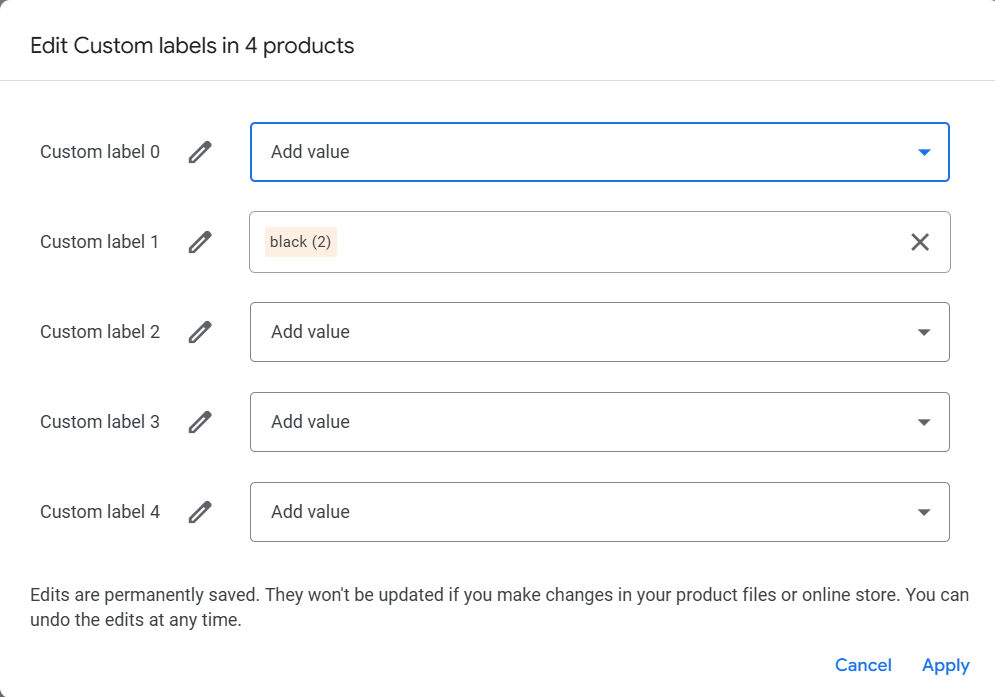
Then you can fill in your value for any of the label fields (0-4). In the screenshot above, we’re grouping products by color, so we assigned custom label 1 to the color “black.”
2. Adding Custom Labels Using a Supplemental Feed
Using a supplemental feed is still a manual process, but it can be a better option when you’re looking to apply custom labels across a large number of products. If this is the route that best suits you, check out my step-by-step guide on how to create a supplemental feed in Google Merchant Center Next.
Product Feed Rules in Google Merchant Center
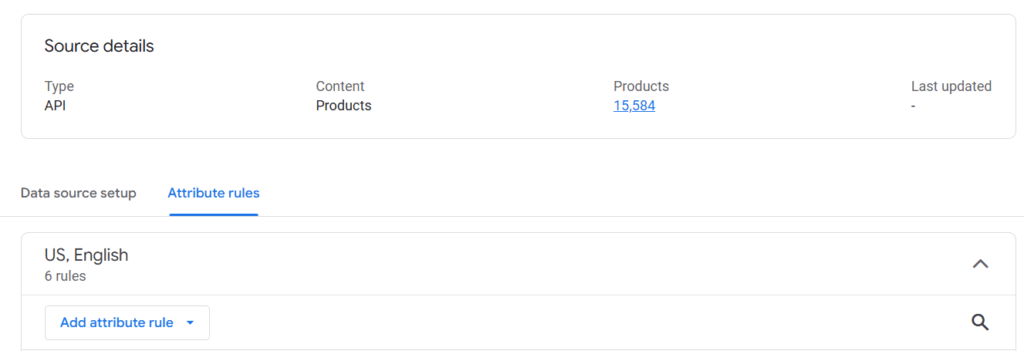
A less manual process is using Feed Rules, which enable you to create custom labels by applying conditions to existing product attributes (like category, brand, or price.)
To access, navigate to Settings > Data sources > Select your feed name > Attribute rules > Add attribute rule.
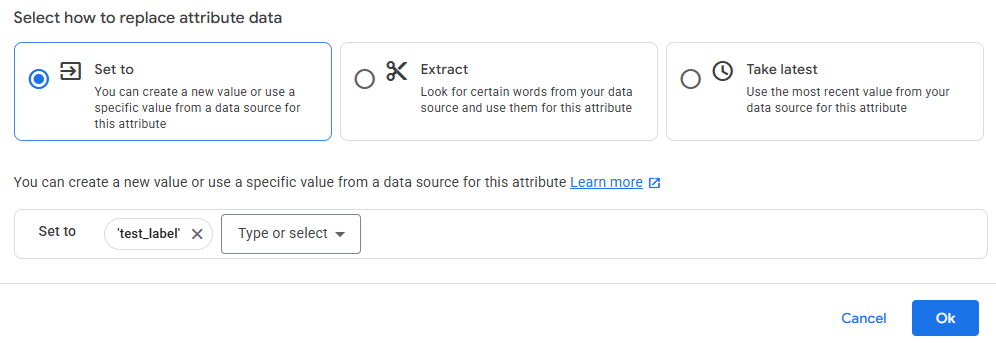
From the drop-down, select Processed attributes > then choose which custom label you are looking to assign a value to. For example, “Custom Label 1.”
Next, you need to create the conditions so Merchant Center understands how to group the products together to assign them to your desired label.
For example, if I'm looking to group together a specific type of product, I could write the condition based on the product title or product type, depending on what information I'm including in my product feed.

You can also sort the products further by adding “And / Or” conditions.
Next, select “Set to,” then type in the desired name for your custom label.
So the steps to set up custom labels are as follows:
- Add Attribute rules > Process attributes > Custom label X [0, 1, 2, 3, or 4] > Apply conditions > Set to > Name your custom label > Ok
While feed rules are a less manual alternative, they can be limiting for larger catalogs. Managing numerous rules can become cumbersome, and feed rules offer limited flexibility for complex setups.
Feed management tools, on the other hand, offer greater flexibility, better scalability, and the ability to automate updates and integrate with multiple platforms, making them a better choice for larger catalogs.
Content API for Shopping
For more advanced setups, many ecommerce platforms allow you to define custom labels within the platform. With the help of a developer, you can use the Content API for Shopping to group products together and apply custom labels dynamically based on your rules without manually updating your feed.
This approach also enhances the feed's accuracy with real-time adjustments, which is crucial for managing complex catalogs with frequent inventory changes.
If you choose to go this route, I know a few good developers who can help!
Product Feed Management Tools
For retailers with large or frequently changing product catalogs, feed management tools are a great solution for optimizing and automating product feeds across multiple platforms. I personally work with third-party feed management tools, and they make my day-to-day easier by automating updates, reducing human errors, and ensuring product data is always accurate, which helps mitigate disapprovals and other feed errors in Merchant Center.
Beyond maintaining feed hygiene, feed management tools can automate custom labels, reformat product titles, update descriptions, and apply any additional rules. With automation, you can easily assign labels, saving time and enabling more strategic segmentation for your Google shopping campaigns.
Once the feed management tool pulls the data directly from the ecommerce platform, the feed is processed and optimized within the feed management system before pushing to Google Merchant Center via API.
So, Why Choose A Feed Management Tool?
Less Manual Work, More Automation
Unlike Google Merchant Center’s Feed Rules, these tools let you set up dynamic updates for inventory, pricing, promotions, and more – all without constant manual updates.
One Platform, Multiple Channels
You can easily manage and optimize feeds for various advertising platforms, including Google Shopping, Microsoft Ads, Meta Ads, Amazon, and more, all from one place.
Custom Labels & Advanced Filtering
Set up complex product groupings and apply conditional logic without needing a developer.
Maintains Feed Hygiene
Many tools flag issues like missing attributes or disapproved products, helping you fix them before they impact your performance.
Built for Growth
As your catalog expands, feed management systems handle the heavy lifting. This makes scaling up your ad account more efficient.
Some of the most popular feed management tools include DataFeedWatch, Feedonomics, and GoDataFeed. Some options for smaller catalogs include Channable and Simprosys (Shopify feed app).
If you're looking to scale your ecommerce advertising strategy, I would highly recommend looking into a feed management system.
Best Practices for Using Custom Labels in Google Merchant Center
- Aligns Labels with Marketing Goals - Before setting up custom labels, consider what matters most to your strategy. Are you focusing on profit margins, seasonality, bestsellers, or promotions? Ensure labels align with your strategy effectively.
- Keep It Simple - With only five available labels, use them wisely. Keep naming conventions clear and consistent to avoid confusion.
- Custom Label 0: Profit Margin – High, Medium, Low
- Custom Label 1: Seasonality – Summer, Winter, Year-Round
- Custom Label 2: Bestsellers – Top Seller, New Arrival, Clearance
- Automate Label Assignments (If Possible) - Mitigate manual labor, use feed management tools, ecommerce platform rules, or Google Merchant Center’s feed rules to dynamically assign labels based on criteria.
- Test and Optimize Over Time - Regularly analyze performance data in Google Ads to see how different product segments are performing, and tweak your labels as needed.
Final Thoughts
Custom labels in Google Merchant Center Next are a game-changer for advertisers looking to refine their Google Shopping campaigns and beyond. By implementing some type of strategic labeling system, whether it’s manually tagging products or using third-party tools, you can enhance campaign segmentation, improve smart bidding, and drive better results.
If you need help managing or optimizing your Google Merchant Center feed or aren't sure where to start, our team of expert marketers is here to assist. We'll ensure your feed is set up for success to help you reach your marketing goals.
Meet the Author

Maggie Humphrey
Maggie is our Director of Ecommerce, working out of our Rochester office. She first joined Cypress North as a Digital Marketing Intern in 2019 and returned as a full-time member of the team in 2022.
With a background in both paid and organic marketing, Maggie oversees all of our ecommerce clients, using her expertise to craft holistic strategies that drive incremental growth. She takes a data-driven approach to her work, using insights to make proactive decisions that help clients boost revenue and hit their goals.
In addition to regularly publishing comprehensive ecommerce guides for Cypress North, Maggie lends her thought leadership to one of the top sources for PPC and SEO news as a contributor for Search Engine Land.
Maggie was born and raised in the Rochester area and graduated from the University of Brockport. After her summer interning with us at Cypress North, she went on to gain several years of experience as a marketer in both in-house and agency settings.
When she’s not at work, Maggie can be found spending time with family and friends, spoiling her adorable golden retriever Oakley, or somewhere out on the water. She loves boating, cooking, and binge-watching reality TV. She also enjoys reading – and inadvertently started a book cult among her coworkers.