Put Your Campaigns to the Test: A Guide to Google Ads Experiments

If you’ve ever run a Google Ads campaign, chances are, you’ve wondered how a change in your settings or assets would impact performance. Maybe you’ve been afraid to take the plunge on changing settings because you can’t afford to put all your eggs in one basket just to have performance tank. Maybe you’re not convinced the change you have in mind will make a difference. Or maybe you are convinced, but you need help persuading your client or manager.
No matter the reason, it’s nice to have some data to back (or refute) your theory before you make (or don’t) a significant change to campaign strategy.
Enter campaign experiments.
Not familiar with them? We’ll break it down.

What are Google Ads Campaign Experiments?
Think of them as an A/B testing tool.
To put it simply, experiments are a way to test the impact of changes to a campaign before applying those changes to your setup. When you run an experiment, you get real performance data, from actual users, which you can then use to make an informed decision about how to proceed.
How does that work? We’ll get into the details below, but essentially, experiments allow you to run an alternate version of your campaign in tandem with your original, measuring and comparing performance against your existing setup along the way.
Why use experiments to test campaign changes?
Why not just make a change and compare performance before and after?
Well, you could use that strategy. But is that the best approach? Probably not.
Your Google Ads campaigns don’t exist in a vacuum. Regardless of your industry or product, there will always be external factors that impact performance. Running campaign experiments allows you to test your change in the same environment as your original campaign. Meaning differences in performance can be better attributed to the change you made, rather than things like seasonality, current events, and changes in your competitor’s strategy.
If comparing apples to apples data is important to you - and it should be - experiments are your friend.
What can you test with experiments?
Experiments can be used to test the majority of campaign components, however, there are some limitations to note:
- Campaign types
- Experiments can only be applied to search and display campaigns
- They are not available for app, video, discovery, or shopping campaigns
- Budget
- Experiments use the original campaign’s budget (split between the original and the experiment) - you cannot test one budget versus another
- Campaigns using shared budgets are not eligible - just switch the campaign to an individual budget if you want to apply an experiment
- Audiences
- Audience lists must have at least 10,000 users in the list in order to run experiments using a cookie-based split (don’t worry, we’ll explain what this is in a minute)
- Ad customizers
- The following ad customizers are not compatible with experiments:
- Target Campaign
- Target Ad Group
- The following ad customizers are not compatible with experiments:
- Only one experiment can run at a time, per campaign
- You can schedule up to 5 experiments in advance
When should you use campaign experiments?
If you’re contemplating a major change to a search or display campaign but are uncertain about the impact, we recommend firing up an experiment. Campaign experiments are without question the best, most data-driven way to test changes to a campaign. If you want real answers as to whether or not a change succeeded or failed, use an experiment.
Some common uses for campaign experiments include testing:
- Different bidding strategies
- Device bid adjustments
- Alternate landing pages
- Ad schedule
- Audience targeting/bid adjustments for search campaigns
- Ad copy changes
Pro Tip: There are other ways to test variations in ad copy and landing pages than to use experiments.
For a single campaign
You can test ad copy by simply creating multiple ads (with different creative, copy, or final URLs) within your ad groups. As your campaign runs, monitor the performance of your ads. Pause losing ads and create new ones to try to beat your current winning ads.
If you do this, be sure to set your ad rotation to “Do not optimize: Rotate ads indefinitely” so that your new ads will rotate evenly with your originals. If you were optimizing for performance before the test, don’t forget to change this back once you get the data you need. For more information on ad rotation, check out our guide to Google Ads settings.
For multiple campaigns
If you’re testing the same ad copy or landing page changes across multiple campaigns within an account, use Google’s Ad Variations feature instead of experiments.
We’ve hit the “why” (data, baby!), the “what” (a killer testing tool), and the “when” (whenever you want to test the impact of a major change to a campaign). Hopefully, that gets your wheels turning about all the testing you’d like to do.
Campaign experiments best practices
The most important rule to remember with experiments is to only test one change at a time, where all other elements of a campaign remain the same. It may be tempting to tackle your whole list of changes at once, but campaign optimization doesn’t happen all at once.
While you can make multiple changes to a campaign and run an experiment, you’ll be left wondering which of those changes actually made an impact. We don’t recommend doing that.
Test one element at a time, then move on to the next.
Ready to start testing? Let’s get into how…
Setup: How to Create Experiments in Google Ads
So, you’re excited to get testing and ready to set up a Google Ads experiment. Great! But before you can do that, Google will have you draft your changes in what they call a “draft”.
What is a campaign draft?
A draft is simply a copy of your campaign that you can edit without making live changes to the actual campaign. The changes you make in your draft can be directly applied to your campaign or used to make an experiment campaign to test.
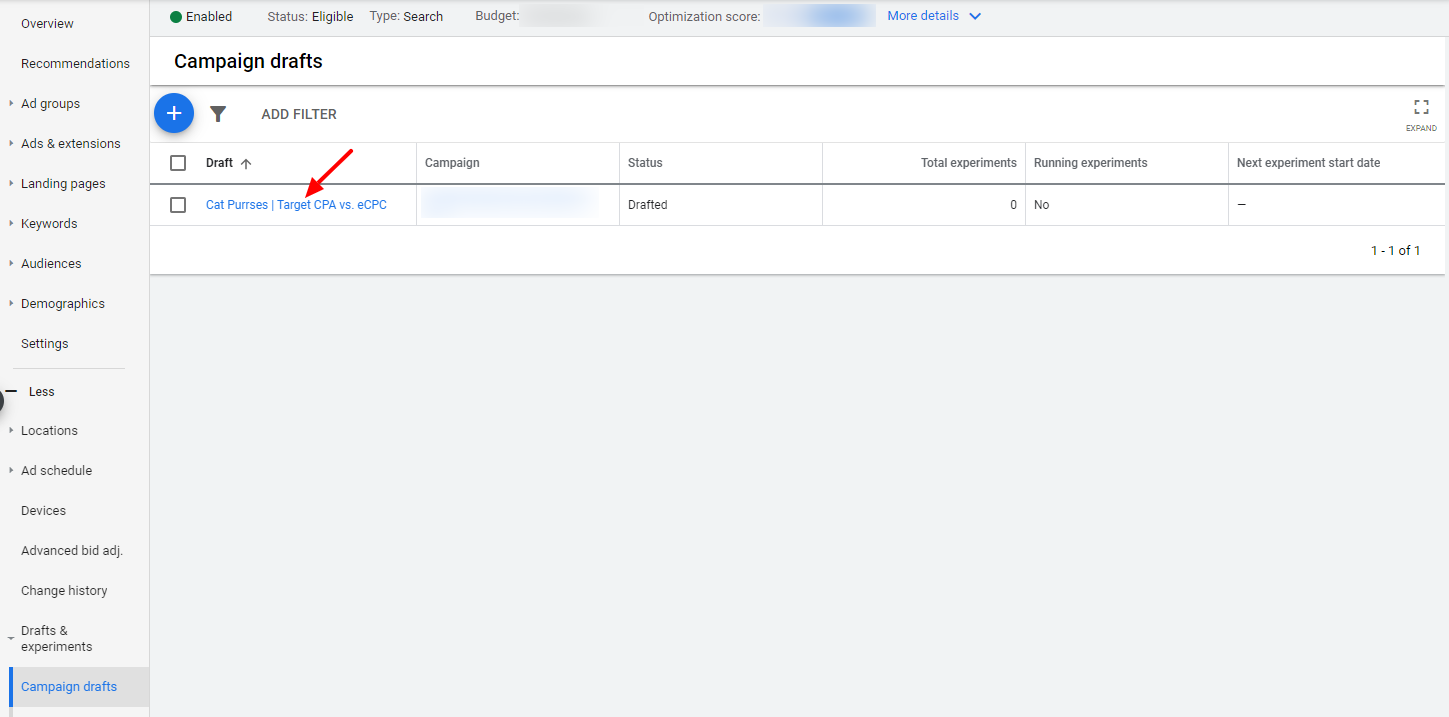
Creating a campaign from an existing draft
Navigate to the Campaign drafts tab (found in the Drafts & Experiments dropdown) in the Google Ads online interface. Click on the name of your draft to open it:
Now, skip ahead to the Setting Up Your New Experiment section below.
Need to create a draft? We’ll walk you through it.
Creating a campaign draft
To start, make sure you’re in the online version of Google Ads. Drafts created in Ads Editor cannot be published without being set to “enabled” or “paused”, and cannot be used to create experiments.
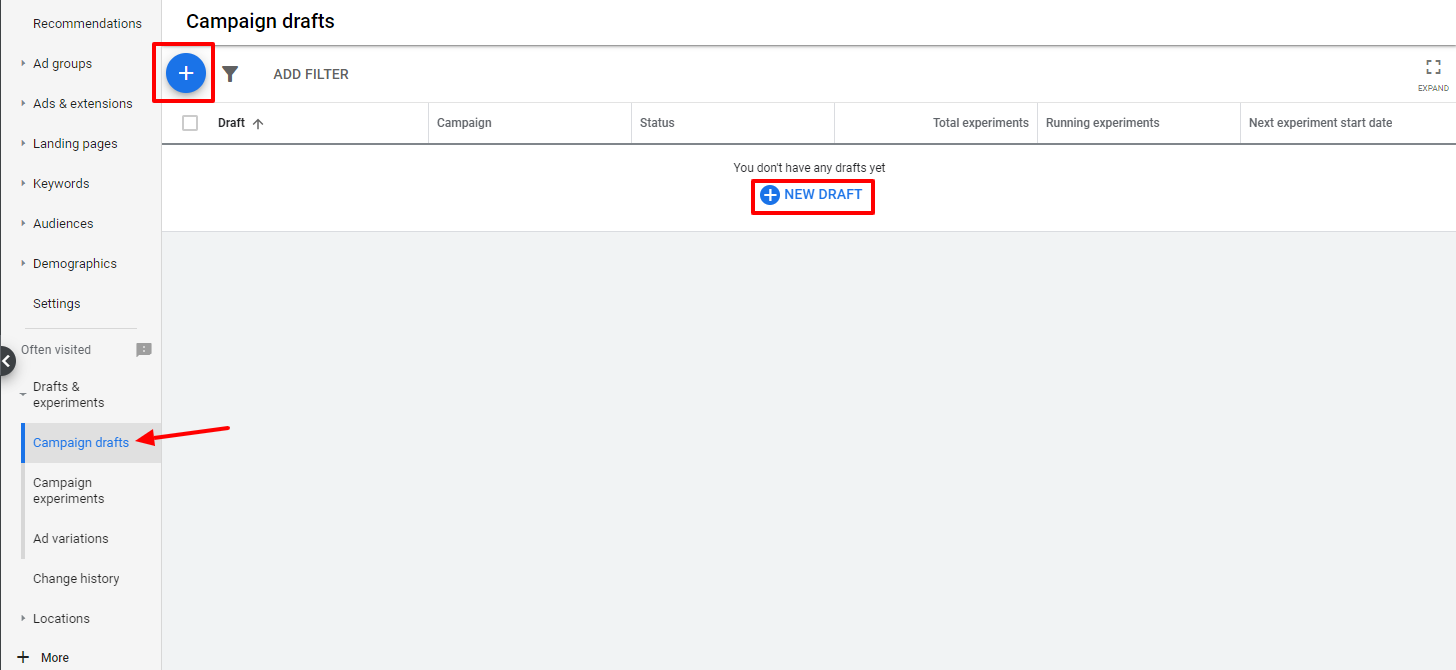
Navigate to the campaign you’d like to experiment with, and expand the “Drafts & experiments” menu. Select “Campaign drafts” from the dropdown.
Click the blue plus (if this is your first draft, you’ve got two shiny options!):
You’ll be asked to name your draft. Name it like you would any campaign - descriptively and with whatever naming conventions you follow with your account. We like to name our drafts the same thing we plan to name our experiment later, but you don’t have to. Come up with a system that works for you and stick to it!
If you need some inspiration, we like:
Original Campaign Name | Thing Being Tested vs. Control
Once the experiment is running, naming it as such makes it easy to see campaign and experiment data side by side when sorting the All Campaigns tab alphabetically. It’s also a foolproof system so there’s no confusion if multiple people manage your Google Ads account.
For example:
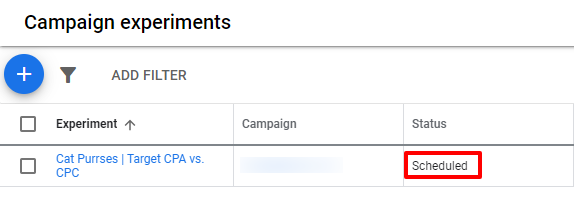
Cat Purrses | Target CPA vs. CPC
In addition to the name, you have the option to add a description. This is handy if you want to add further detail, like say, what the CPA is that you’re testing, or if you’re testing ad copy, how it differs.
Hit save.
You’ll be taken to the Ad Groups tab in your new draft campaign. Look familiar? It should! Your original campaign is now cloned as a draft. You’ll know you’re in the draft and not your original campaign because it will say so at the top of your screen and you’ll be able to see the tab you’re in on the right side of your screen.

From here, you can navigate wherever you need to in order to change the element you’re testing.
Everything in your draft is edited the same way as in regular campaigns, so you know what you’re doing here. Head to settings to change a bid strategy, go into the ad groups to edit your ads, etc.
Food for Thought: Depending on your needs, it might be helpful to compare how traffic from your experiment behaves differently from original campaign traffic on your site. Don’t forget to adjust your tracking parameters for the experiment if that’s the case.
Need help with that? Check out our guide to campaign tracking here.
If you’re not ready to run an experiment just yet, you can stop here. Your draft will be saved (you don’t need to take any further action) and you can navigate to the Campaign Drafts tab to find it later.
Setting up your new experiment
Once you’ve made the desired change(s) to your draft, you’re ready to turn it into an experiment! Click the APPLY button in the top nav.
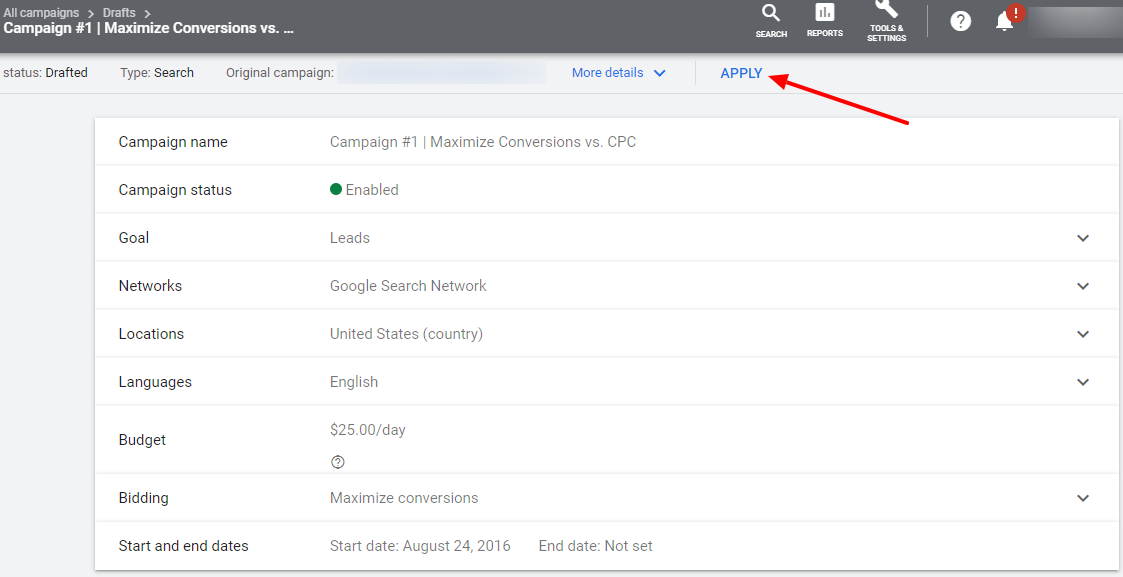
You’ll be presented with two options:
- Apply changes to the original campaign - don’t select this one, that’s not why you’re here
- Run an experiment - choose this option and click APPLY again
Next, you’ll be presented with a slew of options to configure for your experiment:
- Name
- This is the name of your experiment - refer to our naming convention recommendations in the draft section above if you need help naming your experiment.
- Just like campaigns, no two experiments (paused or enabled) can share the same name. Removing an experiment frees up the name for use again.
- Description
- This optional setting allows you to enter additional information for reference - refer to our note about descriptions in the drafts section above for more information.
- Start date
- By default, the experiment start date is set for the next day - we recommend leaving this as is, or setting it for another day in the future. Not only does this eliminate partial-day data (if you were to fire up your experiment the same day you set it up), but it also gives your ads time to be reviewed and approved.
- Yes, even if you didn’t change the ad copy from your original campaign, ads still need to go through the approval process.
- Experiments that have been created successfully, but are not running will show a “Scheduled” status in the Campaign experiments tab.
- By default, the experiment start date is set for the next day - we recommend leaving this as is, or setting it for another day in the future. Not only does this eliminate partial-day data (if you were to fire up your experiment the same day you set it up), but it also gives your ads time to be reviewed and approved.
- End Date
- This is the date on which your experiment will end - you have options:
- None - choose this option if you’d like your experiment to run indefinitely. You can come back and end it whenever you’d like.
- Specific date - choose a date in the future on which your experiment will automatically stop running. We’d recommend at least 30 days to allow time to gather ample data.
- Even if you set an end date, you can come back at any time and manually end your experiment. You can also extend it by adjusting the end date should you so desire.
- This is the date on which your experiment will end - you have options:
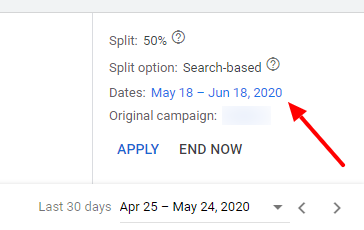
- Experiment split
- In Google’s words, this setting indicates “the percentage of your campaign’s budget that’s allocated to your experiment and the percentage of auctions your experiment is eligible to participate in.” Essentially, you are dictating what percentage of campaign budget should be part of the experiment and what percentage should be part of the regular campaign.
- By default this is 50%, and we recommend keeping it there to test both versions of your campaign evenly
- Note that even with a 50% split, you may see metrics such as impression share, and even budget that are not a perfect split down the center. This is normal - you’re testing for performance changes, remember?
- Experiment split options (search campaigns only)
- This setting allows you to indicate how your experiment and original campaign will be served to users - expand the Advanced options menu to see this setting
- There are two ways your experiment split can run:
- Search-based - this method splits the version of the campaign served at the search-level, meaning every time a search is performed, Google will randomly select either your experiment or your original campaign. This means that the same user could be delivered both versions, if they perform a search that triggers your campaign more than once.
- Cookie-based - this method splits the version of the campaign served at the user-level, meaning that the same user will only see either the experiment or the original campaign, no matter how many times they perform a relevant search. This is an ideal setting for testing creative as the user sees the same ad/landing page every time, reducing the influence of other factors on the results.
- Remember, you must have at least 10,000 users in each of your campaign’s audiences in order to use cookie-based split
- All display campaigns use cookie-based split, the option to choose your split is only available in search campaigns
Changing your experiment
Once your experiment is live, don’t touch it!
Why not? Well, any changes you make can, and likely will, impact performance. And while you can adjust the date range to view performance data before and after the change you made, both in the experiment and the original, that gets messy quickly. Don’t do that to yourself.
Of course, you may find yourself in a situation where making a change is unavoidable. If that’s the case, remember the following:
Once an experiment has been created, any changes made to your original campaign will not be applied to your experiment unless you make the change to the experiment manually.
Pause a keyword in the original? Better pause it in the experiment too, or data will be skewed. Remember, consistency among elements other than the one which you’re actively testing is key to a successful experiment.
Pro Tip: Once an experiment is live, it will be available in Google Ads Editor.
Some changes have a bigger impact on what you’re testing than others.
Before you make a change to a live experiment, it’s important to think about that change, why you’re making it, and how it could affect both the experiment and the control.
For example, say you’re testing maximize conversion bidding against eCPC and two weeks into it you decide to extend the experiment to gather more data. No harm done, changing the end date of your test isn’t going to impact how your campaigns perform (though do consider seasonal changes before you extend a test for too long).
But what if your boss blesses you with more ad budget halfway through an experiment? Be careful. We’ve seen dramatic changes in CPA when adjusting budgets on campaigns using maximize conversion bidding. If you’re making budget changes, we’d recommend stopping the current experiment and starting fresh with the new budget in place.
Google will let you do what you want.
Be extremely careful making changes to your experiment - Google will not stop you from changing the very element it is that you’re testing.
For example, if you’re experimenting with target CPA bidding, and adjust your experiment campaign’s setting to maximize conversions in the middle of your test (by accident, of course), there’ll be no warning, no “are you sure you mean to do that?” messaging, and the change will go through.
Monitoring Google Ads campaign experiments
You did it! Your first campaign experiment is up and running. Your job now is to sit back, relax, and let the test do its thing. Of course, you’ll want to keep an eye on it throughout the process.
Fortunately, Google Ads makes it really easy to do that! There are a couple of places where you can view your experiment’s performance.
In the Campaign experiments tab: Here you’ll see helpful high-level information on your experiment like whether it’s running, and when it ends. Click on the name of the experiment to be taken to the Experiment itself.
In the Campaigns tab (all campaigns): Love that high-level view? Say no more. Experiments are reported right alongside other campaigns, in their own rows. Experimental versions of campaigns are indicated by a beaker icon, rather than the usual green circle for enabled campaigns.

All data from experiments is factored into the totals at the bottom as well.
In the Ad Groups tab (all campaigns): Similarly to the above, you can view all ad groups from your experiments alongside those from your regular campaigns in the Ad Groups tab. Experimental ad groups are noted by the beaker icon here as well.
Or, See how your experiment is performing just like a normal campaign: If you select your experiment from the list of campaigns in the left-hand menu, you can dive in just as you would any other campaign.
This view lets you review ad groups, keywords, devices, the change history, etc. That’s cool and all, but if you want to see exactly how your experiment compares with the original, this is where things get really juicy…
In most tabs within your experiment, there’s a panel above the usual graph and table view that highlights specific performance metrics. The panel shows 5 metrics at a time, but you can choose from the following list (and change between them as needed):
- Conversions
- Clicks
- Cost
- Conv. value
- Conv. value / cost
- CTR
- Avg. CPC
- Impr.
- All conv.
- Conv. rate
- Cost / conv.
- View-through conv.
- Value / conv.
These metrics report on the performance of your experiment, and when hovered-over, show you how the original is performing. If there’s enough data available it will also tell you whether the difference is statistically significant.

Pretty rad right?
Pro Tip: The performance comparison will show data for dates during which the experiment is/was active. However, the data in the graph and table below is based on the reporting date range you have selected.
If that’s not the same as your experiment window, and you want to view data from that time period only, just click on the experiment date range on the right side of the performance comparison panel to change your dates.
This will update your reporting date range to match the experiment!
Ongoing monitoring of your experiment is crucial to your campaign’s overall success. Now that you know where to find data on how your experiment is going, be sure to check back often. Throughout the life of your experiment, you’ll want to be on the lookout for major improvements or worsening performance (hopefully not the latter, but hey, that’s why this is a test!).
Ending experiments & applying changes
There are two ways a campaign experiment can come to an end: manually, whenever you choose to stop your test or automatically at a specified date. Either way, Google Ads makes it easy for you to apply (or not) the changes you had been experimenting with.
Ending an experiment early
As noted earlier, even if you’ve pre-selected an end date, you can stop your experiment at any time. Did you give yourself 60 days but reached the point where you have the data you need to make a decision at day 43? You have the ability to end your experiment.
To do so, navigate to any tab within the experiment campaign where the performance comparison panel can be viewed. Check out the box in the upper right corner for your options:
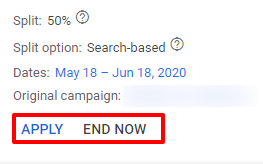
If your original campaign stands as the winner, simply click END NOW to end the experiment. You’ll be prompted to confirm that you really want to do this because once you end an experiment, you cannot restart it.
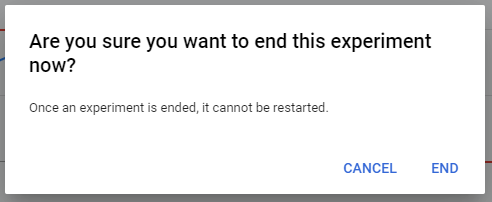
If you change your mind and want to keep this thing going, select CANCEL. If you’re committed, hit END. Your experiment status will change to Finished, and your original campaign will continue to run as it was before.
If you’re happy with the results of your test and want to make the change official - select APPLY. This will end your experiment and give you two options for how to proceed:

Choose the option that’s right for you and click Apply again. Presto change-o! You’ve made the change you’ve been testing. It’s like magic, except a lot more scientific.
The experiment status will change to Applied. You can choose to remove it later without affecting the updated (or new) version of the original campaign. Just like removing a regular campaign, this will permanently remove your experiment and all of its data.
Experiment ended
Once your experiment has reached the end date you’ve set, it will stop running, but you can still access it from the Campaign experiments tab of your original campaign. The performance comparison panel will also still be available to help you analyze the success of your experiment and make a decision about whether or not to apply the change you’ve been testing.
The view will be very similar to what you’re used to from monitoring the experiment throughout its run, with a few minor changes:

Note that the experiment status is now listed as Finished, and the END NOW option on the right has been replaced with REMOVE.
If your experiment didn’t perform as well as you’d hoped and you want to stick with your original campaign, no further action is required. However, if you want to delete the experiment, click on REMOVE. Keep in mind that removing an experiment permanently deletes it.
Pro Tip: If you don’t remove the experiment once it’s over, you’ll continue to be able to access it - note the above example is from 2018. This is handy if you want to go back and reference data, however we would strongly recommend against applying historical experiments as the results are likely to be very different. When in doubt, test again.
If you’re happy with the performance of your experiment (and we hope you are!), you can make the change in your campaign right from here.
Click APPLY

Choose the option that’s right for you and click APPLY again

Once you do that, the experiment status will change to Applied. You’ll still have the option to remove it at any time, and doing so will not affect the updated (or new) version of the original campaign.
Next Steps
Now that you know what Google Ads experiments are, and how to create them, it’s time to start testing!
Keep in mind that even if an experiment goes well, there’s always room for improvement. And what works today may not work 6 months from now. Get in the habit of testing often. Use experiments not as a one-time justification for change, but as your tool for making informed, data-backed decisions for continual optimization and growth.
If you’re following along with our complete guide to Google Ads, you’ve made it through the final section! If you’re craving more digital marketing content, check out our blog or in-depth resources.
Have questions about whether or not you should test a big change? Need an extra set of eyes to help analyze the results of your experiment? Or, are you looking for an unbiased, third-party audit of your account? We’re a team of performance-driven Google Ads experts and we’re here to help! Contact us to talk to us about your goals so we can determine the best route for you!
Meet the Author

Jess Budde
Jess is our Director of Marketing Operations & Client Services, and a co-host on our weekly Marketing O’Clock podcast. She joined Cypress North in 2013 and works out of our Buffalo office.
Jess serves as a liaison between internal and external teams, collaborating closely with both to cultivate successful client-agency relationships. She oversees all relationships from the very beginning, facilitating the sales process and proposals, managing contracts, and onboarding. She continues to act as a point of contact to ensure we’re providing the best experience and results for all clients.
Beyond client services, Jess is a performance marketing generalist with expertise in both paid and organic strategy. In previous roles as a senior marketing manager, she led some of our largest client accounts, driving results with PPC campaigns, lead nurturing, and organic content.
For more than a decade, Jess has been a trusted voice and thought leader in the digital marketing community, keeping clients and colleagues alike updated on the news that impacts them via the Marketing O’Clock podcast.
Jess is a Western New York native and graduated with a Bachelor of Arts in communication studies from Niagara University before attending Syracuse University, where she earned her Master’s degree in television, radio, and film. Prior to joining Cypress North, she worked in series development, talent, and casting at MTV during the golden Jersey Shore era.
When Jess isn’t working or giving takes on the latest digital marketing news, she enjoys spending time outside, hanging out with her two beautiful children, and watching the entire Sons of Anarchy series on repeat. You may also find her slinging beers at Brewed & Bottled, the craft beer shop and bar she runs with her husband.
Jess is an amateur ornithologist, Limp Bizkit lover, Candy Crush professional, and hot sauce connoisseur who enjoys burning herself into oblivion with the hottest sauce she can find.