Are You (Accurately) Tracking The Right Conversions? A Google Ads Conversion Breakdown

As an advertiser on Google Ads, before you optimize your settings, write a single line of ad copy, or conduct keyword research, it's essential that you decide what the goal for your campaign is and what conversion actions you will track.
Conversions are the specific actions that users take which you have defined as key to your marketing goals. They are a necessity and are the standard barometer for success in Google Ads. That being said, it’s important to remember that not all conversions are created equal. The key to proper account structure lies in driving valuable conversions at a profitable price.
Note: Conversions are the bread and butter of Google Ads. If you’re not tracking them, you don’t have a chance of knowing how your campaigns are performing and how valuable they are to your business. This is the reason we decided to make this article the first in our complete guide to Google Ads. That being said, we may mention a few advanced topics in this article that you aren’t yet familiar with. Don’t worry! We will cover all of these topics in other articles in the guide and will link to those articles for context when needed.
Understanding Conversions
First off, let’s talk about what conversions actually are. It’s pretty simple really, conversions are the desired action that you want people to take after clicking on your ad. The reason you are running ads at all is to attempt to get users to take this action. These actions will normally take place on your website, but in some cases can occur on the search engine results page (phone calls and form submissions). These actions will vary based on your industry, product, service, goals, and structure. Conversions come in a wide variety of flavors, and each can carry different significance/weight.
We’re not talking about brand awareness or reach. We’re talking about actions that are proven to help your business generate a profit. Whether it’s an online purchase, reservation, call to inquire about your service, quote request, or asset download that allows you to acquire new leads for your CRM, there are many actions that your business might see as a “win” for your Google Ads campaign. These are called conversion actions.
If you care about performance, conversions are how you will gauge performance. Knowing when a desired action is taken is a necessity if you want to successfully:
- Structure your campaigns
- Bid accurately
- Track performance
- Calculate ROI
- Utilize Google’s powerful machine learning to optimize performance
... just to name a few.
So how do you begin tracking conversion actions?
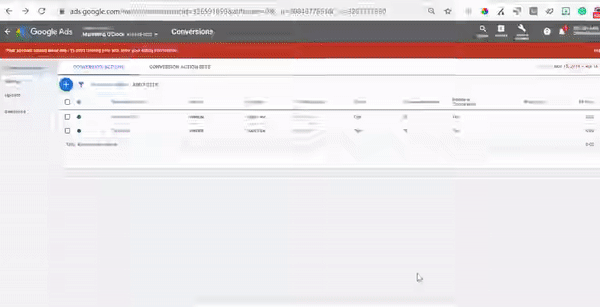
To set up or manage existing conversions in your Google Ads account, open the tools and settings menu on the upper right corner of your screen. Then, click “Conversions” under the measurement section.

This is your home base for all things conversions - where you’ll manage all conversion actions, conversion action sets, and conversion settings.
Note: Through 2022, most advertisers will use cookies (not the tasty treat - but a tracking pixel) to track when a user takes an action. Google is currently in the process of revamping the way they allow cookies to be used for tracking and we will update this article once that process is completed.
To set up a conversion, click the blue plus sign at the top of this page. You’ll be prompted to choose between four types of conversions.
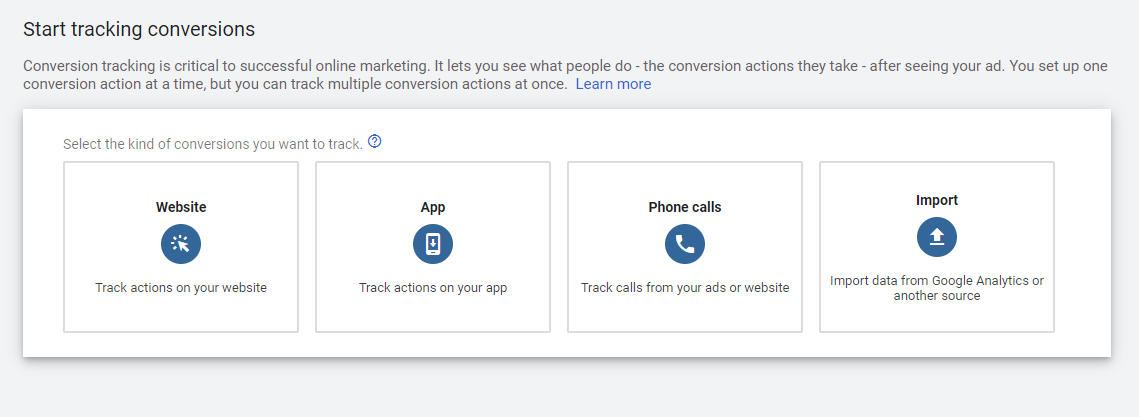
Let’s break down what each of these conversion types is, and how it can be used:
Website
Website conversions include things like lead form submissions, link clicks, and page views. There are two ways you can track conversions on your site:
- Tracking of a Page- If a user is taken to a page on your website that determines success (Thank You page, Lead Submitted Page, Contact Success Page, etc.), you could set up a conversion action so that Google would track those page views as a conversion.
- Tracking of an Action- If there is an event that occurs on a single page, meaning the user is not taken to a separate page upon completion of that action, you will need to track these conversions as events. Some examples include a form that instantly submits and keeps users on the same page, a click-to-call button, a specific portion of the page viewed, and a click to a video that opens in a modal. You can’t count a page view as a “win” in this situation, so you have to set up event tracking.
App
You can choose from the following app conversions:
- Google Analytics App + Web (Firebase)
Choose this option if you are looking to import app conversions from a linked Google Analytics App + Web or Firebase project. - Google Play
Want to track Android app installs? This option lets you track Google Play for app installs and in-app activity. - Third-party app analytics
Using other app tracking? This is for you.
App tracking can be a full guide in and of itself, so we won’t dive deep into the installation of each of the app tracking options here.
Phone calls
You can choose from the following phone conversions:
- Calls from ads using call extensions or call-only ads
This will track users who called your business directly from your ad on the search engine results page. This can either be from a call extension or a call ad, a simple ad that will initiate a call from the searcher’s mobile phone when clicked. - Calls to a phone number on your website
This option will swap out phone numbers on your site with a different number (only for Google Ads traffic) so you’re able to track when an ad click led to a phone call. With this, the advertiser can set a minimum call length so the only conversions that are tracked are calls that hit specific time requirements.
This option requires advertisers to use Google Forwarding Numbers.
- Clicks on your number on your mobile website
Because users can click to call directly from your site on a mobile device, you’ll be able to choose any number to track on the site itself - no swapping or forwarding numbers required.
Store visits
For local campaigns, Google allows you to track users who click on your ad and then visit your store, restaurant, or office. The missing piece here is there is no way to record purchasing information back to these clicks, you only know if they show up to your location. It lacks the accuracy of being able to determine how the user converted or what they purchased.
As I’m sure you can guess, tracking for this can be quite complex. It’s not always the most accurate, nor particularly helpful for advertisers, and isn’t even available for everyone with a Google Ads account. If you are considering store visit conversions, reach out to us! We can discuss if it’s right for you and help you determine the value of these visits if it is.
Import
If you’re tracking the same Goals in Google Analytics that you are in Google Ads, this is probably the easiest option for you. Google Analytics is one of several platforms from which conversion data can be imported into Google Ads.
We will cover the import options and process later in the article, but first, let’s make sure you understand conversion settings.
Note: If you are using lead form extensions, any submissions will automatically be recorded as a lead form conversion. These conversion actions will be automatically set up in your account upon the first lead form extension submission from a user on one of your ads.
Only actual form submissions will be recorded as lead form conversions. If your lead form extension is served with your ad (whether it’s clicked on or not) and the user clicks through to your site to convert, the conversion action they completed on your site would be recorded.
Conversion Settings
If you’re following along and creating conversions manually, the next screen you’ll be brought to will ask you to specify a few settings for your conversion. This is the same page you’ll use to edit your conversions after you’ve imported them from Google Analytics or another platform. The process is almost identical for website and phone conversions, with a couple of exceptions.
First, tell Google the type of website conversion you want to track by specifying a conversion category. Here’s the full list of options available:
Sales
- Purchase
- Add to cart
- Begin checkout
- Subscribe
Leads
- Submit lead form
- Phone call lead (this option will only appear if you selected phone calls on the previous step)
- Book appointment
- Sign-up
- Request quote
- Get directions
- Outbound click
Further
- Contact
- Page view
- Other
You’ll then have the option to fill in the following fields:
Conversion name
This is just the name of the conversion for your reporting purposes within Google Ads. Make it relevant and easily distinguishable.
Value
By assigning *proper* value to a conversion, you can give your bidding strategies more power. Certain bid strategies allow you to optimize for conversion value, meaning they will try to get as much value as possible, not just as many conversions as possible.
For example, if you sell SaaS products and conversion values are assigned properly, Google would know that selling a premium version is more valuable to your company than selling the base level . If you optimize for conversion value or return on ad spend, Google would use this information to get you as much value as possible within your daily budget.
This obviously makes sense for products with specific pricing and eCommerce campaigns, but you can assign values to conversions that don’t have cart values, too. If you know exactly how much a new lead is worth to your business when they convert on a search ad, assign that value to your conversion action. Giving Google as much information as possible sets you up for success.
When assigning value to your conversions, the options to choose from are:
- Use the same value for each conversion
If you go this route, the values will be the same across the board. Each lead is just as valuable as the next, no variation.
- Use different values for each conversion
This route will force you to add dynamic values to the tracking code on your site. You will probably need the help of a webmaster to execute this. The easiest way to achieve this is by importing your conversions from Google Analytics so it can pull in the eCommerce values (see below).
- Don't use a value for this conversion action (not recommended)
If you don’t want values assigned, then don’t use a value. We don’t recommend this, and neither does Google. At a minimum, we’d recommend using the same value of 1.
- Use the value and currency from Analytics This will only be an option if you import your conversion from Google Analytics. If you sell a lot of products on your site with different values, this is the easiest option.
If you don’t know what to pick, we recommend choosing the conversion value option with the most detail that you can be confident in.
Call length (phone call conversions only)
Google allows you to specify a minimum call length in order for a phone call to be counted as a conversion. The default length is 60 seconds.
Conversion count
How many times should your conversion count for one person? This is in place to try to de-duplicate users that convert multiple times, where it makes sense, of course. For example, If someone converts twice by downloading an eBook, should that count at 1 conversion or 2? What if someone makes a purchase and then comes back to order again?
If you are tracking sales, we recommend counting “every” conversion, but if tracking contact forms, leads, or downloads, then use “one” so that there isn’t duplicate tracking.
Conversion window
Not everyone instantly converts after they click on an ad. Some people take days, others weeks to months. A conversion window gives you a cut off for how long the tracking should exist for. In other words, for how many days after the click will your ad be credited with the conversion?
Google defaults to a 30 day window for counting conversions that resulted from an ad click but you can go all the way back to 90 days. We recommend a larger conversion window if first-touch attribution is important to you, or when working with more complex conversions/sales funnels.
A good way to find out what conversion window you should use is to log into Google Analytics and find what the average Time Lag is for your conversions. To do this, you can go to:
Conversions > Multi-Channel Funnels > Time Lag
You can then set the Lookback Window to 90 days. By doing this you can see the lag in conversions by days (from when they had their first session until conversion). You can then analyze the data and choose a number of days that will comfortably gather the majority of your conversions.
View-through conversion window
One of our favorite conversions on the planet are view-through conversions, which are most commonly driven by remarketing campaigns. This is a secondary conversion that happens when:
1. Somebody sees your ad
2. They don’t click on the ad (costing you no money)
3. They convert on their own (while never clicking on an ad!)
You can set this timeframe for a view-through conversion window anywhere from 1-30 days.
Conversions vs. All Conversions
Next, you’ll be asked whether or not you want your conversion to be included in “Conversions”, meaning the “Conversions” column in reports. If you select no, your conversion will be included in the “All Conversions” column in reports, but will not technically be counted as a Conversion.
This goes back to the concept that not all conversions are created equal. “All Conversions” specifies that the user action is valuable to your business and should be tracked, but isn’t important enough to be the main goal for your campaign.
It essentially comes down to this: if you want to track an action and optimize your campaign for that action, add it to “Conversions”. If you want to track an action, but not optimize your campaign for that action, don’t include it in “Conversions”. You can still see how many users are completing these “All Conversions” in the “All Conv.” column of your reports.
Let's use ecommerce as an example. Google Ads lets you track purchases as a conversion, which would be your main goal for an ecommerce campaign. But, they also allow you to track “add to cart” and “begin checkout”. You may be interested to know how many times a click on your ad resulted in an item being added to a cart, but you wouldn’t want to mix these small wins with what you’re really optimizing your campaign for, purchases. Why? Thanks for asking!
- Reporting
When tracking performance for your campaigns, you’ll want to make sure metrics such as cost per conversion and conversion rate are calculated based on the conversions that indicate whether your campaign is a success or failure.
Let’s say you’re running a shopping campaign for $25 pennants and you can make a profit off of a $5 cost per acquisition from your Google Ads campaign. While it’s great to know whether or not someone added a pennant to their cart, including this action in “Conversions” would lead to inaccurate reporting of cost per acquisition.
- Optimization
If your ad rotation is set to optimize for best performing ads, the only chance Google Ads has of knowing which ads are performing best is if you clearly specify what your main conversion goals are for the campaign. You don’t want them to show ads that resulted in more “add to carts” you want them to show ads that resulted in more purchases.
If you run your campaign on all devices, you may find that users add items to their cart on mobile but more often complete the checkout process on their desktop. This is important information that you’d want to know! Keeping conversions in the appropriate conversion category (“Conversions” or “All Conversions") ensures your conversion tracking is organized so you can easily make these distinctions and optimize accordingly.
- Smart Bidding
If you’re using any kind of smart bidding it will optimize toward conversions, conversion value, or return on ad spend. If you add small wins like “add to cart” to “Conversions” (not “All Conversions”), Google Ads would optimize toward these small wins as if they were your key performance indicator for success in that campaign.
Let’s say you’re using maximize conversions bidding. You would choose this strategy in an attempt to have your ads generate as many purchases as possible, not as many “add to carts” as possible. By adding “add to cart” and “begin checkout” to “All Conversions, you’re able to track these actions without optimizing for them.
Attribution model
We could create an article on Attribution as long as this entire piece, so we’ll keep it short here. Simply put, attribution is assigning value to different points in the conversion journey. If someone performed the following ad clicks, how would you like to credit them (assuming a 30 day conversion window)?
- 1st Touch - Search click [15 days ago]
- User did not convert
- 2nd Touch - Remarketing display click [8 days ago]
- User did not convert
- 3rd Touch - RLSA Search click [1 day ago]
- User converted
Who should get credit for the conversion? Google gives you the following options:
Here’s how each works:
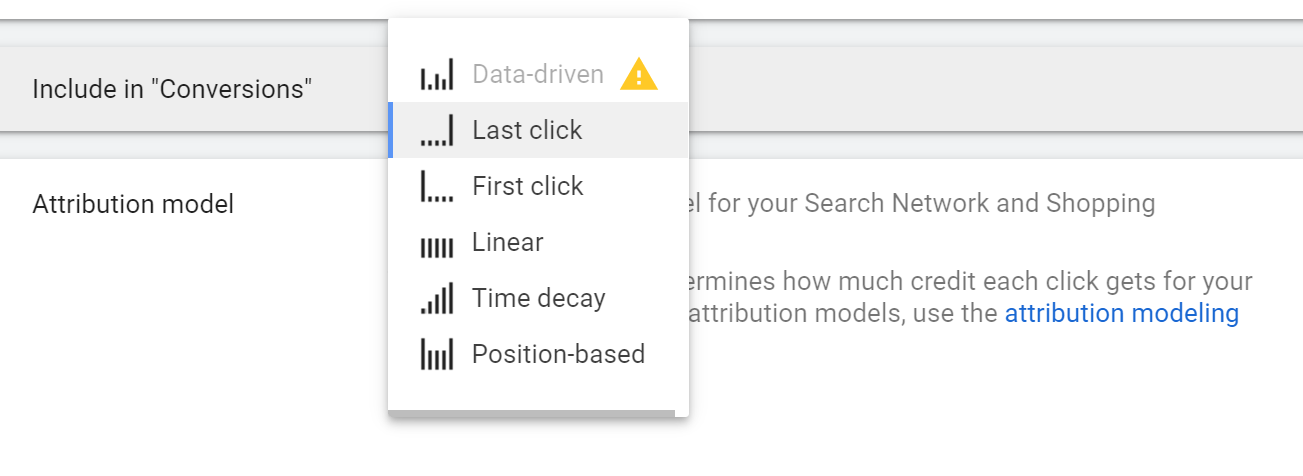
- Data-driven
Google will look at the history and user patterns and determine your attribution for you, you need a lot of conversions for this, 300 within the last 30 days for each specific conversion action you use it for, to be exact. - Last Click (default)
All Conversion value goes to the last touch. Above, the RLSA campaign would get 100% of conversion value, search & remarketing would get 0%.
- First Click
All Conversion value goes to the first touch. Above, the search campaign would get 100% of conversion value, RLSA & remarketing would get 0%. - Linear
In this case, the conversion value would be broken up equally across all ad clicks. So in the above example, it would be 33% search, 33% remarketing, 33% RLSA. If you aren’t sure what to do, we would recommend using this instead of the default last touch. - Time Decay
Let’s get sciency with this. Time decay will grant more credit to ad touches that that happened closer in time to the user’s conversion. This is determined by half-lives. Yep, science. The credit is distributed using a 7-day half-life. Every 7 days, the credit of a touch will drop down. In other words, an ad interaction 8 days before a conversion gets half as much credit as an ad interaction 1 day before a conversion.
So in the above example, RLSAs could get 0.57 conversions, Remarketing would get 0.28 conversions (half of RLSAs), and Search would get 0.14 conversions (half of Remarketing).
This is generally not a great solution to use on most campaigns, unless you really, really value last click but don’t want to go whole hog on full last touch attribution. - Position Based
This option allows you to give a percentage of the “win” to different touch points along the user’s conversion journey. It gives 40% of credit to the first and last ad interactions (each) and spreads the remaining 20% of the credit out across the other ad interactions on the path.
For our example, the search click would be credited 40%, the RLSA click would be credited 40%, and the remarketing click would be credited 20%.
Implementing Conversion Tracking on Your Website
If you’re manually creating your conversion (not importing), you’ll be prompted to install a Global Site Tag on your site next. It’s best practice to install this on every page of your site to get the best view. For example, if you are looking to track calls, this will replace your phone number with the Google Ads forwarding number on all pages for proper conversion tracking.
In addition to installing the Global Site Tag across your site, you’ll be prompted to generate (and implement) additional snippets of code for each specific conversion action you plan to track.
Remember, there are two types of website conversion tracking: page view and event. The implementation process will differ depending on how your conversions are being tracked.
- If you're using page view tracking:
If a page view determines success (e.g. a thank you page), you will have the newly-formed conversion action snippet fire on the page that you’ve deemed to be a conversion. The tracking tag should be fired whenever that page is loaded. This is the easiest way to track conversions on a website as the only configuration needed is to place the code snippet on that ‘conversion’ page.
- If you’re tracking an event:
By setting an event, you will then be able to trigger the conversion tag to fire when an action occurs, even if a new page is loaded. Google’s Tag Manager is the most commonly used solution to help assist with this.

There are 3 different options you can choose from to implement the tag on your site.
- Installing yourself
We only recommend using this option if you have development expertise.
The Global Site Tag should be placed in the <head> and only needs to be implemented once. Again, you’ll be prompted to install an additional event snippet for the specific action you’re tracking. This will need to be installed individually for each conversion.
- Emailing
If you don’t have development experience but have a webmaster or development team who can help you, simply choose the ‘Email the tag’ option and add their email address. They’ll receive an email telling them how to set up the tag and event snippet for you.
- Using Google Tag Manager
If you don’t have access to a webmaster, this will be the best option for you.
Don't have the help of a webmaster? Download our step-by-step tutorial for setting up Google Ads conversion tracking with Google Tag Manager.
First, you’ll have to set up your conversion linker before any individual conversions can be tracked.
In Google Tag Manager, create a new tag and select “conversion linker” as the tag configuration.
Now, add a trigger to your tag. You probably want it to fire on all pages of your site to get the best view of conversion data.
Now that your conversion linker is in place, you can set up tags for your conversion actions.
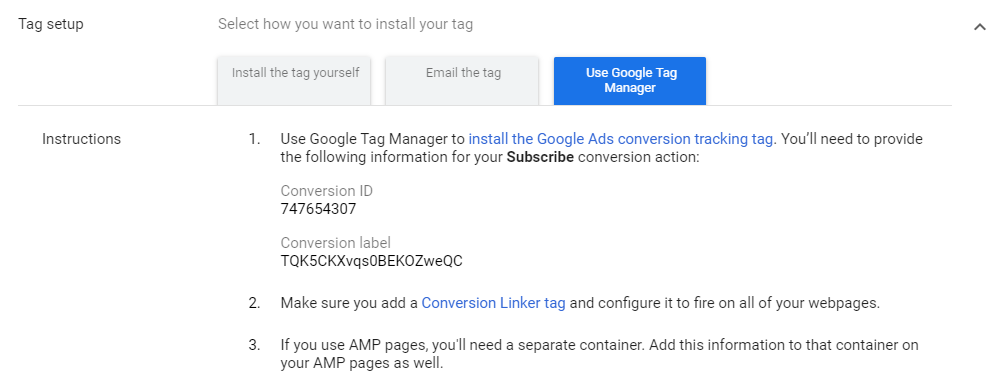
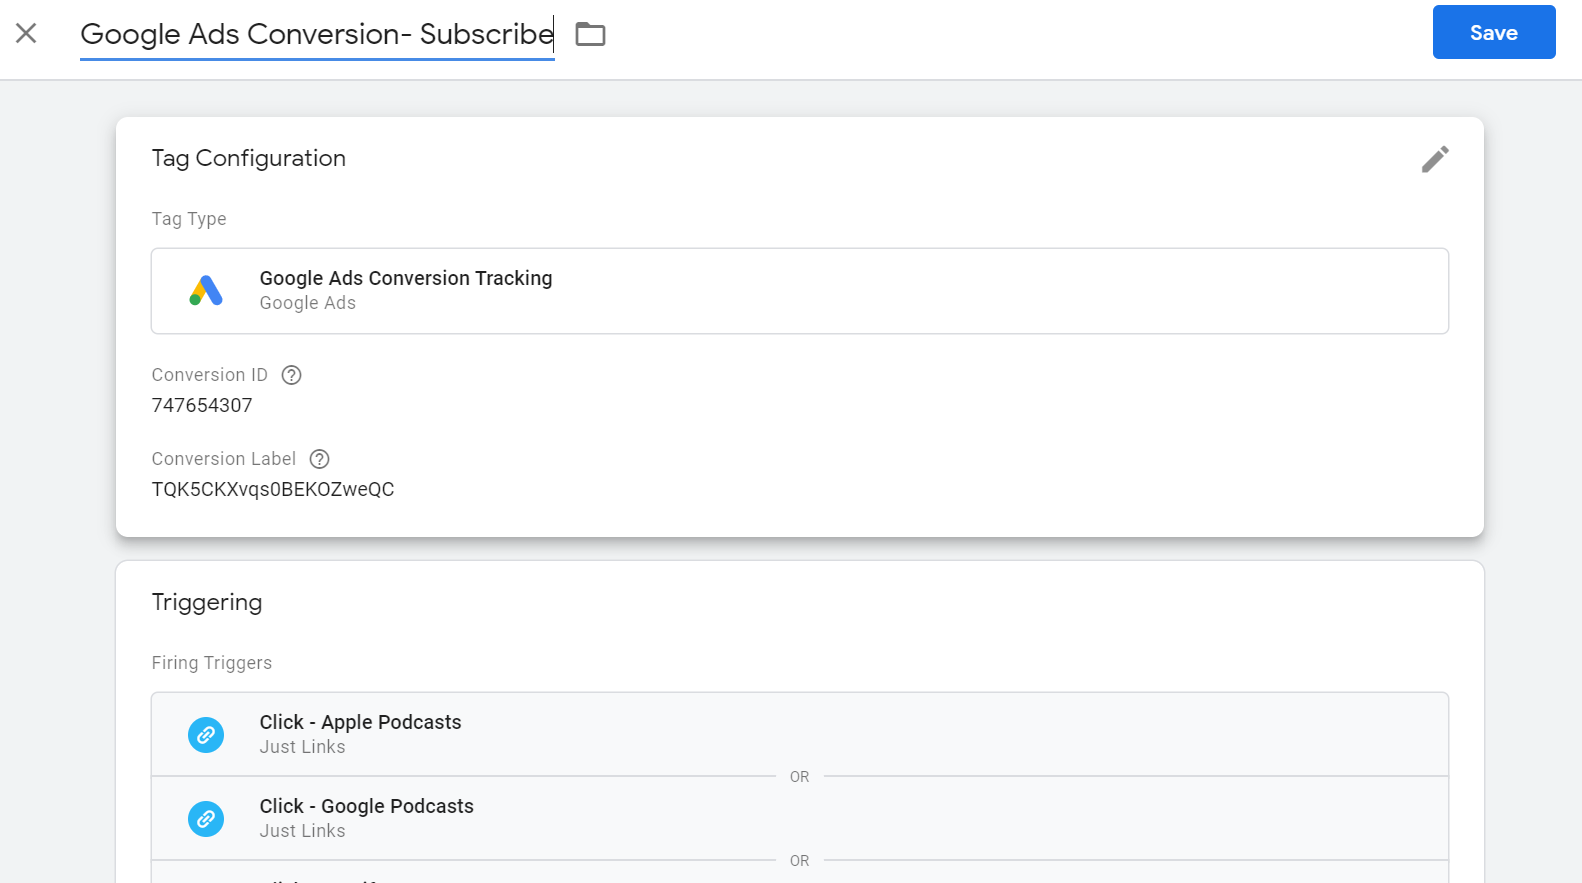
To create the tag for this specific conversion, select “Google Ads Conversion Tracking” as your tag type. Google Ads gives you a conversion ID and label that you will assign to your tag. You can additionally choose to add a conversion value, order ID, and/or currency code.
If you already have a trigger for your event, or page view add it to your new tag. If not, set up a new trigger.
For the example above, the tag would look like this:
Importing Conversions
Importing conversions from linked accounts allows you to pull conversion data from the following platforms:
- Google Analytics
This will pull data from Google Analytics, not specifically from a cookie. In order to do this, you must tie your Google Ads account to your Google Analytics account. Doing so gives you the option to import the goals you have set in Analytics into Google Ads as conversions.
At our agency, we usually either import conversions from Analytics or set them up in Google Tag Manager if importing from Analytics isn’t an option. Most marketers have tracking in place for organic conversions already, so the easiest method of conversion tracking is to import this goal data into Google Ads.
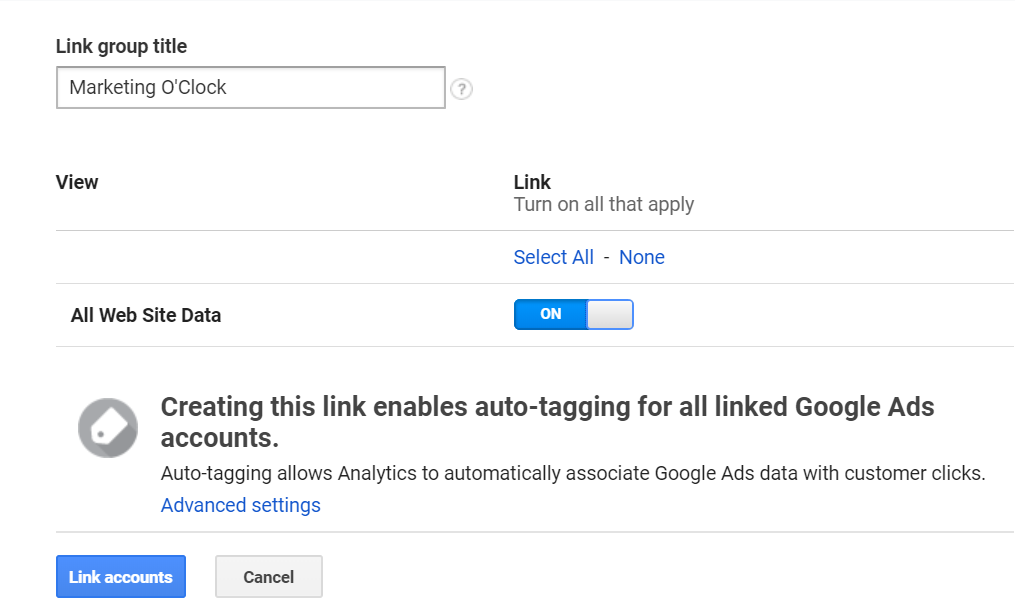
To link your accounts, you’ll want to go to the Admin tab in Google Analytics. Then, under “Product Linking”, click “Google Ads Linking”. On the next page, click “New Link Group”.
Now you’ll see a list of all the Google Analytics accounts you have access to under your account. Select the appropriate account and click “Continue”.
Select the view(s) you want to link to Google Ads by toggling the ”On” switch. By linking the accounts, you agree to automatically enable auto tagging. Now, click “Link accounts”.
You did it! Your accounts are linked. It may take up to 24 hours to share data between your accounts, at which time you can quickly and efficiently import your Analytics conversions into Google Ads.
To import conversions, add a new conversion from the Google Ads Conversion page and select “Import” and “Google Analytics”. You’ll see a list of all of your goals from analytics and can select all the goals you’d like to import.
Once the conversions are imported, you can go back in to each conversion and edit the settings the same way you would if you were creating them manually.
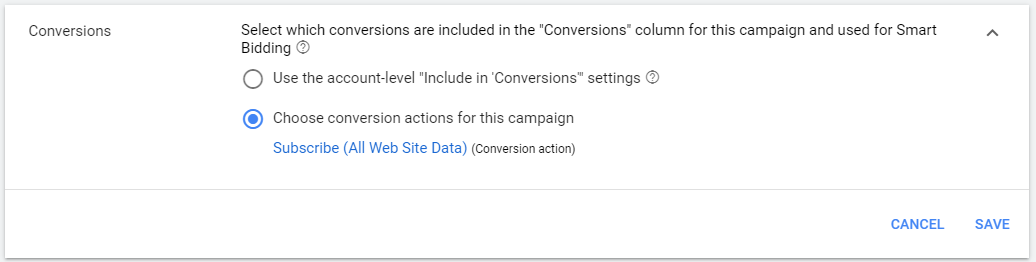
You can change the conversion window, value, count, and attribution model. You can also manually select a conversion category for a conversion retroactively. For these new conversions imported in the example above, we would assign the “Subscribe” category to the “Subscribe” goal.
It’s very important to ensure each of your newly imported conversions are appropriately counted as “Conversions” or “All Conversions”. For our podcast ads, we want to optimize our campaigns to get as many subscribers as possible. So, we would include “Subscribe” in "Conversions". We would count our other imported conversions, such as episode plays and contact form submissions, as “All Conversions”. This will allow us to keep track of these actions but not optimize for them.
Advertisers are able to import conversions from other platforms as well. These will not apply to most advertisers, but it’s good to know these options are available if you need them.
- Google Analytics App + Web
This is a newer conversion type that pulls both Google Analytics web data and data from apps for cross-platform tracking. - Third-party app analytics
This option allows you to import Android and iOS app conversions from a linked third-party app analytics provider.
- Salesforce
Import conversions from your company’s Salesforce account so you can track these conversions in Google Ads.
- Other data sources or CRMs
This is how you submit offline conversions, meaning someone clicked on your ad and then converted either over the phone or at your store or office later on.
- Track conversions from clicks- this would work if someone submitted a form after clicking on your ad (the form submission itself is not counted as a conversion), then is added to your CRM, and your sales team closes the deal and they convert later on. You would have to capture the gclid from the ad click with the form submission, send it to your CRM, then export that data and import it into Google Ads after they convert. Google would be able to match the gclid to the initial ad click and attribute the conversion properly.
- Track conversions from calls- a person calls your business (the phone call itself is not a conversion) and converts while on the call or afterward. You will need a Google forwarding number to import offline conversions that originated from a phone call. After the user converts, you will need to upload their phone number and the time of the phone call to Google Ads so that it can properly attribute the conversion.
Conversion Action Sets
From the “Conversion actions” page, there are two tabs across the top, “Conversion Actions” and “Conversion Action Sets”. What’s the difference? Glad you asked!
As we will continue to hammer home, not all conversions are created equal, and many advertisers will need to optimize different Google Ads campaigns for different conversion actions.
As you already know, the first tab, “Conversion Actions” is where you set up, view, and edit all of your individual conversions. The “Conversion Action Sets” tab allows you to group those conversions together so multiple conversions can be applied to different campaigns.
This all goes back to the idea of telling your campaigns which conversions to optimize for. Let’s say you have multiple campaigns that you want to optimize for calls to your business or contact form submissions. However, you may also have a conversion in your account that tracks whitepaper downloads specifically for a separate, top-of-funnel campaign. By grouping phone calls and form submissions together as a conversion action set and applying that set to your campaigns, Google Ads knows to optimize for form submissions and phone calls, not downloads. Grouping them together as a set saves you time when applying these conversion actions to future campaigns because you won’t have to individually add each relevant conversion action to applicable campaigns.
Depending on the nature of your business, you may choose to group conversions together by tiers based on where these conversion actions are located in your conversion funnel. Here’s an example of how that might work for a software as a service company:
Top-of-funnel conversions - Whitepaper downloads
Mid-funnel conversions - Calls to your business, contact form submissions
Bottom of funnel conversions - Free trial subscriptions
These conversion action sets could then be easily applied to relevant campaigns, helping Google’s machine learning optimize for the right actions at each step in the funnel.
Applying Conversions To Campaigns
The default conversion selection for campaigns is to “Use the account-level ‘Include in 'Conversions’ settings”, meaning your campaign will optimize toward any and all conversion actions in your account that are included in “Conversions” (not “All Conversions”). If you’ve read the rest of this article, you know that this is a bad idea because not all conversions are created equal. For more robust accounts, each campaign will have specific goals that require unique conversion actions or conversion action sets. You’ll want to be sure to indicate this at the campaign-level.
You can tell your campaign which conversions to optimize for during the initial setup of a campaign, or in the campaign settings tab for campaigns that already exist.
Select “Choose conversion actions for this campaign”, find the appropriate conversion action(s) or conversion action sets, and select them to add them to that campaign.
Remember, assigning conversions to a campaign is just telling Google Ads that that is your ideal result - it does not guarantee that these are the only actions your ad clicks will generate. This is particularly important if you’re using conversion-focused automated bidding including Enhanced CPC. If you tell Google Ads that you want to use Enhanced CPC bidding optimized for conversions in the example above, they may raise your bid if their machine learning predicts that a user is more likely to subscribe. If the bid strategy works as it’s supposed to, they would not raise your bid if their machine learning predicts that a user will download an episode or submit a contact form.
That being said, if a user clicks through to your site from an ad, they’d still be able to complete the other conversion actions you’ve set up in your account. In the podcast campaign example, someone could still click on our ad, go to our site, and download an episode. This conversion action would still be reported as a conversion (assuming this action is “included in conversions” under the conversion’s setting).
Conversion Reporting
You can monitor campaign performance at the campaign level from the “Campaigns” page, or the ad group level from the “Ad groups” page. This is the most basic form of reporting in Google Ads, but once you’re familiar with the different columns and segments available, you may find it useful to use Google Ads pre-defined reports or use a custom Google Data studio report to dig into your data further.
Columns
Columns allow you to analyze the KPIs that are important to your campaign. There are a ton to choose from, here are all the columns under the “conversions” section:
Conversions: The number of times users clicked on your ads and completed the conversion actions you have set up in your account and included in “Conversions”.
Cost/conv.: This is the total amount you’ve spent on your campaign (in the specified time period) divided by the number of conversions reported in the conversions column. This does not include view through conversions or “all conversions”. This number is essentially the cost per acquisition for your campaigns and is a key indication of success or failure. You’ll want to set clear CPA goals for your campaign based on the value of a customer for your business.
Conv. rate: How often, on average, someone clicks on your ad and then converts. This is calculated by dividing the number of conversions by the number of clicks.
Conv. value: The sum of all the conversion values attributed to that campaign in the time period you’re looking at. These are based on the values you assign to conversions in your conversion settings or cart values.
Conv. value / cost
Conv. value / click
Conversions (by conv. time): Standard conversion reporting in Google Ads is based on when the user clicked on the ads. So, if someone clicks on your ad and then goes back to the site to convert later on (as long as it’s within your conversion window), the standard reporting will show the time of the click as the time the conversion happened. This column, however, will report conversions based on when the conversion action actually occurred.
Conv. value (by conv. time)
Value / click (by conversion time)
All Conv.: This is where you’ll be able to see the “microconversions” that you set up conversion actions for but did not include in your main conversions. The numbers in this column will always be greater than or equal to your “Conversions” column. Lesser-conversions are added to your actual conversions to calculate “all conversions”.
Cost / all conv.
All conv. rate
All conv. value
All conv. value / cost
All conv. value / click
Value/ all conv.
All conv. (by conv. time)
All conv. value (by conv. time)
Value / all conv. (by conv. time)
Cross-device conversions: This reports users who clicked on your ad and then converted later on a different device or browser. Google can’t always tell when a user converts on a different device, but does catch some of them.
View-through conversions: These are recorded when someone sees your ad but does not interact with it and converts on your website later on.
Ecommerce Columns: We’re only covering the very basics of shopping campaigns in this Google Ads Guide, but we do have Google Shopping experts on our team that can help you master the ins and outs of eCommerce. If you need help with ecommerce campaigns, please reach out to us so we can help!
Orders: Every time a user clicks on your ad and then completes a transaction on your site, it’s counted as an order
Avg. cart size: The total number of products sold (attributed to clicks on your ads) divided by the total number of transactions.
Avg. order value: Revenue (attributed to clicks on your ads) / number of orders.
COGS: The cost of goods sold for purchases from your ecommerce campaigns.
Gross profit: The total amount of money you made that was attributed to clicks on your ads, after removing the cost of goods sold.
Revenue: The total amount of money you made from all transactions that are attributed to clicks on your ads
Segments
Segments allow you to get more granular with your columns, breaking down certain categories by rows. For example, segments are the only way you can break your conversions down by conversion action to see how users are converting on your site. Here’s a list of the most valuable conversion segments:
Conversion action: This will break out all of your conversions by the conversion action name you assigned them when you set them up or imported them. This is probably the most universally useful conversion segment an advertiser can add to their report as it allows you to track the specific actions users are taking.
Conversion category: Remember when you assigned categories to your conversion actions to specify if they were a purchase, quote request, phone call, etc.? You can see the breakdown of those categories by adding this segment to your report.
Conversion source: See a breakdown of whether your conversions were website conversions, phone call conversions, or imported conversions.
Days to conversion: Add this segment to your report to see a breakdown of how many days past the initial click it took for users to convert.
And there you have it.
See! That wasn’t so bad, was it? You’re now an expert on setting up and importing conversions, optimizing conversion settings, and proper conversion reporting in Google Ads. If you’re following along with our full Google Ads guide, your next step is to read on about the intricacies of Google Ads account structure.
Conversion tracking in Google Ads is a basic fundamental and is essential if you want to properly track and measure your campaigns. That being said, proper tracking implementation can be extremely complex. If you’re feeling overwhelmed, have a quick question, or want help setting up conversion tracking, reach out to us!
Meet the Author

Christine Zirnheld
Christine is our Director of Lead Gen and a co-host on our weekly Marketing O’Clock podcast. Known affectionately among coworkers and podcast listeners as Shep, she joined Cypress North in 2018 and works out of our Buffalo office.
As Director of Lead Gen, Christine oversees all of our lead generation clients, providing strategic guidance and assistance as needed to ensure we’re hitting their goals. She is on the cutting edge of paid search strategy and uses her expertise to not only uncover more quality leads for clients, but to turn those leads into customers.
Christine is an established thought leader in the digital marketing community, known for her PPC expertise and strategic mindset. She was recognized as one of the Top 50 Most Influential PPC Experts of 2025 by PPC Survey. Christine has shared her insights as a speaker at several major digital marketing conferences, including SMX Advanced in Boston, SMX London, and SMX Next. She has contributed to Search Engine Journal and Search Engine Land, and even published an ultimate playbook for Google Ads.
Originally from Ashburn, Virginia, Christine graduated from Canisius University with a bachelor's degree in marketing. She also has an associate's degree in fashion business management from the Fashion Institute of Technology.
When she’s not working, Christine can be found singing karaoke or watching Miss Rachel with her toddlers, watching Bravo, dining al fresco, and drinking Diet Coke. She’s known for making her Taylor Swift fandom her personality, talking about the royal family to any of her coworkers who will listen, and reading books about wives who kill their husbands. Christine was the 2002 Hula Hoop Champion at Ashburn Elementary School – and may still be undefeated.