How to Use Redis on AWS ElastiCache for Laravel


Laravel has a very good and well-thought-out caching system built into the framework, designed to help every developer create better and more performant applications. After all, caching is HARD.
While a standard project comes with sensible defaults for caching out-of-the-box, more thought and care will need to be taken when moving to production, especially at scale.
Table of Contents
Distributed Cache with Redis on AWS ElastiCache
Primer
Scaling
Scaling is the ability to increase the application workload and capacity as users/usage increases. It’s a deeper topic I’ll cover in a separate post.
For applications where scaling is not a requirement, everything is a lot easier. In cases where you do have to plan for scaling, particularly horizontal scaling, the primary objective is to have a distributed architecture for all application data. What this means is that your actual application needs to access ALL data from shared external sources that don’t exist on the application server itself.
Typical Distributed Services
- Cache
- Database
- Web Server
- File Storage
- Message Queue
- Queue Workers
Why It’s Necessary
As soon as you have more than one web server, distribution becomes necessary. The easiest scenario to understand is the database, but the concept is the same for each of the distributed services.
Here’s a simple example.
You have two web servers behind a load balancer, and each web server has its own database.
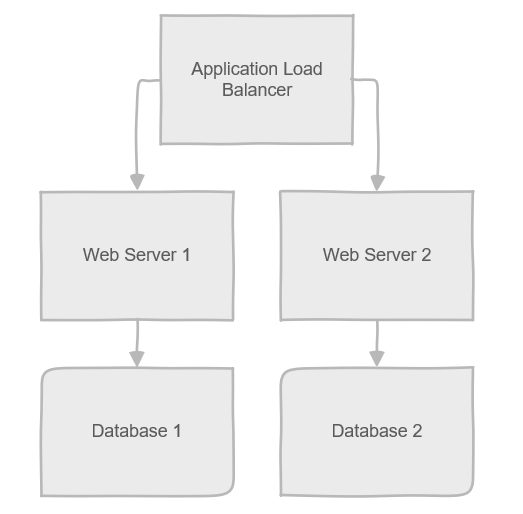
When a user makes a request to your application, they will be connected to one of your webservers, let’s say Web Server 1. When the user creates some data via your application, creating an account for example, the data will be stored in the database of the webserver they happened to connect to.
The next request they make, like navigating to the dashboard, might connect the user to Web Server 2. The database on Web Server 2 does not have the new account the user just created, so the user will receive an error or be prompted to create an account again.
The solution is to distribute the database to a central location that is separate from the web servers so that they both access the same data.
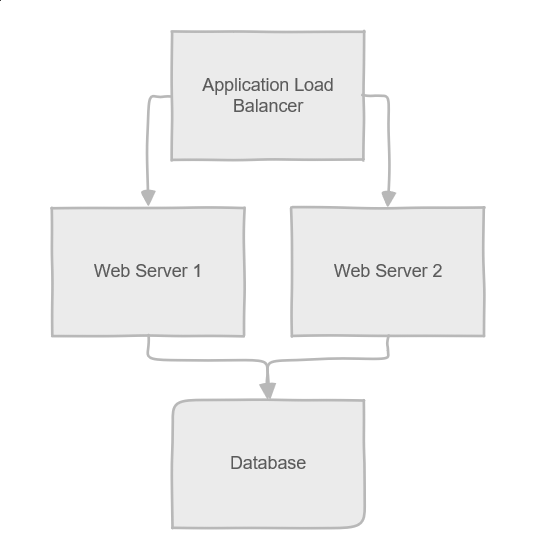
Now that you’ve distributed the database, both web servers will have access to the same data, regardless of which web server the user happens to connect to. This is the same issue and solution for Caching.
Distributed Caching
The default Laravel configuration will use the database as a distributed cache store. While this can work to have a distributed cache, it’s not ideal because it will dramatically increase the read/write load on the database server and basically defeats the purpose of caching - which is to avoid costly database reads for common requests.
Typical caching solutions are memcached and Redis. Both operate on the same principles. They are distributed memory stores that hold the data in memory rather than on disk like a database.
They are also key/value stores rather than relational or document stores. This means that information stored in the memory has only two “columns” - a unique identifier (the key) and the data to be stored (the value). The key is computed by your application in a standard format so that requests to the cache are looked up by the key or index, making for lightning-fast retrieval of information.
By centralizing your caching system, all web servers can access the same cache data for things like objects, sessions, queues, or anything else your application caches.
Distributed Cache with Redis on AWS ElastiCache
If you’re deploying your application to AWS, Amazon provides a host of services to scale your system on the cloud. For caching, you can either deploy and manage your own Redis server using EC2, or you can leverage the ElastiCache service to create managed Redis servers or clusters.
The advantage of using ElastiCache is that you don’t have to deal with the setup and maintenance of a Redis server. You also gain simple scalability and redundancy of the service. It makes it a lot easier to avoid a single point of failure in your caching system.
Like all things AWS, you pay a price for that convenience and, if you’re not careful, costs can skyrocket. The AWS web interface is notoriously confusing, the pricing opaque, and the setup wizards are geared toward steering you into overly expensive solutions. It’s important to have a partner who understands cloud infrastructure (let our infrastructure experts help!) to configure your services for the best performance:value ratio.
Serverless Redis
Intro
The default option for a new ElastiCache Redis instance is Serverless.
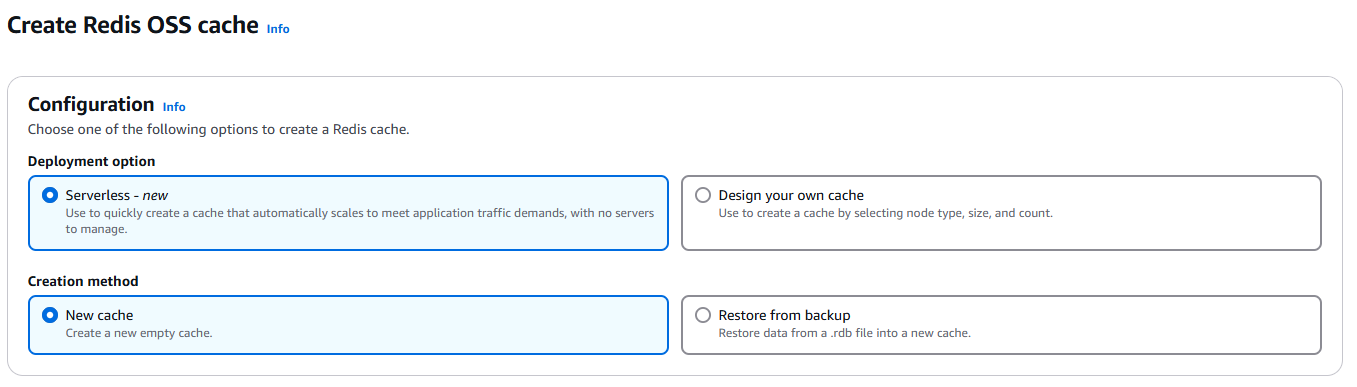
A serverless instance abstracts the actual compute resources away and instead automatically scales up and down capacity based on the workload. This can be a great solution for “bursty” workloads where you have many periods of low usage with occasional spikes in traffic. In that scenario, it avoids having to provision a server with enough resources to handle the worst case 24 hours per day when 22 of those hours have the server sitting mostly idle.
With serverless, you pay only for the ECPU units and Storage units actually being used at any given time. As mentioned, the pricing for this is opaque, and you’ll only really know the cost by trying it and monitoring the usage and billing. ECPU units are incredibly difficult to estimate.
Serverless Redis Quirks and Tips for Laravel
When you create a serverless Redis instance with ElastiCache, you’re actually creating a Redis Cluster. This is important and a little confusing because ElastiCache will present itself to your application as a non-clustered standalone instance. A serverless instance will also enforce Encryption in Transit, which means that you must connect to it using TLS.
This presents several problems for a Laravel application. The first one is simply establishing a working connection between your application and the serverless Redis instance.
By default, Laravel will connect to Redis without TLS because it’s more performant and works great if Redis is running on the same machine as the application - or on a private network where security isn’t a concern for communicating. With ElastiCache serverless, the hosts are outside your application network which is why TLS is enforced.
The solution for establishing a secure connection is simple, but the documentation on it is poor. All you need to do is prefix your Redis hostname with tls:// to get this working in Laravel.
So in your .env file for the project, you’d set the host like this:
REDIS_HOST=tls://example.serverless.use1.cache.amazonaws.comThen you can set your PORT and PASSWORD as you normally would.
Now that you’re connected, you should have a working distributed cache on Elasicache Serverless Redis.
BUT…
CROSSSLOT and MOVED Errors
You’re quickly going to start running into Redis errors in your application. These usually manifest themselves as a server error like the following:
CROSSSLOT Keys in request don't hash to the same slot
Or
ServerException(code: 0): MOVED
This is due to the fact that Redis is operating in a Cluster even though it appears to Laravel as a standalone instance. Basically what’s happening is that the cached data is being stored in Redis on any one of the clustered instances or SHARDS but Laravel doesn’t have a way to indicate what slot/shard to look for data in when it makes a cache read request.
The solution for this is to define and use a specific slot for the Laravel cache. You can do this by setting the REDIS_PREFIX environment variable in your .env file.
IMPORTANT: The value for this environment variable needs to be in a specific format that is poorly documented. Where normally you could set a prefix in a standard string format (e.g. REDIS_PREFIX=my-prefix), for a Redis cluster the prefix needs to be surrounded in curly braces to indicate a SLOT:
REDIS_PREFIX={my-prefix}This will now ensure your Laravel cache reads and writes will all be using the same SLOT and you’ll resolve the Redis errors in your application.
BUT THEN….
App Cache vs Session and Queue Cache Management
We’re getting somewhere! We should now have a working setup with Laravel and serverless Redis on AWS ElastiCache. Your app is running smoothly and you’ve solved the distributed cache, right?
Not quite. If your application uses any type of authentication or session-related functionality, we have a new problem.
Currently, your application will use the same cache store for all of your cached data including app cache, queues, sessions, and potential others. The result is that if you need to clear the application cache, after a deployment to production for instance, doing so will delete the session cache, queue cache, and anything else.
This means that all of your users will be logged out and you’ll delete any pending jobs on the queue. Not good!
Typically the solution to this with Redis is to set the Redis database index to different values for your application cache vs everything else. By default, a standalone Redis instance starts up 16 database slots, so setting your ‘default’ cache connection to 0 and your ‘cache’ connection to 1 in your config/database.php would separate the data out and when you cleared the app cache, everything else would be preserved.
        'default' => [
            'url' => env('REDIS_URL'),
            'host' => env('REDIS_HOST', '127.0.0.1'),
            'username' => env('REDIS_USERNAME'),
            'password' => env('REDIS_PASSWORD'),
            'port' => env('REDIS_PORT', '6379'),
            'database' => env('REDIS_DB', '0'),
        ],

        'cache' => [
            'url' => env('REDIS_URL'),
            'host' => env('REDIS_HOST', '127.0.0.1'),
            'username' => env('REDIS_USERNAME'),
            'password' => env('REDIS_PASSWORD'),
            'port' => env('REDIS_PORT', '6379'),
            'database' => env('REDIS_CACHE_DB', '1'),
        ],
However, a clustered Redis instance ONLY has a single database at index 0 causing this solution to fail on the serverless Redis setup.
The next logical step to solve this issue would be to use different REDIS_PREFIX values for the different SLOTS we want to store our data in. However, this ends up being a problem not reasonably solved in Laravel 11.x.
While you can set those values, the Laravel cache system DOES NOT use them when clearing the cache. This means that clearing the app cache will still clear everything.
You could write a custom cache-clearing function and artisan command for this, but that too is problematic. The end result of that function would be a full scan of every object in the cache searching for your matching prefix. You’d then take the returned list of matching objects and iterate over them to delete them by key from the cache one by one. Your cache store can easily contain tens of thousands of records, millions even, making this operation an incredible performance problem.
For that reason, as of this writing, a single serverless Redis instance on AWS ElastiCache is a non-starter for most Laravel applications.
The Required Solution for Serverless
Given that almost all Laravel applications rely on sessions and queues, you’re going to need to solve the app cache vs session and queue data issue.
To do this while still utilizing the ElastiCache Serverless Redis service, you’re going to have to create two separate serverless clusters. Then, in combination with the steps above, you’ll be able to set different Redis connections for your app cache and everything else. This way when you clear the application cache, all of your other cache data will persist since it lives in an entirely different Redis cluster.
This is a perfectly good solution for large applications that make heavy use of caching and have the budget to support, at minimum, several hundred dollars per month in ElastiCache fees. You’ll have a performant, scalable, and redundant caching infrastructure.
The reality, though, is that relatively few applications require that type of cost and scale. For everyone else, there is traditional Redis.
Traditional Redis Instance
Intro
Traditional Redis is a non-clustered standalone Redis instance, and the most commonly used Redis deployment. Redis runs on a single server that you provision with enough capacity to handle your workload.
The simplest option for this is to set up a non-clustered Redis instance with 0 replicas. This will mimic the standard Redis setup you get when running Redis locally alongside your Laravel app, except it will be a distributed store that all web servers will share. This also provides the best interaction from Laravel, and solves the app cache vs session cache issue easily by using separate database indexes.
The AWS interface buries this option under confusing labels, most notably one called “cluster cache.” But here’s how to reach it:
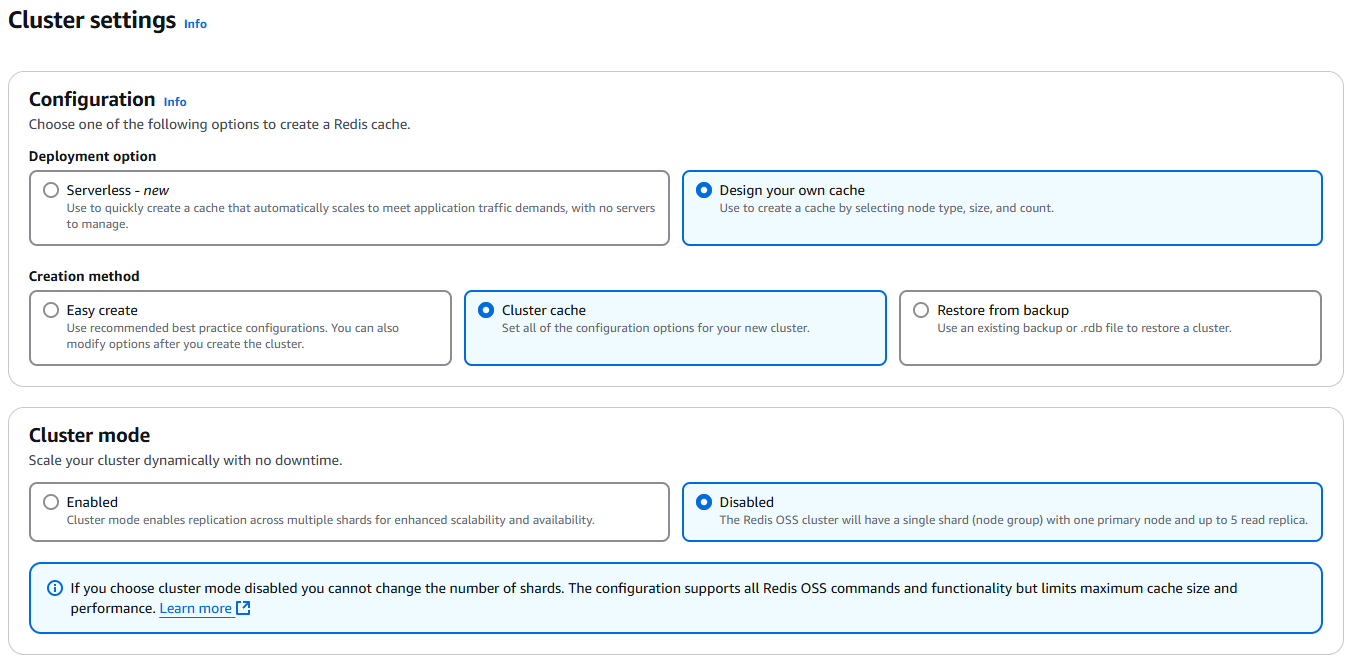

Be sure to size your Node Type appropriately - the default recommendation is very large and expensive! Setting the Number of replicas to 0 will force the instance to act as a single standard Redis instance.
Unlike serverless, you’ll have a known fixed cost for your node based on the Node Type you choose. In this example, a cache.t4g.small instance is about $22 a month. You can view node-type pricing here. If you add replicas, multiply the instance cost by the number of replicas.
Note: Encryption in transit is optional for this setup in Step 2 of the wizard. If you enable it, refer to the details on establishing a TLS connection to Redis from Laravel.
This is essentially the same thing as deploying your own EC2 instance with Redis on it, but with the advantage of not having to install and configure Redis on your own.
If you use Laravel Forge, you can deploy a Cache server to AWS that creates an EC2 instance and takes care of the installation and setup for you.
App Cache vs Session and Queue Cache Management
As mentioned in the serverless section, we need to separate our app cache from our session and queue cache to avoid clearing everything, logging out users, and losing queue jobs when we need to clear the application cache.
Where this technique failed using the serverless cluster, it works perfectly in a traditional Redis instance.
In your Laravel app, in the config/database.php file, you can modify the Redis driver to define ‘cache’ connection and a ‘default’ connection which both point to the same Redis instance but use a different database index.
'redis' => [

        'client' => env('REDIS_CLIENT', 'phpredis'),

        'options' => [
            'cluster' => env('REDIS_CLUSTER', 'redis'),
            'prefix' => env('REDIS_PREFIX', Str::slug(env('APP_NAME', 'laravel'), '_').'_database_'),
        ],

        'default' => [
            'url' => env('REDIS_URL'),
            'host' => env('REDIS_HOST', '127.0.0.1'),
            'username' => env('REDIS_USERNAME'),
            'password' => env('REDIS_PASSWORD'),
            'port' => env('REDIS_PORT', '6379'),
            'database' => env('REDIS_DB', '0'),
        ],

        'cache' => [
            'url' => env('REDIS_URL'),
            'host' => env('REDIS_HOST', '127.0.0.1'),
            'username' => env('REDIS_USERNAME'),
            'password' => env('REDIS_PASSWORD'),
            'port' => env('REDIS_PORT', '6379'),
            'database' => env('REDIS_CACHE_DB', '1'),
        ],

    ],
By default, the application cache will use the ‘cache’ connection, and everything else will use the ‘default’ connection. You could further split out connections and databases if desired for jobs, sessions, or whatever, but this basic setup will take care of our main issue.
Redundancy and Scalability
With traditional Redis, we’ve taken the simplified route and have a working distributed cache system for our application. What we don’t have now is redundancy and scalability for our Redis service.
Redundancy
To achieve redundancy in the event your Redis instance goes offline, you can add one or more read replicas to your instance. This is something that ElastiCache is a great help for.
When you have more than a single instance, ElastiCache will create a “cluster” of your instances, which is confusing because they will not be operating in cluster mode. Instead, it will provide a single endpoint to your instances and act like a load balancer. If one of your Redis instances goes offline, a healthy instance from your replica pool will be promoted to become the main Redis instance and all requests will connect to that instance instead - meaning your application will not error.
This does not help with scalability, however, as your writes only go to one main Redis instance and reads are not distributed to read-only replicas (without some complicated changes to both infrastructure and your code).
Scalability
Because our Redis instance is only running on a single main node, our scalability is restricted to the capacity of the node type we chose during setup. For this reason, it’s important to choose a node type that has enough overhead to handle spikes and increasing traffic, without going overboard and drastically over-provisioning the instance.
If your setup has reached its limits, you can easily resize your node type by modifying your ElastiCache instance.
If you reach the limits of what a single Redis instance can allow for (it would be a lot!) then it’s time to revisit the Redis cluster option and all of the complexity that comes with it. If you reach that point, however, you’ll likely have an entire engineering team. 🙂
Conclusion
Developing a distributed and scalable caching architecture is essential for the majority of applications. Every situation has its unique requirements, and knowing the best way to balance performance and cost to achieve the greatest value is complicated.
Let the expert engineers at Cypress North help you design and implement your solution.
2 Comments
Leave a Reply
Meet the Author

Matthew Mombrea
Matt is our Chief Technology Officer and one of the founders of our agency. He started Cypress North in 2010 with Greg Finn, and now leads our Buffalo office. As the head of our development team, Matt oversees all of our technical strategy and software and systems design efforts.
With more than 19 years of software engineering experience, Matt has the knowledge and expertise to help our clients find solutions that will solve their problems and help them reach their goals. He is dedicated to doing things the right way and finding the right custom solution for each client, all while accounting for long-term maintainability and technical debt.
Matt is a Buffalo native and graduated from St. Bonaventure University, where he studied computer science.
When he’s not at work, Matt enjoys spending time with his kids and his dog. He also likes to golf, snowboard, and roast coffee.
Related Resources

How to Run a Laravel Application With Reverb in an Azure Web App
We’ve been building a lot more Laravel applications over the past few years at Cypress North. Our software engineers find the platform to be very efficient and robust, and it’s increasingly becoming a good fit for our clients' custom software […]
Matt - This was an excellent reference on use of ElastiCache with Laravel. We are currently deployed on Vapor and letting Vapor manage these bits for us, but much of that is very opaque. We would like to use the cache for Session data, but every once in a while, we pull out the Cache::flush(): hammer and don't want to blow out Session (let alone queue!) data...Your article directly addressed these issues and cogently described the pros and cons of clusters vs single instances and the implications.
We're also looking at Laravel Cloud and the serverless pgSQL from Neon - Right now, though, Vapor is the devil we know and we may pick and choose with what we learned from LC, e.g., we're on Aurora Serverless MySQL and getting killed on costs - We think PostgreSQL via Neon on Vapor may be the hot setup.
Have you ever used/deployed ElastiCache ValKey with Laravel? Is it truly a cost-reduced drop-in replacement for ElastiCache on Laravel using Redis drivers??
Thank you for this extremely thoughtful and well-written reference.
Hey John, thanks for the note! Regarding ValKey, we have not deployed it in production but it does seem to be a straight swap for Redis. If you use the serverless OSS cache, it's certainly worth exploring for cost savings. If you use the custom configuration and your requirements only need a small node type, the cost is low enough that we just stick to Redis.