How to Use Adobe Acrobat Pro DC to Make Interactive PDFs For Inbound Marketing


Creating unique downloads for your content marketing campaign can be a struggle.
With millions of resources available online, how can you distinguish your downloads from the assets your competitors are providing?
By making them interactive of course! You can unlock a world of possibilities for creative, useful, downloadable inbound marketing content using Adobe Acrobat Pro DC.
In this post, I’ll provide three examples and tutorials for creating interactive marketing assets, specifically PDF downloads, that can be downloaded directly from a landing page or be gated to generate leads. These examples can be added to existing PDFs for extra spice, or can be created from scratch. All will be created using the Adobe Acrobat Pro DC software.
First, a quick refresher on content marketing so we’re all up to speed.
Content marketing provides a clearly defined pool of potential customers with valuable content in the hopes of driving sales for your business or organization. Having a clearly defined audience, a strategic campaign cadence, and high quality downloads to offer to prospects are all key components of content marketing. Today we are going to be focused specifically on the download portion of the equation. We'll be covering:
How to Use Adobe Acrobat Pro DC
Adobe Acrobat DC is a collaborative PDF solution that allows you to create and edit PDF documents. There are different packages available, but here at Cypress North we use Adobe Pro DC which costs about $14 USD per month. This is the complete Adobe package, and it includes all tools and functionalities needed to create PDFs on any device or operating system (to an extent).
Before we walk through how to use Adobe Acrobat Pro DC, there’s some caveats that we should cover first.
For starters, certain features available in Adobe Acrobat PDFs are not compatible with iOS PDF viewers like Apple’s Preview app. This will prevent some form fields from showing in Preview. The best way to get around this is to open the PDF in Adobe Reader or in a web browser.
Another caveat is that not all browsers are able to open PDFs. Chrome, Microsoft Edge, Opera, and Internet Explorer are all able to open PDFs with similar functionality to that of Adobe Reader. Even so, do your research to make sure that your content is accessible for everyone, and provide information on how to open your PDF to ensure that readers can see your content.
Now let’s get started with Adobe Acrobat Pro DC.
Once you’ve acquired access to the software, you need to upload the file you’re working with by going to File → Open → and then select the correct file from your computer.
For the purposes of our tutorials, we’ll be using the “Prepare Form” tool.
To download this tool, go to “Tools” in the main nav.

Underneath “Forms & Signatures”, select “Add” under “Prepare Form”. (I already have the tool downloaded on my computer so my screenshot says “Open”.)

If you already have this tool installed, go to the side bar on the right of your PDF file and select “Prepare Form”. From here Adobe will have to scan your document, so click on the blue “Start” button.

Now that you’re using the correct tool, you’ll notice that a second toolbar has appeared with different symbols at the top of the PDF document. The only features we’ll be using are the mouse pointer module and the text field module. The mouse pointer allows you to click/select different PDF elements, and the text field module allows you to add calculated fields which we’ll be covering next.
To add a text field onto your PDF, you’ll click on the text field module and then click again to drop the field onto the file in the desired position, similar to adding shapes in Microsoft Word. To edit a text field, you’ll need to go to Text Field Properties by double clicking on the text field.

In this tutorial, we’ll be using the General, Appearance, Options, Format, Validate, and Calculate tabs.
- General:
- Under general, you can rename your text field, as well as set permissions for the field
- Appearance:
- Change the style of the text field
- Options:
- Change the alignment of the text within the field, and provide a default value
- Format:
- Edit the text field format (number, percentage, date, etc.)
- Validate:
- Validate text field inputs and generate pop-up error messages. For example, if you didn’t want users to enter a value less than 10, you could set this restriction here
- Calculate:
- This is where we will be creating calculated fields
JavaScript For Adobe Acrobat PDFs
To create our calculated fields, we will be using JavaScript for Adobe Acrobat. However, you do not need to know how to code to follow this tutorial.
We’ll primarily be using basic JavaScript fundamentals including:
- Assigning variables
- If statements (>, <, >=, <=)
- Basic math calculations (+, -, *, /)
The scripts we create will be entered into the Validate and Calculate tabs in Text Field Settings. Adobe executes validation scripts first before calculation scripts, which means that it will check to see if the input is valid before running the calculation.
JavaScript in Adobe Acrobat DC does differ slightly from using JavaScript in other applications. If you’d like to learn more about using JavaScript in Adobe Acrobat DC, you can view the scripting references guide from Adobe here.
Interactive Marketing Download Ideas
Now that we’ve covered how to get started with Adobe Acrobat Pro, it’s time for the fun part.
Let’s get into our specific examples. Keep in mind, these examples have been oversimplified to make the concepts easier to explain and understand. Focus on the actual process of building the PDFs, not on how improbable (or lame) my fictional companies are.
I also recommend that you read through each example instead of skipping around this post. The examples are purposely ordered by difficulty, starting with the easiest example, so you should follow the flow to make sure you don’t miss any information.
A. Make An Estimate Calculator with Adobe Acrobat Pro DC
Problem:
Let’s say you work at a large software company. Your company offers several different types of software packages and custom solutions, so your pricing information is not available on your website. To give prospects a better idea of how much they could be spending on a package, you want to create a downloadable tool that will provide a rough estimate. However, not everyone will pay the same price, so there’s no way to list out all possible price points in one PDF.
Criteria:
- Prospect must have at least 1 user, 5 computers, and 0 mobile phones. Mobile phones are not required.
- Inputs must be whole numbers only.
| Cost | Input Field |
| $0.50 | User |
| $1.25 | Desktop Computer |
| $2.75 | Mobile Phone |
Tutorial:
View the blank PDF file here
Formatting:
- First, I’ll drag and drop all of my text fields over the white and green boxes in my PDF.
- Next, I’ll double click on each text field to open up Text Field Properties. Under the General tab, I can rename the fields from Text2 or Text3 to something that adequately reflects the field. Then I’ll hit close at the bottom.

| Text Field | Name |
| Number of Users | users |
| Number of Desktop Computers | computers |
| Number of Mobile Phones | phones |
| Your Monthly Estimate | monthly_estimate |
- Now I'll go to the Appearance tab and edit the font size to 18 and the font to Helvetica Bold for each field.

- Next, I’ll go to the Options tab and change the alignment dropdown to Center for all fields. Then I’ll set the default value for users to 1, and the default value for computers to 5 based on the criteria we were given at the beginning of the problem. This doesn’t restrict my field input, I need to do that in the Validate tab.

- We want the format for each field to be a number with no decimal places (except for monthly_estimate) so I’ll go to the Format tab → Select format category → and change the format category to “Number” and the number of decimal places to 0.
- For monthly_estimate, I’ll change the format category to “number” with 2 decimal places. Then I’ll set the currency symbol to $ for USD (see the screenshot below).

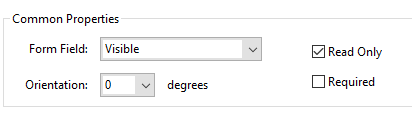
- Finally, we need to make sure that our users can’t edit our calculated field (monthly_estimate). To do this I’ll just check the “Read Only” checkbox on the General Tab.
- For the users and computers input fields, I’ll leave “Read Only” unchecked, and I’ll check “Required” instead. I won’t check anything for phones since our users don’t technically have to have any mobile phones to get an estimate. Required field names will turn red in edit mode.

Validation:
- First, I need to make sure that users enter at least 1 user, at least 5 computers, and at least 0 mobile phones.
- To do this, I’ll go to the Validate tab → then check the radio button for “Run custom validation script” and select “Edit” to open the JavaScript Editor.
- Then I’ll copy and paste the correct script for each field into the JavaScript Editor:
- users field:
- If users try to add less than 1 user, an error message will pop-up on the screen that says “Number of users cannot be less than 1. Please try again.” This lets the user know that they made a mistake and need to adjust their input.
if (event.value < 1) {
app.alert("Number of users cannot be less than 1. Please try again.");
event.rc = false;
}- computers field:
if (event.value < 5) {
app.alert("Number of desktop computers cannot be less than 5. Please try again.");
event.rc = false;
}- phones field:
if (event.value < 0) {
app.alert("Number of mobile phones cannot be less than 0. Please try again.");
event.rc = false;
}
- Users, computers, and mobile phones must be whole numbers. You cannot have 1.5 of a computer. The following script from this Adobe help forum can be used in each field (users, computers, phones) to make sure that users are only entering whole numbers. If they didn't, the error pop-up message "Please enter a whole number." will appear.
- For more information on this script, please visit this Adobe forum.
if (event.value) {
    event.rc = /^\d+,?\d*$/.test(event.value) || /,$/.test(event.value);
    if (!event.rc) app.alert("Please enter a whole number.");
}
This is what the users Validation JavaScript Editor should look like:

Calculations:
- Finally! This is the best part. We need to make all the fields we created work together to calculate an estimate.
- First I’ll go to the Calculate tab under Text Field Properties, and check the “Custom calculation script” radio button. Then I’ll click on “Edit” to open the JavaScript Editor.
- I’ll then enter the following code:
this.getField("monthly_estimate").value=((this.getField("users").value)*0.5)+((this.getField("computers").value)*1.25)+((this.getField("phones").value)*2.75);- In the above script I set the monthly_estimate field equal to each field value multiplied by their respective cost.
- In Adobe Acrobat, you use this.getField to retrieve field inputs and map them to a JavaScript variable. The .value portion of the code will set the calculated value of monthly_estimate to the value of the equation.
This is what the Calculation JavaScript Editor should look like:

Yay! We're finished with this PDF file.
B. Cost Savings Calculator with Adobe Acrobat Pro DC
Problem:
You are hosting a trade show and need to spread the word. To get more companies interested in attending, you decide to create a downloadable PDF highlighting the benefits of attending. You are also offering a discount, and would like these companies to have the ability to calculate their cost savings to encourage them to sign up earlier.
Criteria:
- The trade show runs for 3 days.
- Admission is $50 per day, per attendee.
- Without the discount, attendees cost $1,000 each regardless of how many each company brings.
- Companies must bring at least 1 attendee, but cannot bring more than 50 attendees.
- Inputs must be whole numbers only.
| Number of Attendees | Cost Per Attendee |
| Less than 10 | $950 |
| Less than 20 | $800 |
| 50 or less | $600 |
Tutorial:
View the blank PDF file here
Formatting:
- First, I’ll drag and drop text fields over all of our green and white boxes.
- Next, I’ll rename all of our text fields:
| Text Field | Name |
| Number of Attendees | attendees |
| Number of Days Attending | days |
| Your Discount | discount |
| Cost Without Discount | total_cost |
| Your Cost Savings | cost_savings |
- Now I’ll navigate to the Appearance tab of Text Field Properties and change the font size to 18, and the font to Arial Black for each field.

- After I’ve determined how I’d like the font to look, I need to move to the Options tab to change the alignment of the font, and to set a default value.
- For all text fields, I want the alignment to be set to Center.
- For the attendees text field, I want to set the default value to 1 since at least 1 attendee is required.
- For the days text field, I will set the default value to 3 since that is how long the trade show runs for.

- Finally, I need to format all of the text fields. In Text Field Properties, I’ll click on the Format tab.
- For the users and days fields, I will set the format category to “Number”, and the number of decimal places to 0.
- For the discount field, I will set the format category to “Percentage”, and the number of decimal places to 2.
- I’ll then set the total_cost and cost_savings fields to “Number” format, and will change the currency symbol to $ for USD, keeping the default 2 decimal places.
- As we did in Example A, we need to make sure that users can’t edit our calculated fields (discount, total_cost, and cost_savings). To do this, I’ll check the “Read Only” checkbox under the General tab in Text Field Properties. I also need to make attendees and days required in the same view.
Validation:
- First, I need to make sure that users input at least 1 attendee, with a maximum of 50 attendees. To do this, I’ll navigate to the Validate tab under Text Field Properties, and check the radio button for “Run custom validation script”. Then select “Edit”
- In the JavaScript Editor, I'll enter the following script:
if (event.value < 1) {
app.alert("Number of attendees must be between 1 and 50. Please try again.");
event.rc = false;
}
else if (event.value >= 51) {
app.alert("Number of attendees must be between 1 and 50. Please try again.");
event.rc = false;
}
The first if statement prevents users from entering a value less than 1 by providing a pop-up error message that says “Number of attendees must be between 1 and 50. Please try again.” The second if statement prevents users from entering a value greater than or equal to 51. The same error message will appear if users enter a value greater than 50.
- Validation scripts for the days field use the same code and operate the same way as the attendees field validation, but I’ll sub 51 for 4, since the trade show runs for a maximum of 3 days.
if (event.value < 1) {
app.alert("Number of days attending must be between 1 and 3. Please try again.");
event.rc = false;
}
else if (event.value >= 4) {
app.alert("Number of days attending must be between 1 and 3. Please try again.");
event.rc = false;
}- Now I want to make sure that users can only enter whole numbers for both attendees and days. I used the same code in Example A, but here’s a quick refresher:
- For more information on this script, please visit this Adobe forum.
if (event.value) {
    event.rc = /^\d+,?\d*$/.test(event.value) || /,$/.test(event.value);
    if (!event.rc) app.alert("Please enter a whole number.");
}- This validation script checks to see if the user input a whole number. If they didn’t, an error pop-up message will appear saying “Please enter a whole number.”
This is what the attendees field looks like after entering our validation scripts:

Calculations:
- Now I need to calculate our outputs. Before I work on the discount field, I should calculate the total_cost and the cost_savings fields. Let’s start with the total_cost field.
- First I’ll open the Text Field Properties for total_cost and navigate to the Calculate tab. Then I’ll check the radio button for “Custom calculation script”, and select “Edit”
- In the JavaScript Editor box, I’ll enter the following code:
var a = this.getField("attendees").value;
var d = this.getField("days").value;
var c = this.getField("total_cost").value;

c=(a*1000)+(a*(d*50));

this.getField("total_cost").value = c;- Because there are so many different inputs and text fields we’re working with, I set variables (var) to make the fields easier to work with.
- The variables can be called anything you want as long as they don’t conflict with the code itself (for example, you cannot name a variable getField).
- The second part of the code is the actual calculation: c=(a*1000)+(a*(d*50));
- The final part of the code sets the total_cost field equal to variable c, or the total cost value I just calculated, so that the value can appear in the output box in our PDF.
- Now I’ll move on to the cost_savings field.
- In the JavaScript Editor box, we’ll enter the following code:
var a = this.getField("attendees").value;
var d = this.getField("days").value;
var c = this.getField("total_cost").value;
var s = this.getField("cost_savings").value;

if (a < 10) {
s=c-((a*950)+(a*(d*50)));
}

else if (a < 20) {
s=c-((a*800)+(a*(d*50)));
}

else if (a <= 50) {
s=c-((a*600)+(a*(d*50)));
}
else {
s="Error, try again.";
}

this.getField("cost_savings").value = s;- At the top part of the script, I set all of our variables (same as total_cost above). The only difference here is that I added a variable for cost_savings (var s).
- My calculations are inside of if statements this time, since the calculation depends on the number of attendees the user enters. For example, if the user enters less than 10 attendees, each attendee will cost $950. I calculated the discounted cost for each attendee and added that to the $50/day application fee. To get the cost savings, I then subtracted the discounted cost from the total cost (var c) calculated in the step above.
- I also added an error message here, so if for some reason the code doesn’t work, the text “Error, try again” will appear in the cost_savings field to alert the user that there is a problem.
- For the last step, I need to calculate the discount.
- Generally, discounts can be calculated by dividing the sale price from the original price and subtracting that value by 1.
- To calculate this using our script, we can divide our cost_savings field by the total_cost to determine the percent discount.
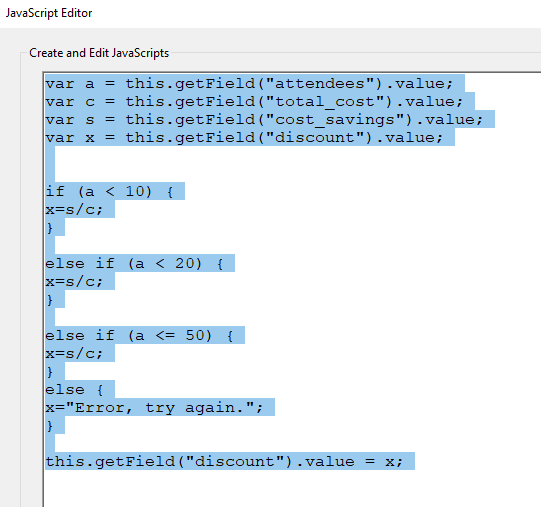
var a = this.getField("attendees").value;
var c = this.getField("total_cost").value;
var s = this.getField("cost_savings").value;
var x = this.getField("discount").value;

if (a < 10) {
x=s/c;
}
else if (a < 20) {
x=s/c;
}
else if (a <= 50) {
x=s/c;
}
else {
x="Error, try again.";
}

this.getField("discount").value = x;
This is what my script looks like in the JavaScript Editor:
Hooray! We’ve finished this example too, onto the next one!
C. Calculate & Return Text with Adobe Acrobat Pro DC
Problem:
You are trying to get companies to sign up for corporate credit cards. To get employees to sign up you are running a promotion where you will give them a certain number of rewards points back for every dollar amount spent. Ideally, you’d like to show them the number of points they’d earn and what membership level they would reach.
Criteria:
- Our input can’t be a negative number - you can’t spend a negative amount of money with a credit card.
- Amount spent can be up to $10,000, anything more than that and the company has maxed out their credit card!
- Once a user surpasses $500, they will start to accumulate rewards points. Rewards points are calculated based on the amount spent in the chart below and are rounded up to the nearest whole number. For example, if I spend $1500.25, I will have accumulated 901 points.
| Amount Spent | Rewards Calculation | Output |
| $500 or less | N/A | No points yet, spend more to get more! |
| $1000 or less | 0.5 * amount spent = points | X points, Bronze Rewards Member |
| $5000 or less | 0.6 * amount spent = points | X points, Silver Rewards Member |
| $10000 or less | 0.65 * amount spent = points | X points, Gold Rewards Member |
Tutorial:
View the blank PDF file here
Formatting:
- First I’ll set up my text fields:
| Text Field | Name |
| Anticipated Amount Spent | amount_spent |
| Rewards Points | rewards_points |

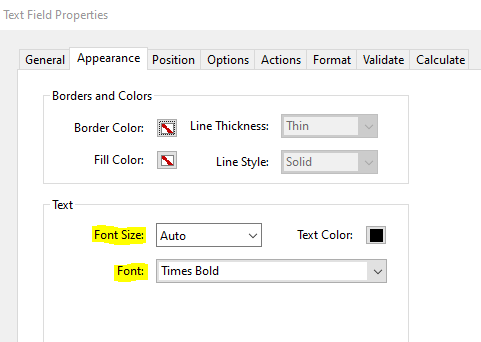
- Next I’ll navigate to the Appearance tab under Text Field Properties to change the font and font size for both amount_spent and rewards_points. This time I’ll use “auto” for the font size and “Times Bold” for the font style
- Now I’ll navigate to the Options tab and change the alignment from “Left” to “Center” for both text fields.

- Since the amount_spent field should be a dollar amount, I’ll change the format category to “Number” under the Format tab. I should have 2 decimal places and use the currency symbol $ for USD.

- The rewards_points field will return both text and numeric values, so I’ll leave the format as is.
Validation:
- To make sure users aren’t entering more than $10k in the amount_spent field, I need to create a validation script similar to the ones in the previous examples above.
- First I’ll open up the Validate tab for the amount_spent field and check the radio button for “Run custom validation script”. Then click “Edit”.
- In the JavaScript Editor box that opens up enter the following script:
if (event.value < 0) {
app.alert("Amount spent must be between $0 and $10k. Please try again.");
event.rc = false;
}
else if (event.value > 10000) {
app.alert("Amount spent must be between $0 and $10k. Please try again.");
event.rc = false;
}- This script will prevent the user from entering a number outside the $0 to $10k range, and will alert them to enter a different value with a pop-up message (“Amount spent must be between $0 and $10k. Please try again.”).
Calculations:
- Now I need to calculate the user’s membership status and the number of rewards points they’ve earned!
- I’ll open up Text Field Properties for the rewards_points field and navigate to the Calculations tab. Then I’ll check “Custom calculation script” and click on “Edit” to open the JavaScript Editor box.
- In the box I’ll paste the following script:
var a = this.getField("amount_spent").value;
var r = this.getField("rewards_points").value;


if (a <= 500) {
r="No points yet, spend more to get more!";
}
else if (a <= 1000) {
event.value = util.printf("% 0.0f",Math.ceil(a*0.5))+" points, Bronze Rewards Member";
}
else if (a <= 5000) {
event.value = util.printf("% 0.0f",Math.ceil(a*0.6))+" points, Silver Rewards Member";
}
else if (a <= 10000) {
event.value = util.printf("% 0.0f",Math.ceil(a*0.65))+" points, Gold Rewards Member";
}
else {
r="Error, try again.";
}

this.getField("rewards_points").value = r;- At the top of the code I set my variables as explained in the above examples. var r is for rewards_points, and var a is for amount_spent.
- Next, I’ll use if statements to determine the amount the user entered into the amount_spent field.
- If they entered $500 or less, a message pops up in the rewards_points field. No rewards points were earned.
- If they entered $1000 or less, the rewards points are calculated (a * 0.5) and are rounded up to the nearest whole number (Math.ceil). For integers, you should use Math.round instead.
- util.printf(“% 0.0f” formats the field and will pull the numeric calculation (a * 0.5) into total_spent without decimal points. The Adobe scripting reference has an additional example of this on page 220.
- +" points, Bronze Rewards Member" adds the text string onto the end of our numeric calculation.
- The remaining if statements operate much the same way. The else { statement at the end will return an error message if for some reason none of the other if statements are true.
- this.getField(“rewards_points”).value = r; will pull the correct if statement result into the rewards_points field.
My calculation looks like this in the JavaScript Editor:

Did you enjoy these tutorials? Fill out the form below and have the finished PDF files for Examples B and C sent directly to your inbox!
As demonstrated in the above examples, there is a lot you can do with PDFs - and we’re just skimming the surface! Content creation can be difficult for any digital marketer, and B2B marketing has its own set of challenges. We hope this gave you some good marketing content ideas and that you enjoyed learning more about using Adobe Acrobat Pro DC, creating JavaScript calculations and validations in PDFs, and building interactive marketing downloads. For help with more B2B marketing challenges, check out our comprehensive guide here.
If you’re looking for unique ideas for content creation or Adobe Acrobat help - let us know! We’d love to hear from you.
For more content ideas, tutorials, and digital marketing tips explore our Blog, check out our Expert Marketing Guides, or visit our Tutorials Library. Thanks for reading!
Meet the Author

Kathleen Hagelberger
Kathleen is a Senior Digital Marketing Manager who joined Cypress North in July 2019 and works out of our Buffalo office. Known by coworkers and clients alike as Kbergs, Kathleen is an SEO specialist who brings more than four years of experience to our digital marketing team. Some of her daily responsibilities include monitoring organic traffic for clients and reporting on what she finds, putting together site plans, helping with new site launches, project management, and other SEO projects. She also makes occasional guest host appearances on our Marketing O’Clock podcast.
Before joining Cypress North, Kathleen gained professional experience through internships with Genesee Regional Bank and TJX Companies, Inc. She has earned her Google UX Design certificate, Google Analytics 4 certification, and HubSpot Content Marketing certification.
Originally from Attica, Kathleen graduated from the Rochester Institute of Technology with bachelor's degrees in new media marketing and management information systems.
Outside of work, Kathleen is on the volunteer committee for Erie County's Walk to End Alzheimer's chapter. She also serves as the Vice President of Public Relations for one of the Buffalo chapters of Toastmasters.
In her downtime, Kathleen enjoys taking dance classes like tap and jazz and fitness classes in general. She also likes going to the beach, trying new restaurants, reading, watching 80s movies, and Marie Kondo-ing her apartment.
Related Resources

How to Improve Your Content With Conversational Writing
Looking to boost your web content writing? A conversational writing style can help you develop better connections with your audience and get your message across more effectively.

B2B Marketing With the Rise of Gen Z: Navigating the Digital Native Workforce
Explore the unique challenges & opportunities of marketing to Gen Z in the B2B space. Discover how these digital natives are reshaping the professional world & what it means for marketing strategies. Stay ahead in the era of Gen Z with expert insights.

What Do ChatGPT & Other AI Mean for Content Writers?
With ChatGPT taking the internet by storm, should content writers be concerned? Here’s everything writers should consider.

A Marketer’s Website Launch Checklist
SEO, Google Tag Manager Tracking, & Content Planning for a New Website There’s nothing quite like launching a beautiful, brand new website, but it is something that can have ugly consequences if not performed correctly. While marketers aren’t typically responsible […]

SEO for PDFs - How To Optimize PDFs For The Web
Let’s face it, for some companies Portable Document Formats (PDFs) are an unfortunate necessity. From sell sheets and downloadable product flyers, to manuals and tutorials - PDFs have secured a spot in our lives, and there are some tips and […]

Why You Shouldn’t Overlook LinkedIn Video Ads For Your B2B Marketing Strategy
LinkedIn Ads is certainly not the first place B2B marketers think to spend their video budget, but it should be! Yes, I know. LinkedIn at face value is a pricey platform in general. However, I’ve found LinkedIn Video Ads are […]

How to Use Your CRM for More Effective Advertising and Digital Marketing
Think a digital marketer’s job is done after the conversion? Think again. Performance-based advertising and digital marketing aren’t just about generating traffic and conversions. It’s also about driving quality. It’s about producing a return. It’s about being able to directly […]

5 Simple Tips For Lowering Costs in Linkedin Ad Campaigns
These seemingly small, easy to overlook best practices will lower your ad spend and CPA. As many seasoned B2B advertisers know, LinkedIn’s powerful professional targeting and niche audience segmentation is hard to beat for business advertising. But if you’re a […]

Should You Hire A Digital Marketing Agency or Hire In-House: An Unbiased Breakdown
Many small businesses (SMBs) hit that point of growth where they know that they need digital marketing help. That is non-negotiable. But is it better to hire an in-house digital marketers or use an agency? This is an important conversation that we have fairly frequently, so we set out to make the ultimate list of pros and cons of hiring a digital marketing agency.

What Is CRM Retargeting and Why Is It a Necessity for B2B Digital Marketing?
Most marketers and internet users alike are familiar with the concept of web retargeting: the practice of serving ads to internet users based on how they’re interacted with your company’s website. However, far too many people are unfamiliar with CRM […]

Best Digital Marketing Podcasts
Whether you're focused on SEO, PPC, social media, content, or affiliate marketing, podcasts are a great way to stay competitive in the dynamic digital marketing landscape. Finding a reliable program to consume from your car, desk, or treadmill allows you […]

Precisely Target Your Ideal B2B LinkedIn Audience With One Powerful Tool
LinkedIn is an incredible tool for B2B marketers due to its unique targeting; namely professional information like job titles and company industries. I’m sure you’ve spent precious time crafting your audiences, but targeting is just the beginning. Arguably, audience exclusions […]

Time Flies & Terrible Lies: July Content Marketing Ideas...NOT
Sooooo, remember last month when I said: Come back again next month for some July-inspired content marketing ideas you can really sink your teeth into... you know, as if you were a T-Rex or something. Well, it appears that I […]

Candy, Cabins & Color TV: June-ified Content Marketing Ideas
Ermagerd! June is almost upon us. Is your editorial calendar up to snuff? If you waited until the last minute to plan out your content marketing for the month, you're in luck! We're here with our helpful post, just in […]

Packrats, Playoffs & Plenty Of Flowers: May Content Marketing Inspiration
Hey you! Did you know that in just one day... Boy I love that gif. It's been a pretty popular one around our office this week, you know, since it's the best way to ring in the month of May […]

Fools, Frogs & Furious 7: April Content Marketing Ideas
For those of you that spent the last month crying over my lack of content marketing post (just kidding, I love you all and appreciate that you were saddened by my absence), I have big news for you... I'M BACK […]

Friendship, Fat Tuesday & The Fish Bowl: Content Marketing Inspiration For February
Dear February, Just because you have less days than everyone else doesn't mean you're any less of a month. In fact, what I love so much about you is that you're just as chuck-full-o-nonsensical (and serious) observances as all the […]

Bubble Wrap, Bubble Baths & Belly Laughs: Content Marketing In January Fashion
The new year is fast approaching, and you know what that means... a brand new content marketing strategy for 2015! As you've likely gathered, we love nothing more than inspiring you to make great content. Baby New Year comes complete with […]

Crosswords, Cookie Cutters & Christmas: December Content Marketing Inspiration
Can you believe it's already December (almost)? My, how time flies. If you're like me, the falling snow and impending year-end can feel like a blessing and a curse at the same time. On one hand, things are slowing down […]

Peanut Butter, Puzzles & One Big Parade: November Content Marketing Ideas
Who's ready for some editorial inspiration? It's almost November, so if you haven't started planning your posts yet, allow me to hit you with your monthly dose of content marketing ideas. I'm sure you're quite familiar with Thanksgiving and Black Friday, […]