A Marketer’s Website Launch Checklist


SEO, Google Tag Manager Tracking, & Content Planning for a New Website
There’s nothing quite like launching a beautiful, brand new website, but it is something that can have ugly consequences if not performed correctly.
While marketers aren’t typically responsible for the design or development of a new website, they play an important role in ensuring usability, creating content, and making sure the site is optimized for search engines and users.
This post will help you accomplish all of those things, keeping you on track on your journey to a shiny new website.
Whether you work in-house or at an agency, this article breaks down what marketing tasks need to be completed before, during, and after a website launch.
No need to take notes! We’ll provide a downloadable checklist at the end of this article.
Before we get started…
As any marketer knows, the site launch process varies from project-to-project, and this post is intended to be an overview of marketing tasks that we generally complete with each launch - it will not necessarily be customized to your experience.
We’ll be catering this article towards WordPress websites, but the concepts can apply to sites built on any CMS.
Finally, this post was written for readers with a baseline knowledge level of platforms like Google Analytics, Google Tag Manager, and Google Search Console. If you are one of those people, keep reading to get started!
The Early Stages
At this point your organization or your client wants a new website. You know what general information you need, what the site should accomplish, and you have an idea of how it should look. You’ve also defined your KPIs and have outlined your goals for the new website. Now you need to nail down the site structure by creating your sitemap.
Sitemap
Sitemaps are used to lay out the structure and navigation of your new website. It’s important to involve all stakeholders in the sitemap process to ensure it’s user-friendly for everyone and that important pages aren’t missing. You also want to make sure that the layout is designed around the goals you have for your new site. Is it easy for users to get to the products page and add items to cart? Can they easily find your contact information? It’s important to keep these considerations in mind.
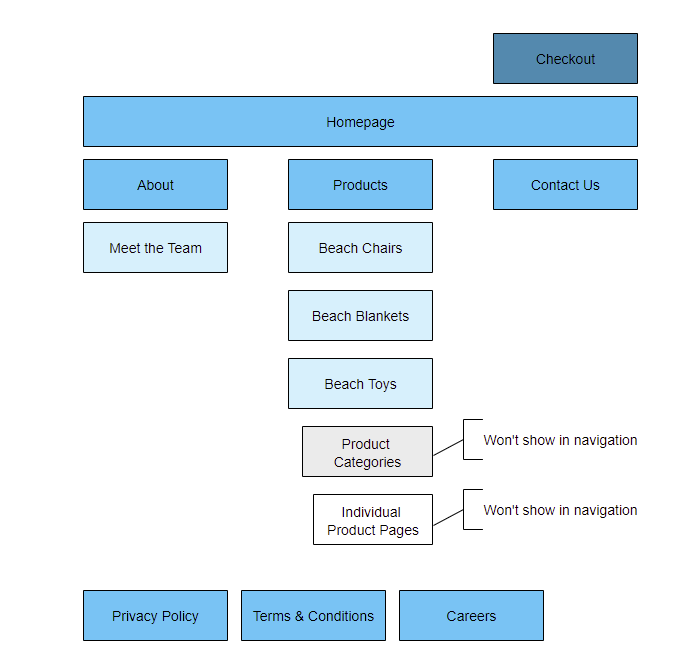
Your sitemap can be created in Google Slides/PowerPoint, Google Sheets/Excel, a mockup tool, or any other platform that can create flowcharts. The sample sitemap below was created in Moqups. Dark blue represents the links above the navigation menu. Blue represents the top-level navigation and footer. Light blue represents pages in the sub-navigation dropdown. Gray and white pages will not show in the navigation.
Keyword Research
After the sitemap has been approved by all stakeholders, it’s time to start working on the keyword research. We like to start by researching terms related to each of our product/service offerings, and our brand name.
If you know which terms have the most search volume you’ll be better able to write optimized copy and title tags. Some popular keyword research tools include Ahrefs, SEMRush, Moz Keyword Explorer, and Google Keyword Planner if you have access to a Google Ads account. You can also use Google Trends to find trending topics and keywords.
If you are unfamiliar with keyword research, checkout our SEO Writing Guide for Bloggers where we cover keyword research, content planning, title tags, meta descriptions, and more.
Outline Website Content Needs & Start Copywriting
If you are launching a brand new site or need to write copy from scratch, now is the time to start planning your content needs and determining who will be doing the copywriting. Since we finished our keyword research, we know which terms to use throughout the page. It’s important to include stakeholders in this step as well to make sure you’re accurately conveying information.
Gain Access to Any Platforms or Systems You’ll Need
If you’re working on behalf of a client, you want to make sure that you gain access to all the necessary platforms you’ll need with the proper permission level. If the client already has a website, we’d recommend getting access to their Google Analytics, Google Tag Manager, and Google Search Console accounts at a minimum, and admin access to their current site (such as a WordPress account).
Planning Stage
By now the new website designs should be finished and we should know how the new website will be structured. The site is likely entering the development phase if it hasn’t already, and our marketing tasks from above should be finished.
Site Plan
Aside from including keywords in our page content, it’s important that we further optimize our new website for search engines by adding title tags, meta descriptions, proper H1 titles, and structured URLs to all pages.
Title tags define the title of the page and appear as the blue linked heading in search results and the name of your tab when on a page. Meta descriptions are the description shown below the title tag in search results.

We won’t dive too deeply into title tags and meta descriptions here (that’s what the SEO Writing Guidelines are for!) but incorporating relevant keywords into your title tags allow search engines to find your webpage, understand it’s content, and index it in the search results. Without a title tag, it’ll be more difficult for readers to find your page in the search engine results pages (SERPs). Meta descriptions are not used for ranking purposes by Google, but it’s still important to write a clear, concise meta description for each of your pages to entice readers to click.
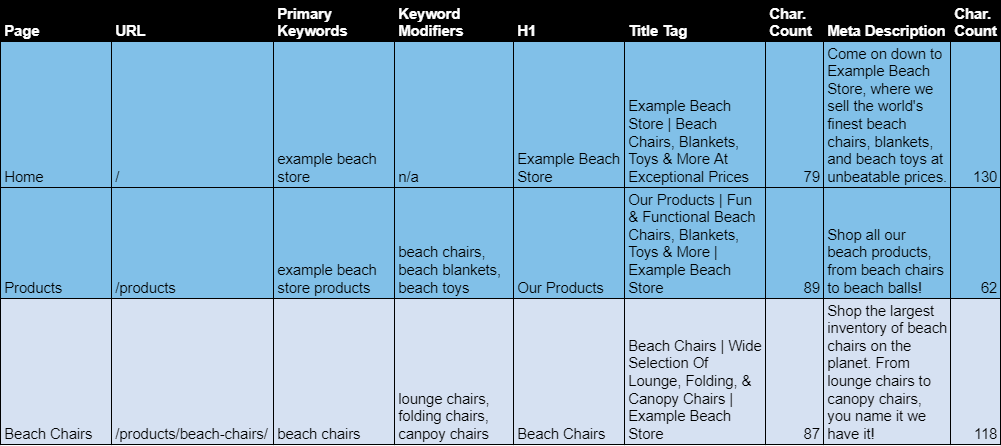
To keep all our title tags and meta descriptions organized for each page we can write them out in a site plan. A site plan document outlines title tags, meta descriptions, H1 titles, and URLs for every page of a website and identifies which keywords should be used on which pages.
As you can see in the screenshot below, this sample site plan is color coordinated to represent the site hierarchy we laid out in our site map, and includes the URL for each page along with our primary keywords and keyword modifiers. The H1 title will be the recommended title of the page, and the title tag and meta description should clearly describe to searchers what the page is about.
Outline Google Tag Manager Tracking & Goals in Google Analytics
If you aren't using Google Tag Manager on your existing site, now is a great opportunity to start! Google Tag Manager (GTM) is a tag management system that allows users to update measurement code and implement site tracking without a developer. GTM can be used to track how many users submit a form, click a button, or view a page. All of this event data is sent to Google Analytics where it can be viewed under “Behavior > Events”. Based on the goals you’ve outlined for your new site, you can put together a list of events to track.
For new websites across the board, the Cypress North team typically likes to implement:
- Time tracking: this collection of tags and triggers allows us to see how long a user may have spent on the site, from 0 seconds to 30 minutes or more
- Scroll depth: this metric allows us to see how far a user scrolled down any page
- Outbound link clicks: Google Analytics does not automatically collect link clicks out to another site from your own site, so we implement outbound link click tracking to see what external links a user clicked on
- Copy text: this metric allows us to see what text a user may have copied (helpful to see if users are copying contact information, product information, or addresses)
- Form submission tracking
- Tracking for important button clicks
- Mailto or Tel clicks: tracking how many users click on an email address (mailto link) or phone number (tel link)
We will also set-up Google Analytics Ecommerce tracking for ecommerce websites.
If you’d like to learn more about events to track and how to set-up GTM, check out our Guide to Getting Started with Google Tag Manager.
After creating your list of events to track, you can now determine which events should also be tracked as goals in Google Analytics.
Pull Site Speed Metrics for Your Current Site
To provide a baseline for your new website, pull site speed metrics on your current site for both desktop and mobile devices. Some good metrics to pull include:
- Core Web Vitals
- Lighthouse Audit scores
- Additional performance metrics from tools such as GTmetrix or Google’s PageSpeed Insights
Core Web Vitals data can be found in Lighthouse Audits, PageSpeed Insights, or in Google Search Console underneath the “Experience” tab.
To run a Lighthouse Audit, visit your website on Google Chrome. From there, click the vertical ellipsis in the upper right, then go to “More tools > Developer tools > Lighthouse” in the top navigation bar.

PageSpeed Insights captures a lot of the same information as a Lighthouse Audit, but uses data on a website collected over a 28-day period on a variety of different devices. Lighthouse Audits will collect data using one device type that you specify and a fixed set of network conditions.
All of these metrics help quantify the user experience, and by pulling data preemptively you will be able to use it in comparison and identify the improvements once the new site launches.
Prep Stage
At this point we are nearing the end of the development phase and should be actively preparing for the site launch. Now is the time to create a redirect list, upload the title tags and meta descriptions we finished in the stage above, and implement our Google Tag Manager tracking.
Redirects
Make a redirect list and check it twice! When migrating from one website to another, it’s important to make sure that all pages on the old site are accounted for and are being redirected to the appropriate pages on the new site. Redirects also help make sure that you are passing value from old pages that ranked well in search engines to their new location. If you are launching a new website from scratch, you can skip this step.
To make a redirect list, crawl your current website using a tool like Screaming Frog to find all the URLs on your current site. Then, map each URL to the new URL using the structure you defined earlier when making the site plan. In order to avoid 404 errors you do need to do every URL which can be a pretty manual process, so make sure you give yourself enough time!
| Old URL | New URL |
| /get-to-know-us/ | /meet-the-team/ |
| /our-products/ | /products/ |
| /our-products/beach-chairs/ | /products/beach-chairs/ |
You do not need to include maps for URLs that aren’t moving (for example, old www.examplesite.com/ does not need to be redirected to new www.examplesite.com/). That will just cause a redirect loop when implemented.
Once your list is complete, work with a developer to implement the redirects! Each plugin operates differently, so you may need to modify your redirect list depending on what your developer specifies.
Upload Title Tags & Meta Descriptions to the Staging Site
Add the title tags and meta descriptions you created in your site plan to each page of the staging site using a plugin like Yoast or have a developer implement the changes. When the staging site is pushed live, your title tags and meta descriptions will be pushed live with it!
If you are not working with a staging site, you can add the title tags and meta descriptions into the backend of your website CMS (like WordPress or Wix) so it’s ready once you launch the new website.
Implement Event Tracking in Google Tag Manager
Now that you have access to Google Tag Manager and have created your tracking list, it’s time to create new triggers and tags for your website as needed. If your new website is being built on a staging site, you can use that to test your new tracking setup. If not, you may need to wait until the site is live before testing your event tracking.
For help getting started with Google Tag Manager, check out this helpful blog post!
While working through event tracking set-up, it’s also helpful to keep track of any broken links, buttons, or usability issues that you see. Let developers know of any issues you find so they can make changes before the site goes live.
Launch Imminent
Submit the Current Website's Sitemap to Google Search Console
This will encourage Googlebot to crawl the current website and find any changes. If you don’t have a Google Search Console account set up for your current website, you can skip this step. We will cover how to create an account for your new website below.
To access your sitemap, first determine where it is located. If you use YoastSEO like Cypress North does, type in the URL of your website and add /sitemap_index.xml to access your sitemap. Then navigate to Google Search Console and click on “Index > Sitemaps” and add the sitemap URL where it says “Add a new sitemap”.

*Website Launches*
Immediate Post-Launch Stage
Woohoo! Your shiny new website is live! So exciting!
Now it’s time to make sure that everything you’ve implemented in the previous steps above are working properly and that your new website is fully optimized for the web.
Add Google Tag Manager & Google Analytics Tracking Code to All Pages
Work with a developer to ensure that the Google Tag Manager tracking code is installed on your website properly. If you’ve chosen to install Google Analytics through GTM, use the debugger to make sure it’s firing on each page. If you’ve decided to go another route, use a Chrome extension like Google Tag Assistant or check a page’s source code to find the Google Analytics tag on your site. Also doublecheck your Google Analytics account under Realtime Reports to see if website data is coming in.
Once you’ve confirmed that both Google Tag Manager and Google Analytics tags are on the site, doublecheck your event tracking in GTM to make sure your events are being tracked correctly. Don’t forget to publish the container!
Set Up a New Google Search Console Property if Necessary
If you did not have a Google Search Console account before, now is the time to set one up!
Visit https://search.google.com/search-console/about and click on the “Start now” button. In the upper left, click on “+ Add property” and select your property type.
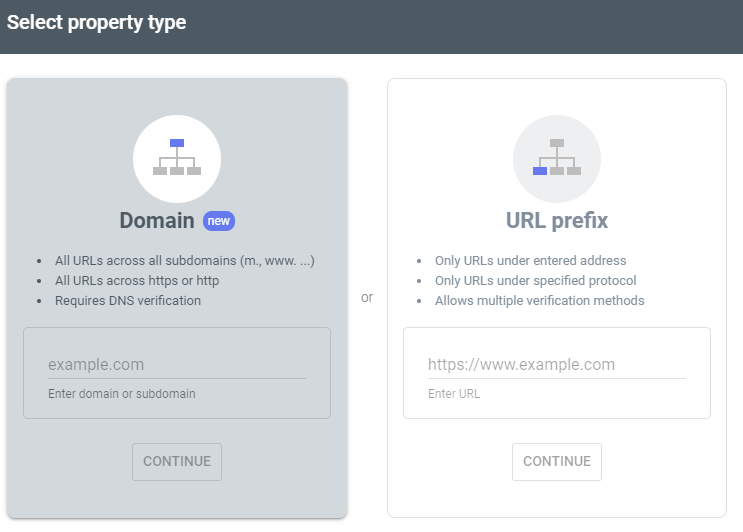
If you are able to provide DNS verification for your new website, select “Domain”. By submitting DNS verification to your domain name provider you are proving to Google Search Console that you are the owner of your domain and all subdomains.
The domain property type allows you to view all URLs across all subdomains if you have them, and view both secure and non-secure versions of your webpages. We like to set up domain properties if possible.
If you are not able to provide DNS verification, select the “URL prefix” property type. Only URLs entered under the address specified will be shown. If you have multiple subdomains those will each need to be added as separate properties.
Once you’ve chosen your property type and provided verification, you can access your new Search Console account!
Set Up New Views, Goal Tracking, & Annotations in Google Analytics
Whenever we launch a new website, the Cypress North team likes to create new views in Google Analytics to exclude internal traffic and to remove parameters from URLs to simplify reporting. If you didn’t have one previously, a view for all traffic unfiltered should also be created.
To create a new view in Google Analytics:
- Navigate to Admin
- Click on "+ Create View"

- Give the view a name
- Select the correct time zone for your organization
- Click on "Create View"
Exclude Internal Traffic View
Internal traffic can be filtered out of your website by excluding your organization’s IP address or the IP addresses of employees working from home. To do this:
- Create a new view
- Navigate to “Filters” under Admin
- Click on “+ Add Filter”
- To exclude one IP address at a time:
- Give your filter a name
- Select the Predefined filter type
- Then select “Exclude”, “traffic from the IP addresses”, “that are equal to” from the drop down menus
- Type in your IP address and click on Save

- To exclude multiple IP addresses:
- Name your filter
- Select the Custom filter type
- Click on the "Exclude" radio button
- Filter by "IP Address"
- Use a regex to filter out multiple IPs
- For example, if I have two IPs, 111.111.111 and 222.222.222 I can use
^(111\.111\.111)|^(222\.222\.222)- ^ signifies the start of the IP address
- \. The backslash identifies the period as a period, not as a wildcard character
- | signifies OR
- For example, if I have two IPs, 111.111.111 and 222.222.222 I can use
- Click Save

Remove Parameters View
Removing parameters from website URLs can simplify the reporting process by removing any UTMs created for advertising purposes or parameters created from site search/filters on your website. To set up this view:
- Create a new view
- Navigate to “Filters” under Admin
- Click on “+ Add Filter”
- Select the Custom filter type
- Select the Search and Replace radio button
- Underneath the Filter Field select “Request URI”
- Use the following search string:
\?.*- \? The backslash identifies the question mark as a question mark (the parameter in the URL)
- . The period is a wildcard, it indicates anything after the ? in the URL
- * indicates 0 or more times

- Click on Save
Goal Set-Up
To set up the new goals you defined in a previous step, navigate to Admin, and underneath View click on “Goals”. Then select “+ New Goal” to choose your goal type, description, and create the set-up. You can also go here to update any existing goals you’d like to keep from the previous site.
Annotations
Make sure you annotate when and what time the new website launched using the annotation feature. Also be sure to annotate when GTM tracking and goal set-up was implemented.

Review the Robots.txt File, Noindex Tags, and Canonical Tags
The robots.txt file on a website tells search engine crawlers like Googlebot which URLs it can crawl and which are blocked. Once the new site launches it’s important to check the robots.txt file to make sure no page is being blocked that shouldn’t be. To check your robots.txt file, type the website URL into the browser and add /robots.txt to the end of it and search it. Pages that have “Disallow” next to it are being blocked from search engine crawlers.
Also take time to review all pages with noindex tags to make sure that pages that should show in search results are not being blocked by mistake.
Canonical tags are used to tell search engine crawlers which version of a page should be indexed and ranked in search results when you have two or more pages with similar content. For example, multiple location pages on a website that offer the same services and contain the same content on each page.
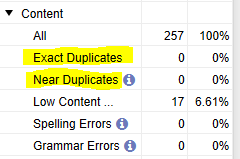
Screaming Frog can be used to find duplicate content. After crawling the website, navigate to “Overview” in the sidebar on the right-hand side. Then scroll down until you see “Content > Exact Duplicates and Near Duplicates”.
Update or add canonical tags to pages with similar content to ensure that your preferred version of a page is shown in search results and to avoid being flagged by Google for duplicate content.
Review Redirects & Title Tags/Meta Descriptions
In addition to reviewing tags and the robots.txt file, it’s also important to ensure that all redirects were implemented properly and that all pages have a title tag and meta description. Run a Screaming Frog crawl to double check for any 404 errors and redirect those pages as necessary. Screaming Frog can also be used to find any missing title tags and meta descriptions.
Verify the New Domain in Google Search Console
After completing all the tasks above, it’s important to inform Google of a change of address if you’re migrating from an old site domain to a new site domain.
This can be done by verifying the new domain in Google Search Console. To do this, navigate to “Settings > Change of address” and select the new site. Then click on “Validate & Update”. It takes a while for Google Search Console to process the request. While the change is being implemented, a banner will appear across the top of the dashboard that says “This site is currently moving to <your new domain>”.
Post-Launch Stage
Submit the New Sitemap to Google Search Console
Submit the sitemap for your new site to Google Search Console one week post-launch using the same process outlined above.
Create a Report to Measure Performance
We like to create website performance reports in Google Data Studio with major website metrics from Google Analytics and Google Search Console to share with our clients. If you don’t have a report already, consider adding the following metrics to get started:
From Google Analytics:
- Number of users
- Number of pageviews
- Site traffic by medium and by source
- Site traffic by device and location
- Site speed metrics, including the average page load time and the average server response time
- Top pages and landing pages by the number of pageviews and sessions
- Goal completions
From Google Search Console:
- Top search terms and landing pages
- Average position
- Impressions and clicks
Look For Broken Links in Google Search Console
To find broken links and search for crawl errors in Google Search Console, navigate to “Index > Coverage” on the left-hand side navigation menu. Then check the URLs listed under the “Error” and “Valid with warning boxes”. Redirect any pages with 404 errors and work with a developer to fix any other website errors.

Pull Site Speed Metrics for the New Site
Two to three weeks after the site launch pull the same site speed metrics you gathered from before the site launch to determine how your website has improved in terms of speed and usability. This includes the Core Web Vitals, Lighthouse Audit scores, and additional performance metrics from tools such as PageSpeed Insights or GTMetrix.
If your site still remains slow, work with a developer to implement the recommendations provided by Google and other page speed tools.
Conclusion & Free Checklist
Launching a new website can be a long, arduous process. If you need assistance with website development, design, or marketing the Cypress North team can help! Don’t forget to fill out the form below to get your copy of the Marketer’s Website Launch Checklist sent directly to your inbox.
Get the Checklist In Your Inbox
Meet the Author

Kathleen Hagelberger
Kathleen is our Director of Organic. She joined Cypress North in July 2019 and works out of our Buffalo office. Known by coworkers and clients alike as Kbergs, Kathleen is an SEO specialist who brings more than four years of experience to our digital marketing team. Some of her daily responsibilities include monitoring organic traffic for clients and reporting on what she finds, putting together site plans, helping with new site launches, project management, and other SEO projects. She also makes occasional guest host appearances on our Marketing O’Clock podcast.
Before joining Cypress North, Kathleen gained professional experience through internships with Genesee Regional Bank and TJX Companies, Inc. She has earned her Google UX Design certificate, Google Analytics 4 certification, and HubSpot Content Marketing certification.
Originally from Attica, Kathleen graduated from the Rochester Institute of Technology with bachelor's degrees in new media marketing and management information systems.
Outside of work, Kathleen is on the volunteer committee for Erie County's Walk to End Alzheimer's chapter. She also serves as the Vice President of Public Relations for one of the Buffalo chapters of Toastmasters.
In her downtime, Kathleen enjoys taking dance classes like tap and jazz and fitness classes in general. She also likes going to the beach, trying new restaurants, reading, watching 80s movies, and Marie Kondo-ing her apartment.
Related Resources

5 Methods to View a Page as Googlebot
Can search engine crawlers access your content? If you’re not sure, check out these five methods to view your pages as Googlebot and other crawlers.

3 Options for Multilingual Website Translation
Managing multilingual web content is challenging, and there are plenty of options available. Learn more about the solutions and how to find the right one for you.

Google Launches AI Mode: What it Means for the Future of Search
Google’s new AI Mode marks a major shift in its search strategy. Here’s how we expect it to transform the user experience and future of search.

13 Digital Marketing Predictions for 2025
Top Industry Voices Share Their 2025 Digital Marketing Trend Predictions As digital marketers, we know a new year brings new goals, new opportunities for growth, and new challenges. But a new year also brings plenty of change. Whether it’s advancements […]

Let's Put a Stop to Google Page Annotations
Google's Page Annotations will direct some visitors away from sites and back to search. We’re calling for an end to this practice.

Choosing the Right Digital Marketing Career Path as a New Marketer
Learn more about the different career opportunities in digital marketing by exploring the roles of SEO and PPC specialists. Gain insights into key skills, tools, and strategies to help you determine the best path for your professional career.

6 SEO Tips & Tricks We Learned at WTSFest 2024 in Philadelphia
Three of our digital marketers recently picked up some new tips, tricks, and best practices at the 2024 Women in Tech SEO Festival. Learn more about what we learned and how we’re applying it to our work.

How to Improve Your Content With Conversational Writing
Looking to boost your web content writing? A conversational writing style can help you develop better connections with your audience and get your message across more effectively.

How to Create a Looker Studio SEO Report Without Paid Connectors or Expensive Subscriptions
Effectively Measure Organic Traffic Performance With an Easy-To-Create Dashboard Measuring organic traffic performance is a key part of SEO. But with so many different metrics available to track, it can be challenging to know what data to look at when […]

Google & Apple Business Profiles: A Comprehensive Overview
Having an accurate & up-to-date business profile is very beneficial to any business. Read on to learn how to set these up on Google & Apple, what each platform offers, and some things to watch out for.

B2B Marketing With the Rise of Gen Z: Navigating the Digital Native Workforce
Explore the unique challenges & opportunities of marketing to Gen Z in the B2B space. Discover how these digital natives are reshaping the professional world & what it means for marketing strategies. Stay ahead in the era of Gen Z with expert insights.

How to Create a High-Quality Email Sending List in HubSpot
The HubSpot lists tool allows you to create and edit lists of contacts, companies, or deals based on specific property values and attributes. This blog post will review the ins and outs of HubSpot lists and the different components of using and optimizing them for email marketing that works.

What Do ChatGPT & Other AI Mean for Content Writers?
With ChatGPT taking the internet by storm, should content writers be concerned? Here’s everything writers should consider.

How to Set Up Google Ads Automated Rules
Learn How To Set Up Automated Rules In Google Ads & When To Use Them In Your Account Automated rules in Google Ads are a feature that can make a digital marketer’s life a bit easier. Our agency uses automated […]

Importing Campaigns from Google Ads into Microsoft Advertising: Everything You Need to Know
Learn How To Import Campaigns Into Microsoft & Common Pitfalls To Watch Out For Building out campaigns in both Google and Microsoft Ads shouldn’t have to take up your whole day. This article will walk you through a comprehensive step-by-step […]

How to Get Started with GA4: A Step-by-Step Guide
Need help setting up GA4 for your company or client’s website? Look no further! This post provides a step-by-step process for creating GA4 properties and best practices to make sure necessary events are tracked and the data flowing into GA4 are accurate.

Testing Website Accessibility: Five Testing Tools & Methods To Identify Accessibility Issues
Is your site compatible with website accessibility guidelines? Use these tools to benchmark and identify improvement opportunities. Website accessibility is often overlooked, but it shouldn’t be. According to CDC estimates, 61 million adults in the United States alone live with […]

23 Of The Best Resources For Starting A Digital Marketing Career
The best social media communities, podcasts, newsletters, and certifications for new digital marketers I didn’t know anything about digital marketing when I started as an intern at Cypress North earlier this year. Acronyms like SEO, CPA, and ROAS meant nothing […]

SEO for PDFs - How To Optimize PDFs For The Web
Let’s face it, for some companies Portable Document Formats (PDFs) are an unfortunate necessity. From sell sheets and downloadable product flyers, to manuals and tutorials - PDFs have secured a spot in our lives, and there are some tips and […]

How to Use Adobe Acrobat Pro DC to Make Interactive PDFs For Inbound Marketing
Creating unique downloads for your content marketing campaign can be a struggle. With millions of resources available online, how can you distinguish your downloads from the assets your competitors are providing? By making them interactive of course! You can unlock […]