How to Transform Your Static Images into Animated Video Ads With Facebook’s Video Creation Kit
As the digital space continues to evolve, video has become more dominant than ever before. Attention spans are shorter, people expect to be entertained, and messaging must be communicated in a fascinating way. For businesses with limited time and budget, creating engaging video ads can be a daunting task. That was until Facebook’s Video Creation Kit hit the scene.
Now, anyone can transform static images into animated videos without any video experience or a graphic design team to rely on. After reading this step by step guide, you’ll be proud to call yourself a Facebook Video Creation Kit pro.
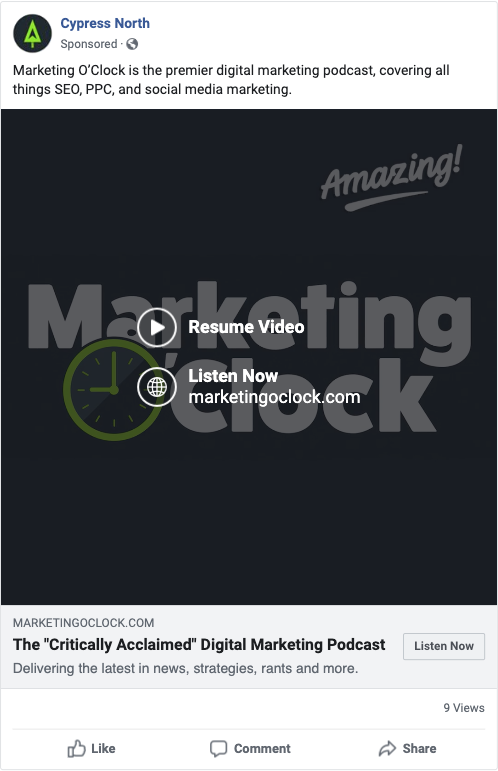
I will be using our podcast, Marketing O’Clock, for visual examples throughout this post.
The Complete Facebook Video Creation Kit Guide:
- A. Locating Facebook’s Video Creation Kit
- B. Choosing the Right Template
- C. Customizing Your Video
- D. Finishing Details
- E. Creating a Slideshow
A. Locating Facebook’s Video Creation Kit
The Video Creation Kit is closer than you may realize. If you have a Facebook Ads Manager account, log in and follow the steps below to locate your kit.
Step 1: Log into Facebook Ads Manager and select the account that you want to create the video ad for.
Step 2: Scroll over the left side menu and click on Ads.
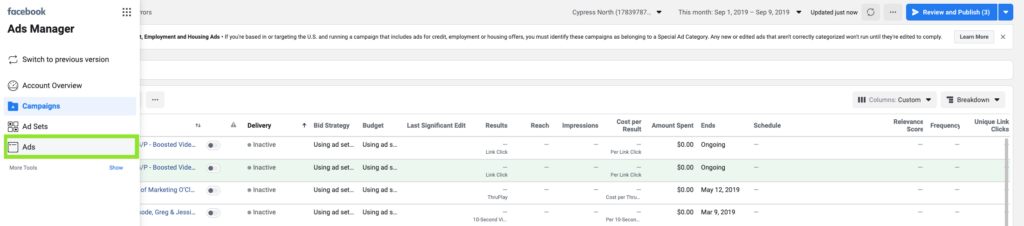
Step 3: Click the green Create button at the top left corner.
Step 4: Either create a new campaign/ad set or use an existing campaign/ad set.
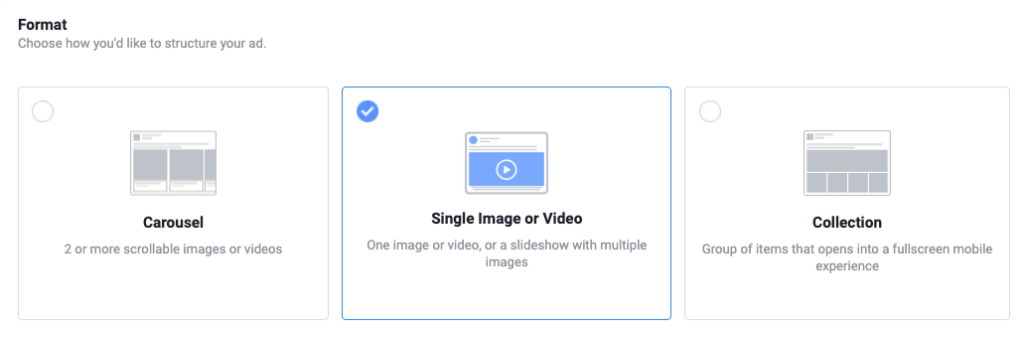
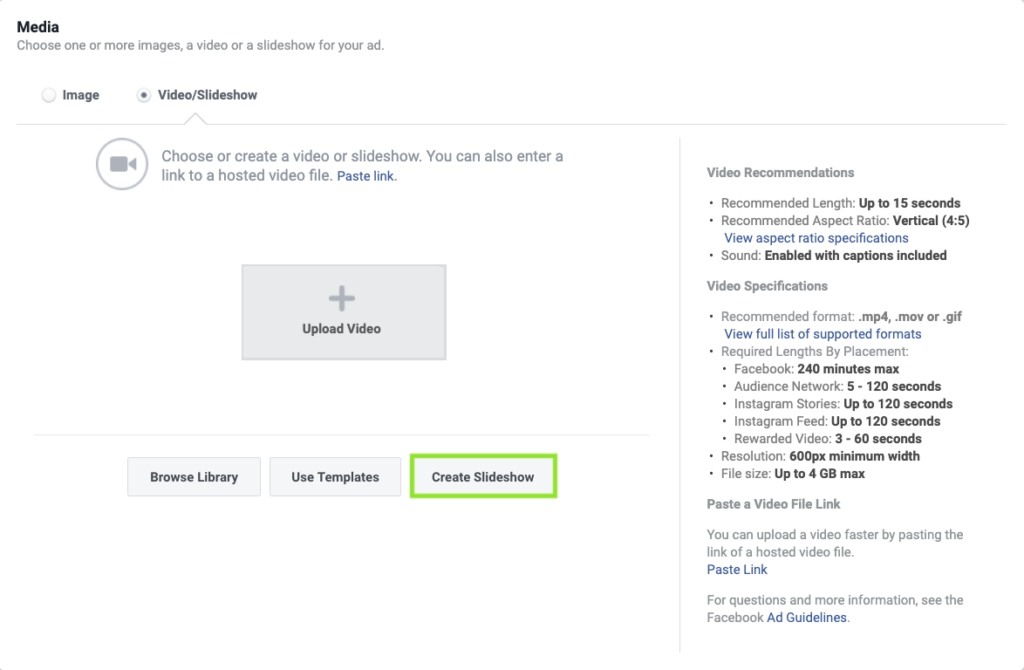
Step 5: Once you land on the ad creation page, locate the Format section. Next, make sure the Single Image or Video button is checked.
Step 6: Scroll down to the Media section of the page and click on the Video/Slideshow button.
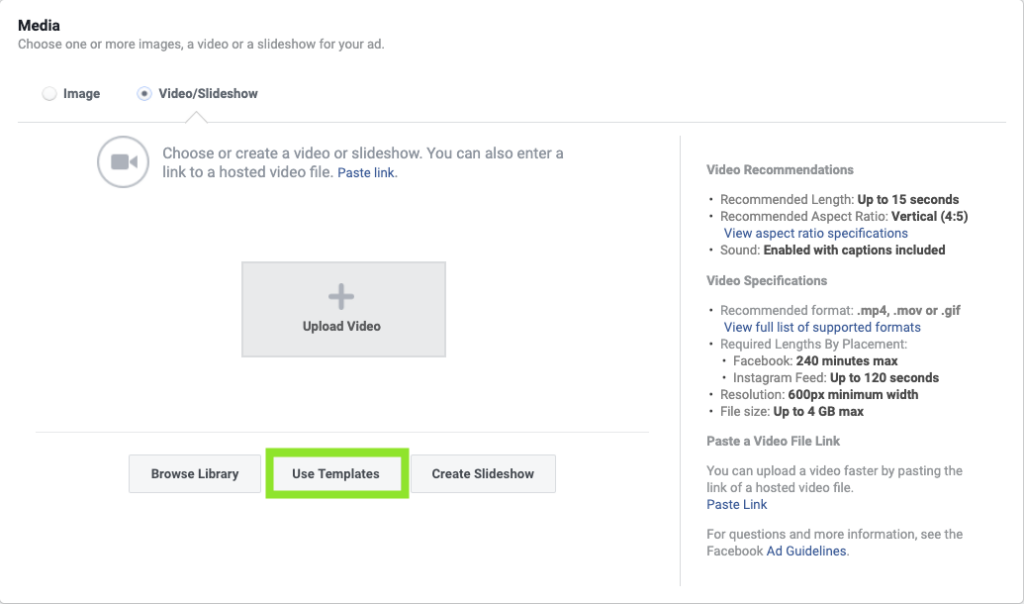
Step 7: Right below, click on the Use Templates button.
Welcome to Facebook's Video Creation Kit!
B. Choosing the Right Template
Before choosing a template, it’s important to determine what goals you want to accomplish with this video. Are you looking to promote a new product? Are you building brand awareness? What do you need to successfully communicate your message to your target audience? Questions like these will help you decide which template best fits your goals.
Step 1: Once the Video Creation Kit window opens, choose the template that best fits your goals by simply highlighting a box. Unfortunately, you currently cannot create custom templates from scratch. You can only choose the templates offered by Facebook.
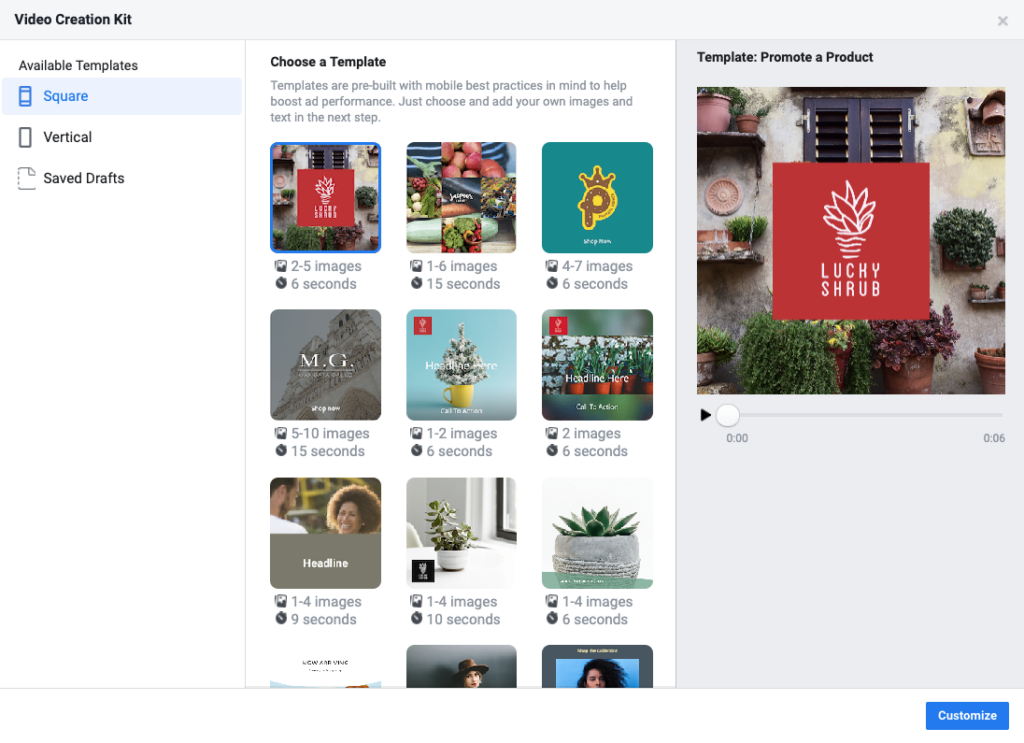
Video Creation Kit Template Options Based on Goals:
Promotion: These templates are perfect for promoting a new product, service, sale, or event. Most are short videos that highlight a single image.
- Promote a Product - 6-second video with one featured image, logo and description.
- Highlight an Image - 6-second video with one featured image, description and logo.
- Feature an Image - 10-second video with one featured image, headline and logo.
- Spotlight an Image - 9-second video with one featured image, headline, and logo.
- Display a Product - 6-second video with one featured image and headline.
Awareness: These templates offer more room for descriptions and images, allowing you to provide more information about your brand.
- Show Product Benefits - 15-second video with four featured images, descriptions, logo and call-to-action.
- Drive Product Discovery - 15-second video with four featured images, descriptions, logo and call-to-action.
- Sell Multiple Products - 6-second video with three featured images, descriptions, logo and call-to-action.
Action: These templates allow you to add a call-to-action that captures your audience's attention and, hopefully, drives more relevant clicks.
- Present a Horizontal Image - 6-second video with one featured image, headline, call-to-action box and logo.
- Frame an Image - 6-second video with one featured image, headline, description, and logo.
- Showcase a Square Image - 6-second video with one featured image, headline, call-to-action and logo.
- Showcase a Horizontal Image - 6-second video with one featured image, headline, call-to-action and logo.
Feel free to mix and match these templates with other goals. How you edit your video can make all the difference when it comes to a successful ad. Find a style that works with your branding and start editing.
Step 2: Make sure you keep the video ad placement in mind (feed, stories, in-stream videos, etc.) so you know what dimensions to edit within. You can sort videos by dimensions on the left-hand side (square or vertical).
TIP: Under every template, you’ll see the length and how many images are included. When you highlight each template, a preview will appear on the right-hand side showing exactly how the video will animate.
Step 3: Once you highlight the template you want to edit, click the blue Customize button at the bottom right-hand corner.
C. Customizing Your Video
Collect all of your images, logos, colors, and copy together because now it’s time to let the creative juices flow.
Once the Video Creation Kit opens with your selected template, focus your attention to the top navigation layout under Customize Scene. This is where you will travel between scenes.
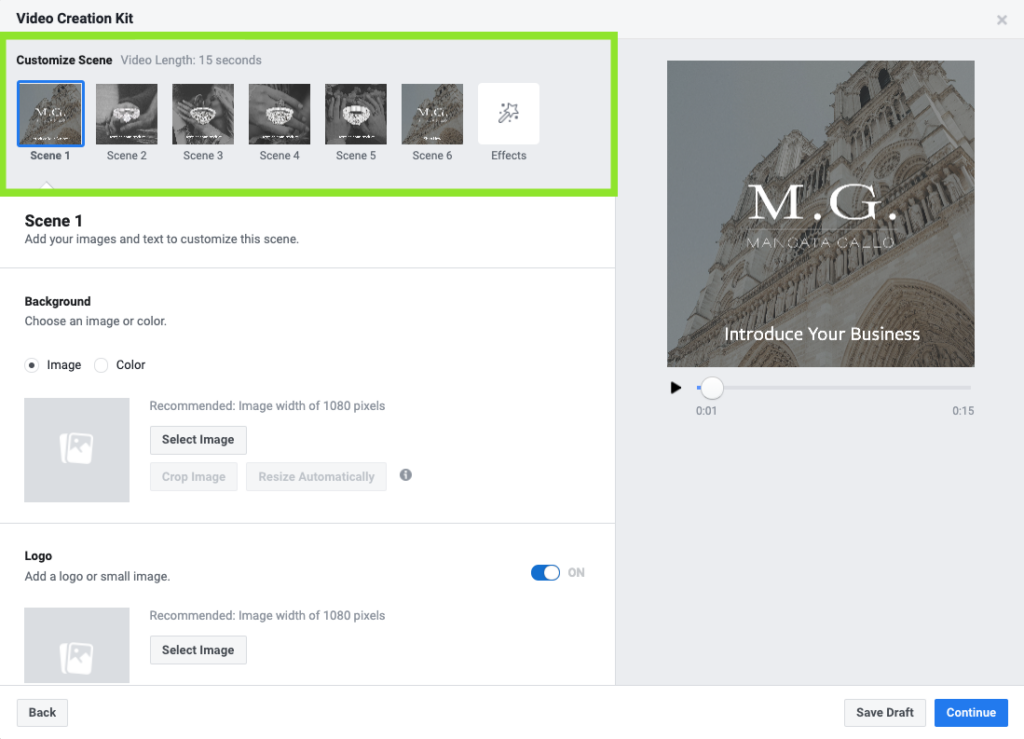
On the right-hand side, you will also see a preview of the video you are currently editing. As you continually make edits, the preview will update to show you the final product.
Each scene may include different editable features so don’t expect to make the same edits in every scene.
If you don’t want to include a particular feature on a certain scene, just switch the toggle to OFF.
Now, it’s finally time to customize…
Step 1: First, edit the background by selecting the image or color option. Upload an image or select a custom background color.
Read the Facebook Ads Guide to learn how to properly crop your images.
TIP: The template may keep the image from your first and last scene the same. For better brand recognition, I recommend starting the first scene with your logo.
Step 2: Edit the logo or small image. This image doesn’t fill the entire space but instead lays on top of the background you previously set.
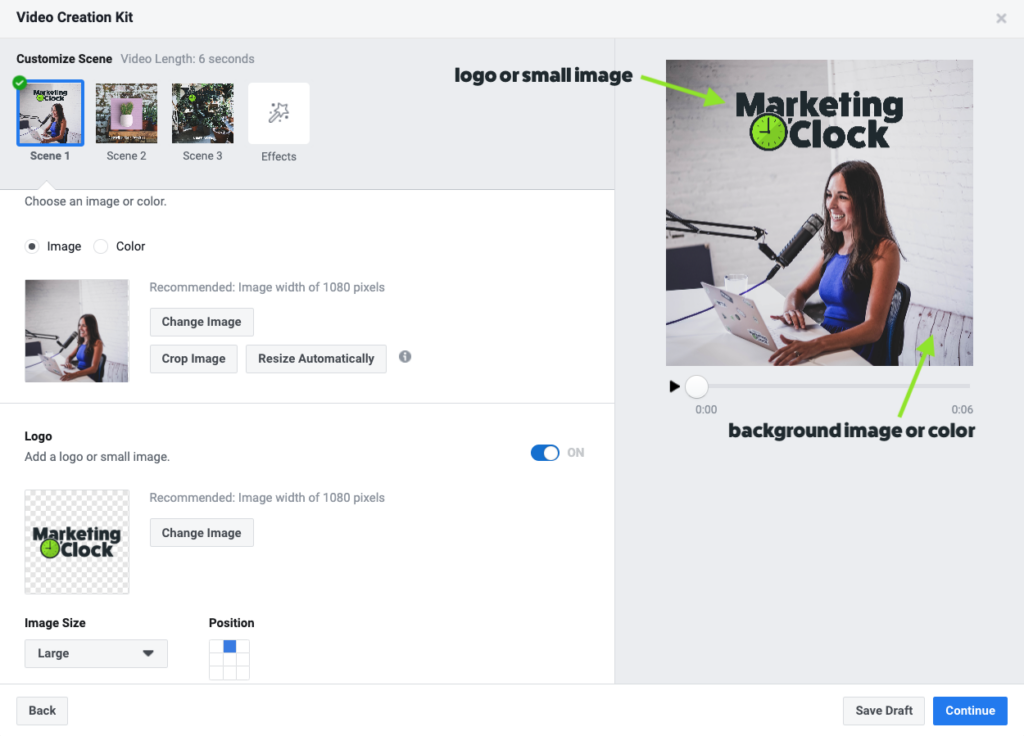
After uploading an image, you can edit the position using the grid and change the size to small, medium or large with the drop-down menu.
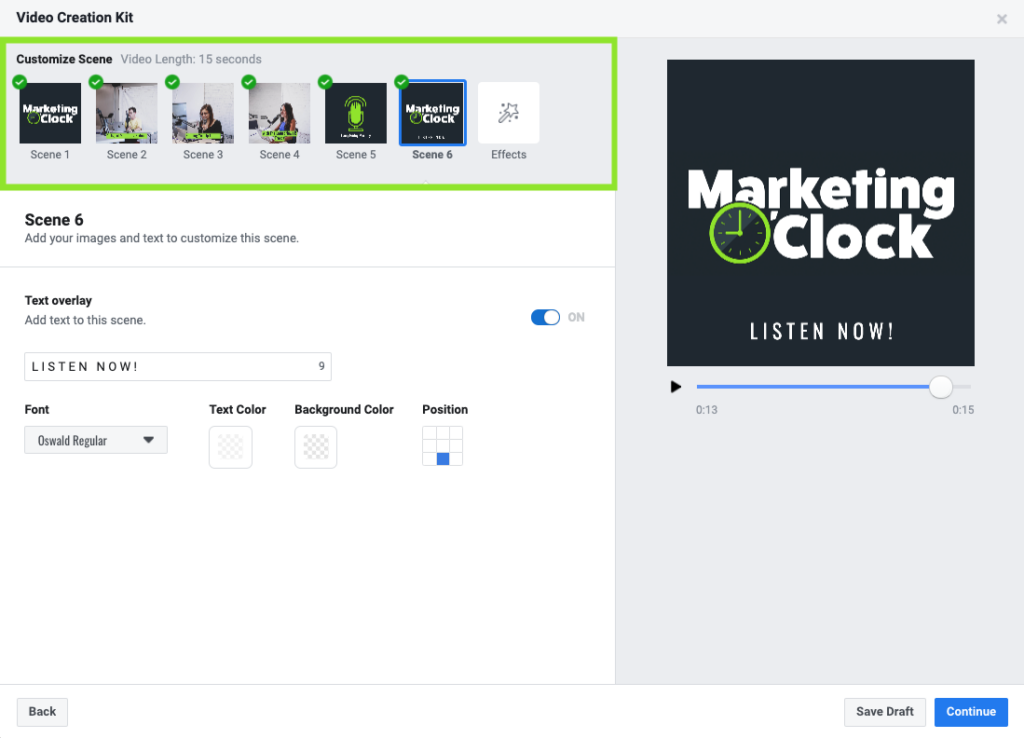
Step 3: Next, edit the overlay text. You are allowed to include up to 30 characters in each scene. You can also select a font from the drop-down menu provided, edit the text with a custom color, change the position (depending on the scene) and edit a custom background text color. If you decide to add a background color to your text, make sure you change the opacity to 100 to apply the full effect.
TIP: When editing the last scene, your text overlay should reflect some form of a call-to-action.
Step 4: Go through and fill in all the necessary information for each scene until you see a green checkmark next to every box on the top navigation.
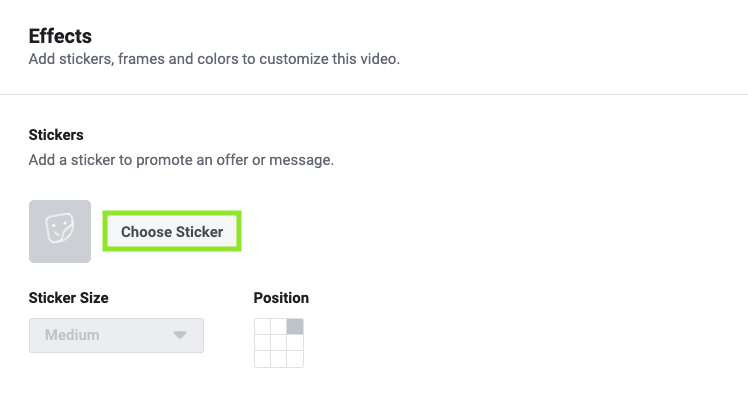
Step 5: The last step is adding Effects. After editing all the scenes, click on the last box in the navigation called Effects with the star wand icon.
Step 6: Click on the Choose Sticker button under Stickers.
Once the separate window pops up, you can sort with the drop-down menu that includes stickers for:
- Promotions
- Discount
- General
- *Seasonal Events (Back to School, Easter, Mother's Day, etc.)
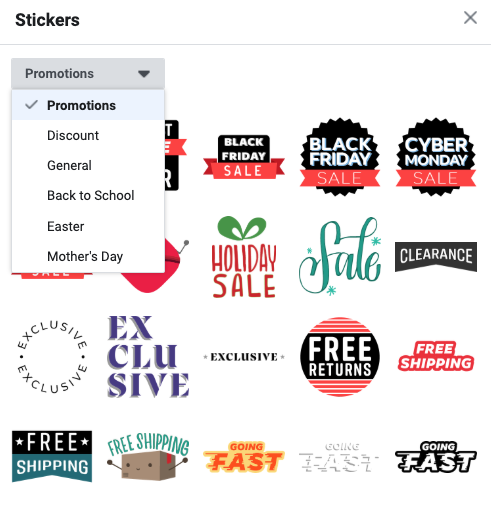
Currently, Facebook stickers are the only effects offered, although, we are hoping for more options soon! The stickers cannot be customized, but you can adjust the sticker size from small to large and change the position. It’s also important to remember that any sticker you choose will appear on every scene. You are not able to make a sticker appear on one scene and not another.
If you want to delete the sticker after selecting one, all you have to do is click the Remove Sticker button.
TIP: Stickers are the perfect way to add a call-to-action if you weren’t able to fit one in the headlines or descriptions.

Step 7: Click the Save Draft button in the bottom right-hand corner before finalizing your video.
TIP: Saved drafts don’t save any stickers so make to write a note about which ones were used so you can add them in again when you edit the draft.
Step 8: Hit the blue Continue or Use Video button in the bottom right-hand corner once your video is complete.
D. Finishing Details
Stick with me because the hard work is mostly done! But, you can pat yourself on the back for making it this far. You should already feel like a Video Creation Kit expert. All that’s left is exporting your beautiful new video and setting it live for your audience to enjoy.
Step 1: After you click the blue Use Video button, the Video Creation Kit will close and bring you back to Ads Manager. Your video should automatically begin uploading.
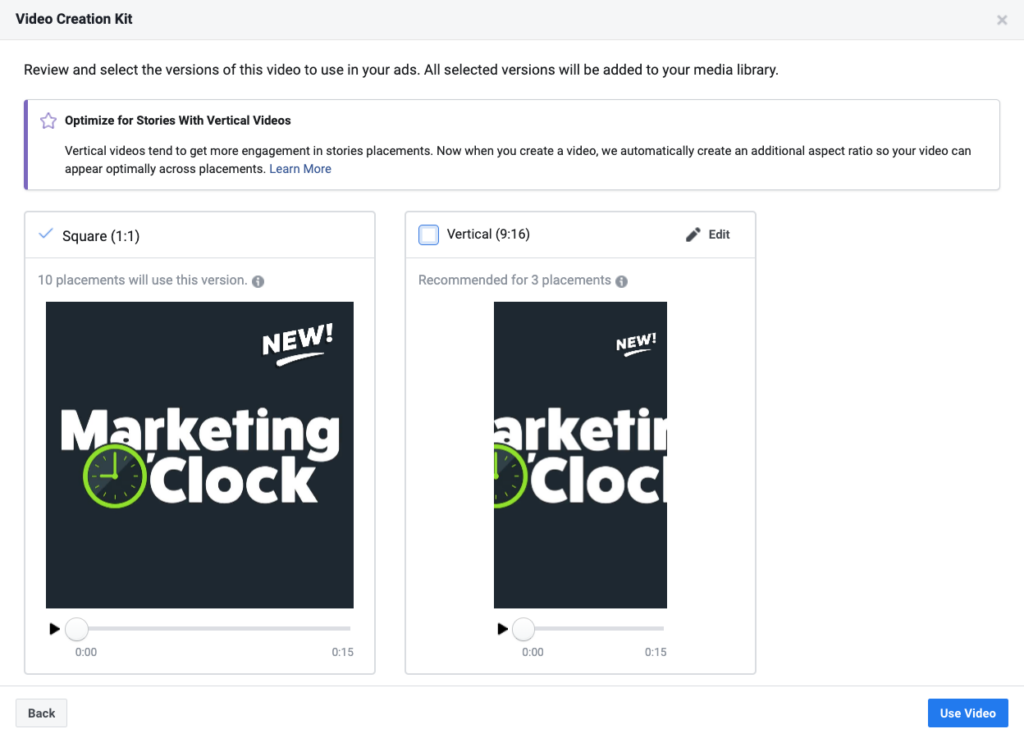
TIP: A separate window may appear after you click the blue Continue button. Facebook will prompt you to additionally export a vertical (9:16) video. If the crop doesn’t look right or you’re not using Facebook stories as placement, I recommend unchecking this box. Then, click the blue Use Video button at the bottom right-hand corner.
Step 2: Wait for Facebook to export your video (this may take a few minutes).
Step 3: Finally, complete the rest of the ad requirements and publish.
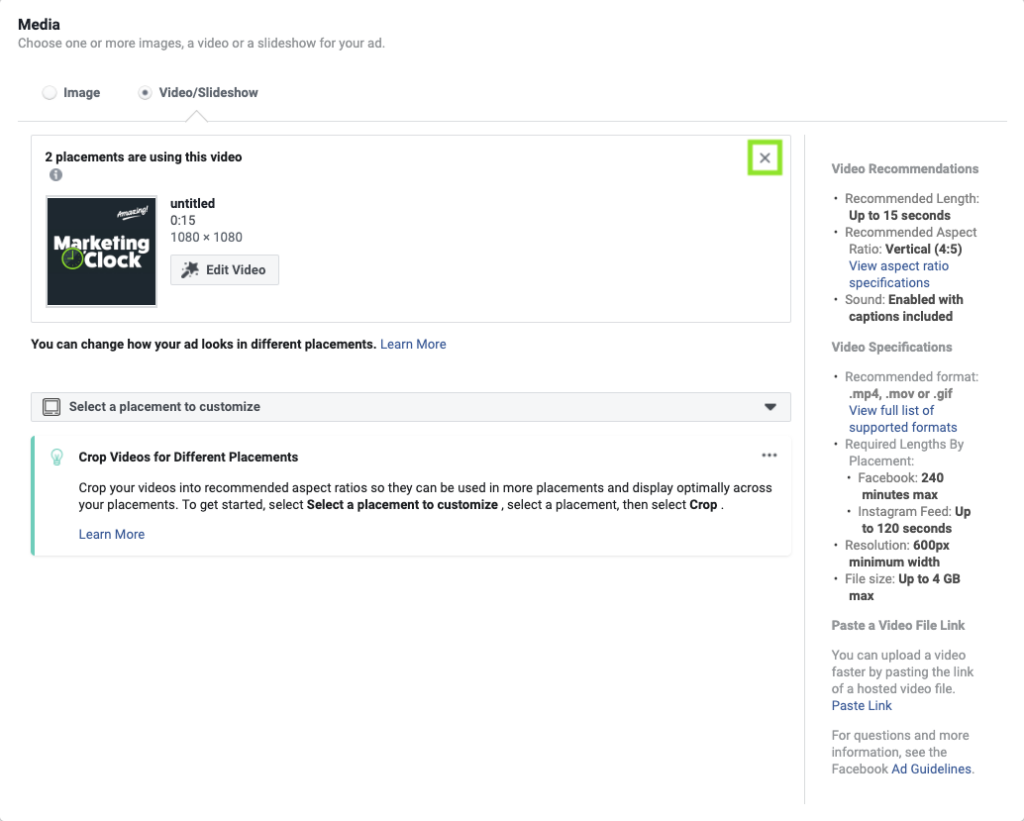
TIP: If you want to go back and edit your video, just click the x button under Media to remove your video.
Then, click Use Templates button again and go to Saved Drafts on the left-hand side of the Video Creation Kit.
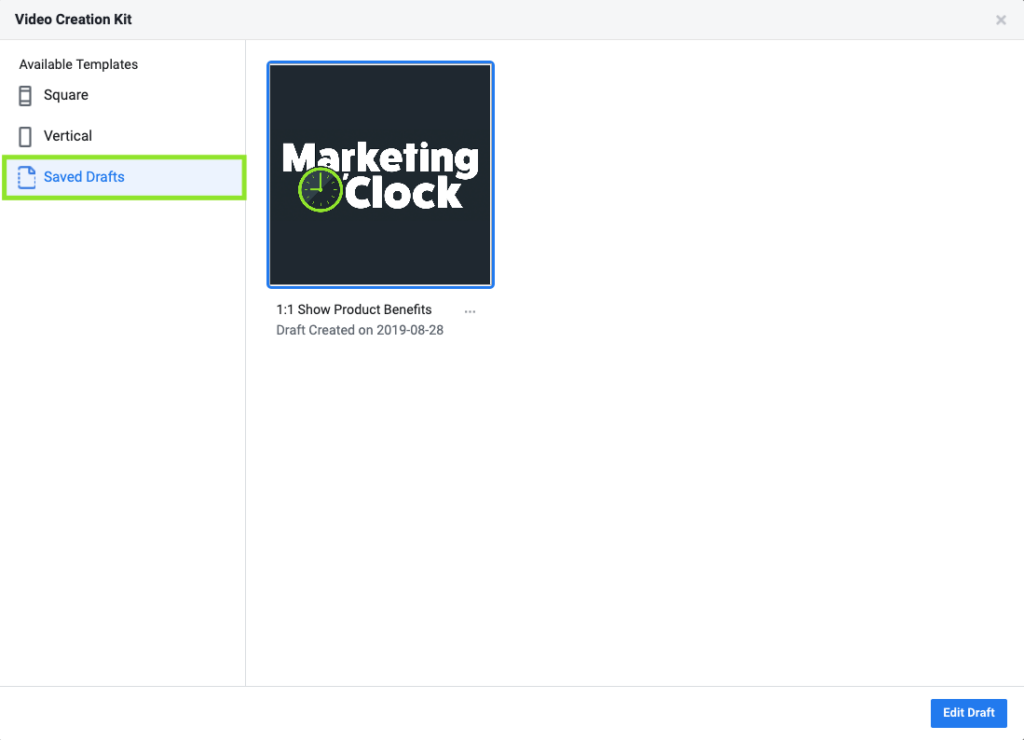
Click Edit Draft in the bottom right-hand corner to access your saved video.
Congratulations! You are now a Facebook Video Creation Kit pro. Throw a party. Eat some cake. Give yourself a sticker. We finally made it to the end! Now you can easily take any static images and confidently edit them into eye-catching videos for your Facebook and Instagram campaigns.
On the other hand, if this Video Creation Kit still looks intimidating, Facebook provides a simpler solution with slideshows.
E. Creating a Slideshow
If you want to turn your images into a video but aren’t keen on some fancy animations, slideshows are the answer for you. Slideshows are included in Facebook’s Video Creation Kit but are more to the point compared to their templates.
Step 1: Follow steps 1-6 in part A of Locating Facebook’s Video Creation Kit.
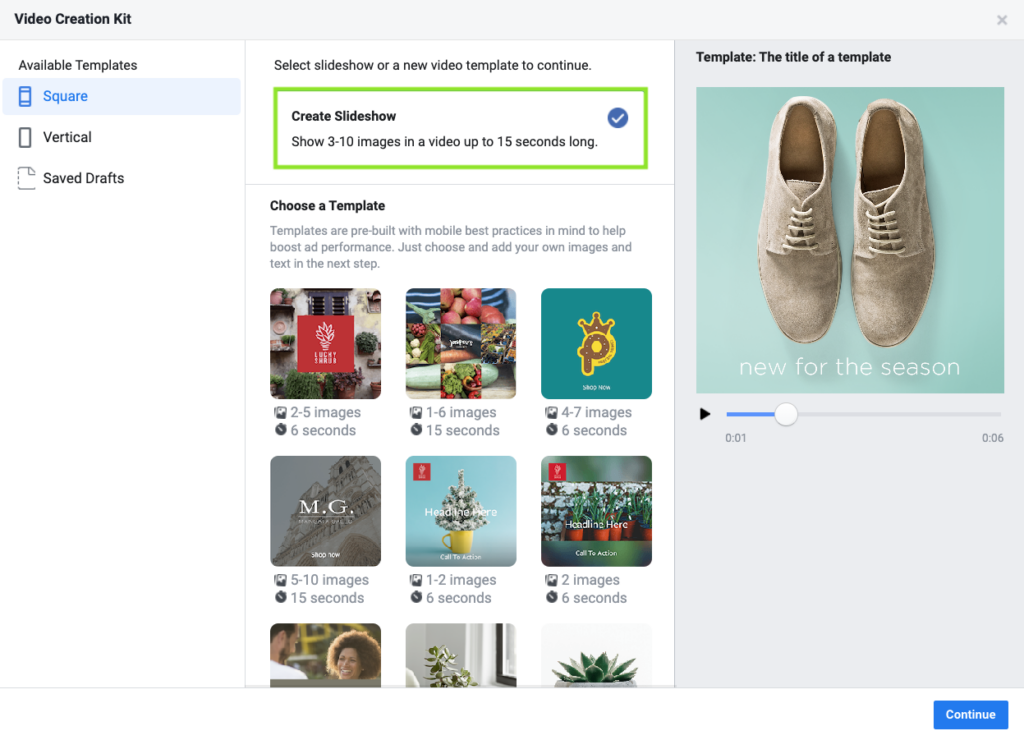
Step 2: Click on the Create Slideshow button.
Step 3: Once the Video Creation Kit window opens, make sure the Create Slideshow box is checked instead of selecting a template. Then click the blue Continue button at the bottom right-hand corner.
Welcome to Facebook Slideshows!
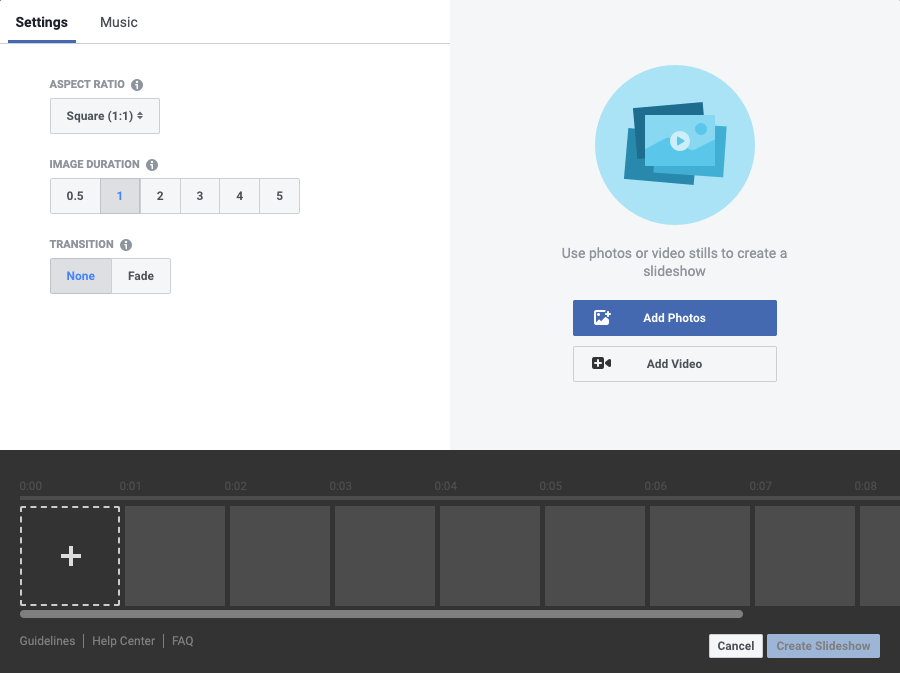
Step 4: To get started, you can either click Add Photos or Add Video on the right-hand side.
TIP: When you upload a video, Facebook will automatically pull still frames from it. These will be uploaded to a separate Video Stills tab. Click the + in the top right corner of the images to add to the slideshow.
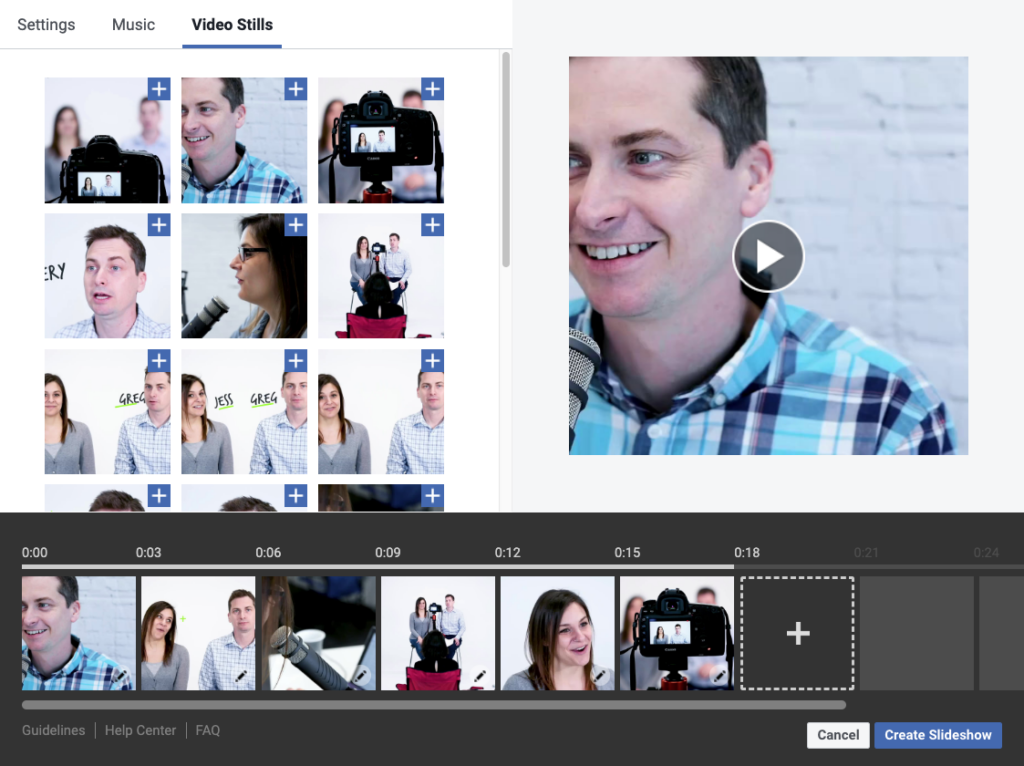
Step 5: Now it’s time to edit. We’ll cover everything you have the power to change below.
General Settings - Under the Settings tab, you can adjust the following:
- Slideshow Length: This depends on how many pictures you add and how long you make the transitions. But, these videos can’t be longer than 15 seconds.
- Image Crops: You are able to crop your images under Aspect Ratio into original (based off the first picture you upload), square, rectangle or vertical dimensions.
- Image Duration: You can select how long you want each picture to show from 0.5 seconds to 5 seconds. Your selection will automatically adjust depending on how many pictures you upload.
- Transitions Between Images: You can select None or Fade.
- The Order of Images: Your navigation between images is located on the bottom. Simply click and drag to rearrange.
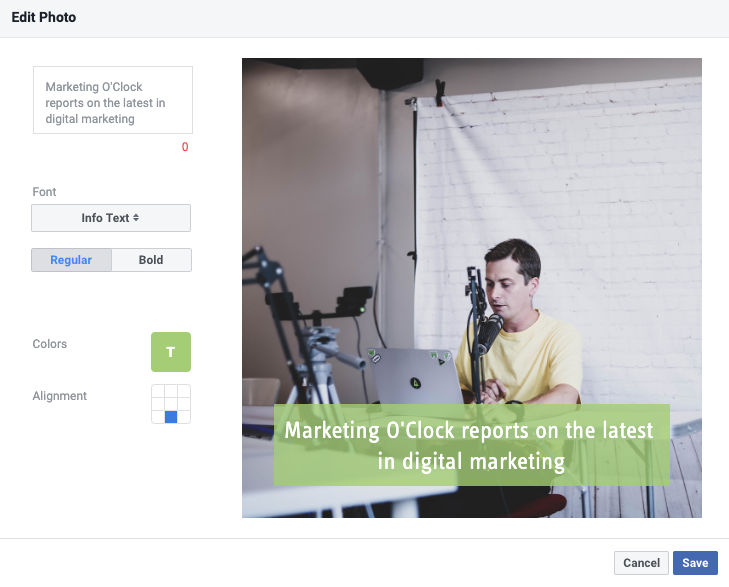
Overlay Text - Add text to each picture by clicking on the pen icon in the bottom right-hand corner of the image. The following are editable text features:
- Character Count: Slideshows offer more room when it comes to the character count. Compared to 30 characters on templates, slideshows allow up to 60 characters.
- Fonts: Select from Facebook’s drop-down menu. You can make the text Regular or Bold.
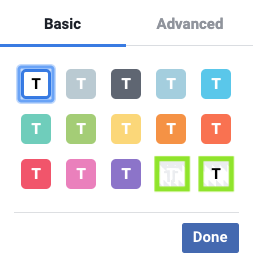
- Text color: To change, click the T box next to Colors. You can only have white or black text with a transparent (the green highlighted boxes shown below) or color background.
- Custom Background Text: This can be added under the Advanced tab, but you are not able to alter the opacity. Also, the background color forms a uniform rectangle around the text instead of following the outline of the words as it does in templates.
- Position of Text: Alter using the grid next to Alignment.
Music - Unlike templates, you have the option to add background music to your video.
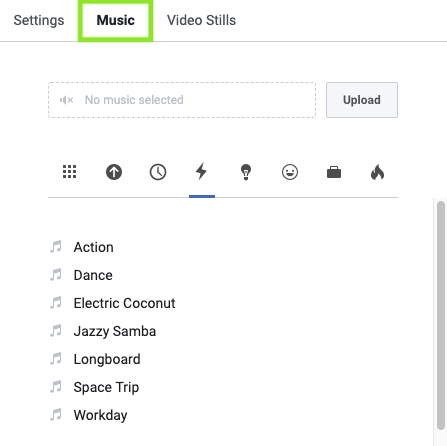
- Click on the Music tab next to Settings.
- Sort through Facebook’s copyright free music selection using the icons. To add a song, all you have to do is click on the song and it will appear in the dotted line box. The song will automatically play along with your video.
- If you have the rights to your own music, you can click the Upload button to add your own song.
Step 6: Once your video is ready to export, hit the blue Create Slideshow button in the bottom right-hand corner and your slideshow will automatically upload.
Step 7: Last but not least, fill in all the necessary information needed to finish the ad until it resembles the example below.
Slideshows aren’t as visually fancy, but they are easier to navigate, generate and will, hopefully, capture the user's attention more than standard image ads do.
I created two examples so you can visualize the difference between templates (left) and slideshows (right).
Congratulations! You made it to the end of this blog post and have officially earned the title of Facebook Video Creation Kit pro. Now it’s your turn to spice up your ad creative and start creating compelling video ads with less time, money, and effort than ever before.
And don’t forget to tell us about what masterpieces you were able to create with Facebook’s Video Creation Kit in the comments below.
Let the magic begin.
Related Resources

13 Digital Marketing Predictions for 2025
Top Industry Voices Share Their 2025 Digital Marketing Trend Predictions As digital marketers, we know a new year brings new goals, new opportunities for growth, and new challenges. But a new year also brings plenty of change. Whether it’s advancements […]

B2B Marketing With the Rise of Gen Z: Navigating the Digital Native Workforce
Explore the unique challenges & opportunities of marketing to Gen Z in the B2B space. Discover how these digital natives are reshaping the professional world & what it means for marketing strategies. Stay ahead in the era of Gen Z with expert insights.

5 Steps to Conduct a Successful Social Media Audit
Are your social media platforms in need of a refresh? Follow these 5 steps to audit and optimize your platforms for success.

5 Tips for Getting the Most Out of the LinkedIn Ads Campaign Manager
Read these 5 ways you can leverage the insights in the LinkedIn Ads Campaign Manager to manage and optimize your LinkedIn ads.

23 Of The Best Resources For Starting A Digital Marketing Career
The best social media communities, podcasts, newsletters, and certifications for new digital marketers I didn’t know anything about digital marketing when I started as an intern at Cypress North earlier this year. Acronyms like SEO, CPA, and ROAS meant nothing […]

Pinterest as a Search Engine: An Advertisers’ Guide to Keyword Targeting in Pinterest Ads
Pinterest – the land of dream wedding dresses, instant pot recipes, room inspo, and… SERPs? Pinterest is so much more than a social media platform. Yes, the platform allows users to like, share, and discover new content based on their […]
Best Digital Marketing Podcasts
Whether you're focused on SEO, PPC, social media, content, or affiliate marketing, podcasts are a great way to stay competitive in the dynamic digital marketing landscape. Finding a reliable program to consume from your car, desk, or treadmill allows you […]

Precisely Target Your Ideal B2B LinkedIn Audience With One Powerful Tool
LinkedIn is an incredible tool for B2B marketers due to its unique targeting; namely professional information like job titles and company industries. I’m sure you’ve spent precious time crafting your audiences, but targeting is just the beginning. Arguably, audience exclusions […]

Facebook Ads Budget Optimization: Everything You Need To Know
Facebook has major news for advertisers. Come September 2019, account managers will no longer be able to set budgets at the Ad Set level in Facebook Ads. Instead, Facebook's Campaign Budget Optimization will become the default setting for all campaigns, […]

Deep Dive: Reddit Ads Update
With this Reddit Ads update, Reddit expressed interest in offering more options for marketers but did this update miss the mark? We're diving deep into what the update includes, how to navigate it, and how you should adjust your Reddit […]

Digital Marketing in 2019: What to Watch For
The Pros Rampant Responsive One of the biggest boons for advertisers in 2018 was the ability to optimize campaigns by moving away from standard banner sizes and utilizing responsive display ad formats. The proliferation of flexible ads such as Facebook […]

How To (Properly) Share Access to Pages & Ad Accounts in Facebook Business Manager
Facebook's Business Manager has been a boon for advertisers and agencies across the world. With simple sharing, no transferring of ownership, easy transition from client to client and easy employee access, there's not a lot to complain about. The only […]
Why You Shouldn’t Use Facebook Groups To Build a Community
Never have Facebook Groups been more prevalent than they are today. It seems like every podcast you listen to and site you visit is pushing fans, listeners, and visitors to follow along in a Facebook Group. It’s true, Facebook Groups […]
Instagram for Business: Pros and Cons of Instagram's Changing Platform
The Marriage of Facebook and Instagram Instagram has had quite the last 4 years. When Facebook originally acquired Instagram for $1 billion in 2012, not much initially changed for the platform. Nonetheless, it was clear that with Facebook's back-to-back purchase of […]

What to Do If You Accidentally Claimed a Facebook Page/Ad Account Instead of Requesting Access
Facebook Business Manager is a fantastic tool that makes managing clients a dream. Companies can quickly give or terminate access to employees in a single location. In order to perform this task however, access must be requested to an account. […]

13 Tips For Getting The Most From Facebook Live Posts
In a world of decimated brand reach, a new tool has risen that brings Facebook exposure back. Facebook Live has arrived and has been a boon for marketers looking to attract eyeballs to brand posts. While this new post type […]

Download or Disregard - Wishbone: A Guide to the "Hot" New App We Really Wish Would Go Away
App name: Wishbone Wishbones. Those slimy crescent shaped bones that you and your siblings would fight over to break in half and see whose side was larger (and more importantly, whose wish would come true). That is loosely the thinking behind […]

Interview: Tips & Tricks On How To Properly Market On Reddit
Most marketers believe that Reddit will never work for them. That's simply not true. I was recently asked some questions by David Kirkpatrick of MarketingSherpa alongside the great Brent Csutoras of Kairay Media. The interview covers the following Reddit-related topics: […]

Facebook's Pay-to-Play Model: Why You Should Reassess Your 2014 Organic Social Marketing Plan
The goal of any type of marketing is to sell product. Period. That includes marketing with social media. Whether through awareness, buzz, brand building, or general goodwill, we use social media to promote ourselves and our product. This is an […]

Checklist: How to Set Up Social Media Accounts for New Brands
What email should I use when setting up new social accounts? How do I give my SEO firm access to manage my social accounts? I have multiple Google+ Pages and Profiles -- help! Because we help businesses in all aspects […]