Overcoming Website Launch Challenges by Improving Processes

How We Tested Changes On Ourselves to Improve Client Work
If you’ve ever been through the process of launching a website, you know there are plenty of challenges you can run into along the way.
We at Cypress North experienced this first-hand earlier this year. As you may have heard, we put ourselves through our website development process to design, build, and launch a new site for our agency.

Many of the challenges we faced were outlined in The Making of Cypress North's Website blog post by Heather Monahan. But I’d like to go into more detail on one particular aspect that Heather outlined; improving organization and refining processes to make content loading as seamless as possible.
In this post, I'll walk you through the steps we took and the tools we used to help improve organization, and how we’ve continued to improve upon this to use for current clients.
How We Realized We Needed Improvements
When I was brought in to help, the site had already been in development for quite some time. As we've mentioned before, it was hard for us to devote time to ourselves for this project because we're so dedicated to the work we do for our clients. What we needed was a plan and a straightforward process to keep us on track. That’s where my organizational skill set came in handy.
After a few meetings with our leadership team, I developed an idea for a solution and a general sense of how to implement it.
If you’ve read the other blog post, you know that one of the biggest challenges we faced was loading the copy we wrote into the site. While we had designed and built plenty of sites before this, this was our first project with a dedicated content writer who was writing the site copy vs. having each department handle its own pages.
I realized quickly we needed an organized content-loading process. But we also needed a centralized place for everything - documents, notes, links, etc. - to live for fast, easy access.
Our Solution: The Master Document
The solution, to me, was simple. We needed:
- Everything to be in one place
- An updated version of the site layout that reflected our most recent discussions
- A central location to find everything you needed to know about the status of a page/module
- A place to make note of what still needed to be uploaded to the page after it was built
And thus, the Master Site Doc was born:
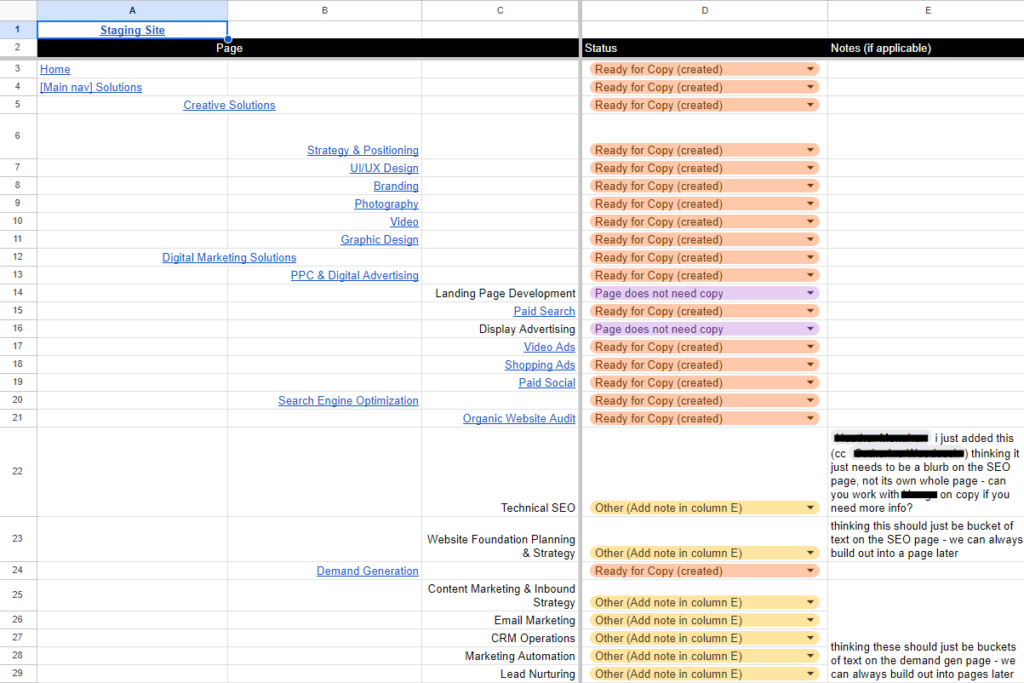
Here we see a way to access all of the pages on the site in one place. Since not all pages were built yet on our staging site, the main navigation bar hadn’t been set up yet, which made it hard to see what pages were missing and ultimately where they would nest.
I had assigned columns A, B, and C to show where the pages would live and utilized the various alignments to show sub-pages under each topic.
So under Solutions, you’d find:
- Creative Solutions
- Digital Marketing Solutions
Then under Creative Solutions, you’d find:
- Strategy & Positioning
- UI/UX Design
- Branding
- Photography
- Video
- Graphic Design
Update: We still utilize this layout with current client projects. This also makes it easier for our developers to know how to build the main navigation menu initially. Here’s a screenshot from a current project:

Since there were so many ideas that needed to be understood and addressed, I added plenty of status options in column D to cover all of our bases.
Everything started in a “Pending” status. Then I asked all department heads to review the pages related to their department to make sure nothing was missed or needed to be updated. From here, they could select any of the following options:
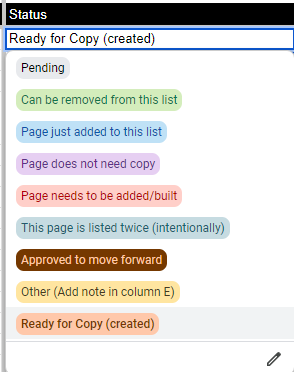
This provided the team with all the information they needed about the status of a page at just a glance.
- Was it just added to the list? Then a conversation needed to be had about the page's copy, imagery, and design.
- Can a page be removed from the list? I’ll delete the whole row, no need to overcomplicate it.
- Approved to move forward? Content writers can start meeting with department heads to get copy ideas.
- Ready for copy (created)? The page has been built and the content writers can reference the page layout and start loading copy if it has been approved.
Update: As we’ve implemented this master document concept into new client projects, it’s important to mention that the options in the above dropdown menu were unique to things that we needed at the time. These can and should be updated depending on what the client needs. Here’s an example from a current project:
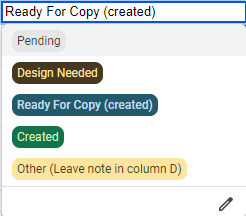
Once all the pages were created, linked, and set to “ready for copy (created)” or “other” with a corresponding note in column E, we were ready to move on to the next set of columns in the document; the content writing section.
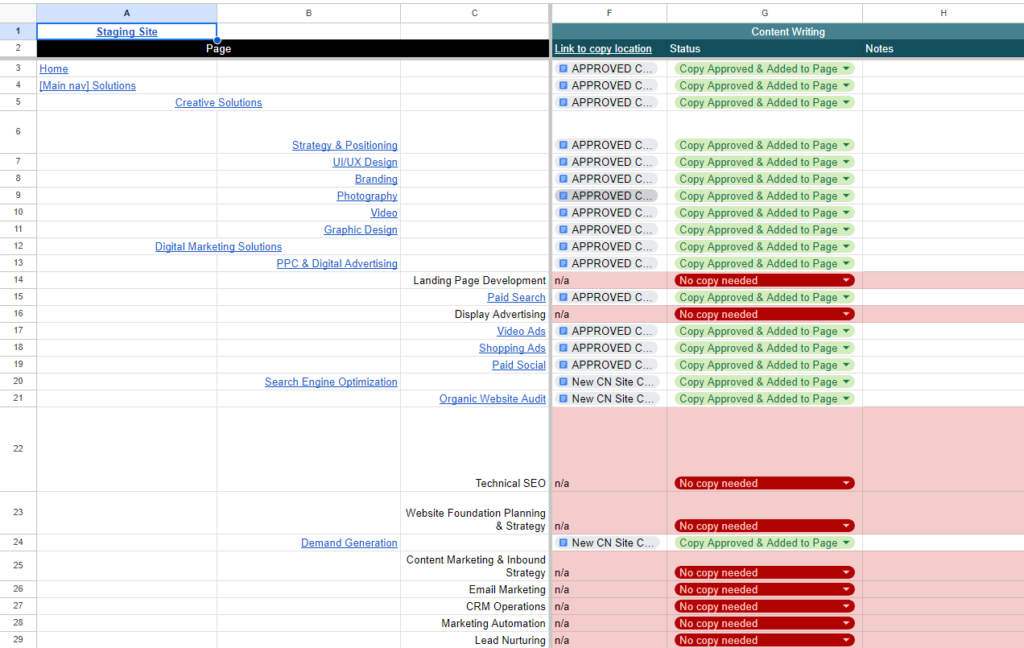
Columns F, G, and H were designated specifically for content writing. We included a general link to the document where our content writer drafted copy at the top of column F, but all of the individual links in column F take you to the exact location in the copy document where that exact content lives.
This was a necessary step because rather than having separate documents for each page, we had ONE document with all of the copy for the whole site in it. So if someone needed to review the copy for the Search Engine Optimization page in row 20, they could click on that link in F20 and be taken right to the place they needed to be in the document without having to scroll through everything looking for it.
The content section came with its own status column as well so the whole team knew if a page didn’t need any copy or if the copy was ready to be reviewed, needed edits, was ready for implementation, or had been added to the page.
Update: The content section is still utilized as pictured above with the individual page copy location linked in the necessary column. This will make it easier for clients also if we choose to give them access to the master document.
We also still give it its own status column where the options can be updated as needed for the specific client.
A Closer Look at the Content Document
Organizing the content document also took thought because we needed to make sure everything was clear to anyone loading the text onto the page. I worked closely with our content writer to come up with a way that made sense for her to write it, but also clearly conveyed to the rest of the team where the copy needed to go.
Ultimately what we decided to do was to lay out the page in a similar format to what the page would become at the end. You’ll see that in the image below with the arrows pointing to each live module.
One thing that helped with this was adding a space in the document for specific modules. Since designing and building websites is an integral part of our company, meaning that we’re very familiar with this, we didn’t always utilize this throughout this document. However, it is an essential feature when presenting content to clients so they can better visualize the copy on the page.
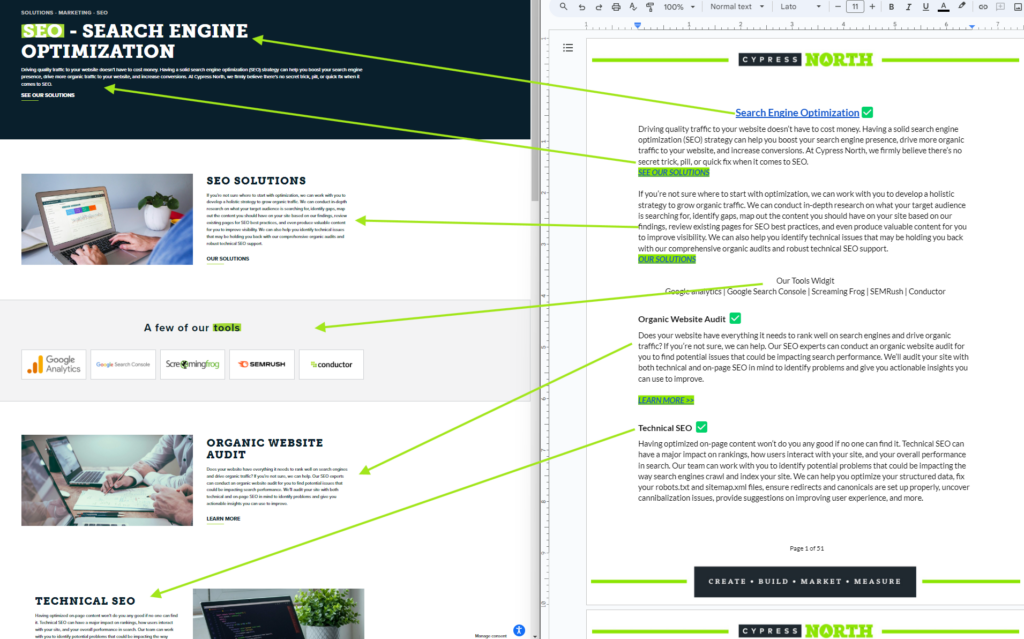
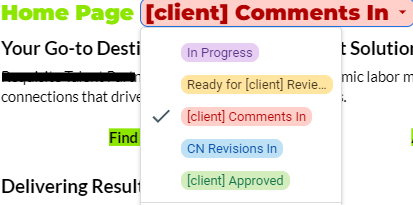
Since we had so many people in this document reading, revising, and approving content, we also asked department heads to add a green check box next to any copy that was approved.
Update: One thing we’ve changed with this is that we now use dropdown menus in Google Docs instead of using the green emoji checkbox.
Loading Content
Once all the pages were created and all content was approved, we moved on to the content loading section.
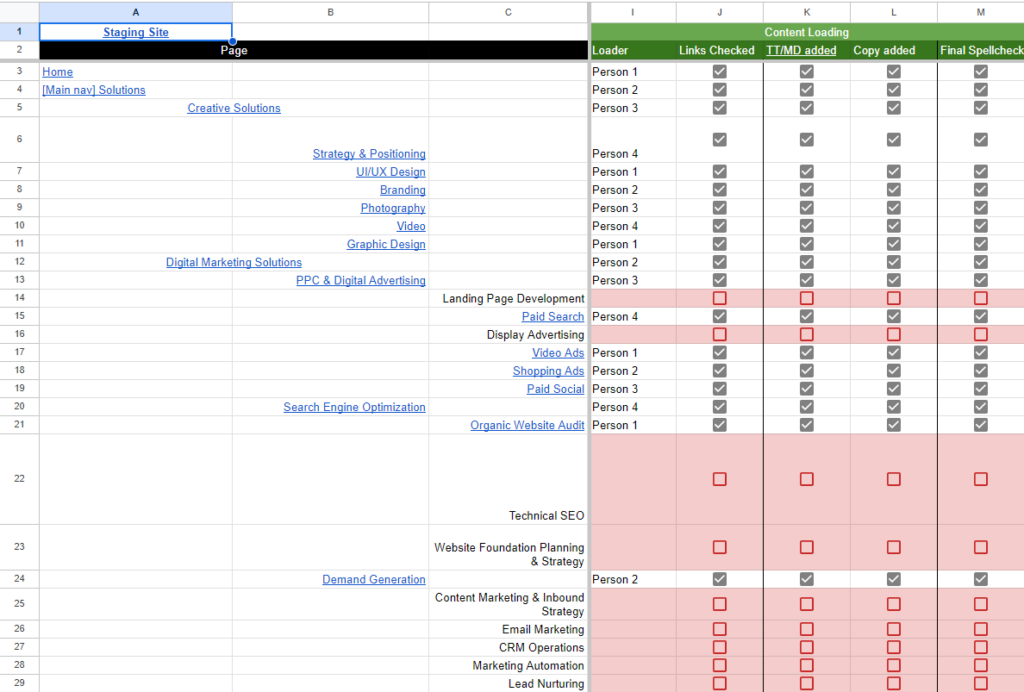
Columns I, J, K, L, and M walk us through who is loading the content and their responsibilities. We had asked for volunteers to load the content to the site and then split the rows up among those people.
The person assigned to a page was responsible for checking the following:
- All of the links worked and were going to the right place
- Title Tag and Meta Description were added (from a document linked at the top of column K)
- Page copy was added and content was read over one last time for a final spell-check
When they completed the task, all they needed to do was check the box. This was necessary because again, at the end of this project, there were so many people in this document at the same time and this told everyone at a quick glance which pages still needed attention.
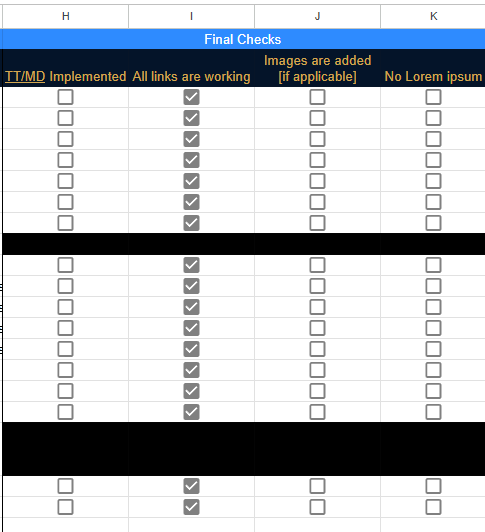
Update: This section for current clients is very similar, but as mentioned previously, can and should be tailored to the unique needs of the project. In this image from a current project, you'll see we removed the column for “copy added” because that’s in the dropdown menu in the content section. We also included columns for adding images to pages and checking that all placeholder text (lorem ipsum) has been removed.
The other great thing about putting this in an Excel file or a Google Sheet is that you can utilize other tabs to keep other aspects of a project organized and in the same place. For our specific project, we needed a place for employee testimonials, client testimonials, and all employee bio information - so each of those had its own tab.
This idea creates endless possibilities for future clients. You could add a tab for current and future blog posts, for images, or even for title tags and meta descriptions, which are currently kept in a separate document but could very easily find a home in the master document on our next project!
The Importance of Constant Improvements
The digital marketing landscape is an ever-changing field, meaning processes should always be evolving to accommodate these changes.
While I am proud of the document that I created to get us through our own site launch, I’m very open and willing to accept ways to improve upon it. As outlined above, we are still making updates to sections when we find something new that works better and will continue to do so for future clients.
Need help with launching a new website? Contact us for help!
Meet the Author

Catherine Woodcock
Catherine is a Digital Account Executive who joined Cypress North in January 2022 and works out of our Buffalo office. Known around our agency as Cat, she is our resident project manager and organizational queen who keeps our internal team on track while maintaining a focus on PPC and SEO efforts for our clients.
A Buffalo native, Cat graduated from the University at Buffalo with a bachelor’s degree in linguistics. She previously worked for a local marketing company, gaining three years of experience before joining our digital marketing team at Cypress North.
Cat is related to THE Woodcocks of Woodcock Brothers Brewing Company. When she’s not working, she enjoys the usual hobbies of your average 1960s housewife: sewing, baking, and reading. Cat also enjoys traveling and even spent a short stint meandering around Europe while living in Germany during college.


