How to Get Started with GA4: A Step-by-Step Guide

Learn How To Set Up Google Analytics 4 and Download Our Free Checklist!

Need help setting up Google Analytics 4 (GA4) for your company or client’s website? Look no further! This post provides a step-by-step process for creating GA4 properties, best practices to make sure necessary events are tracked, and ensure the data flowing into GA4 are accurate.
Access Management
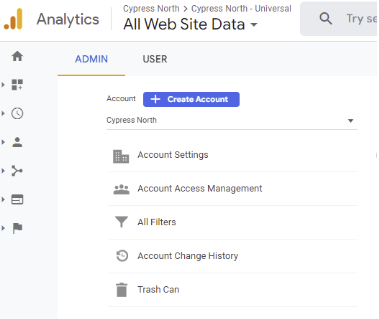
Before we dive into the setup, take a look at your account access. This area is where you can remove or add new users to an account. When creating a GA4 property, it will inherit users from the Universal Analytics property you’re on. You can add any additional users you’d like.
- In Google Analytics, go to “Admin” at the bottom left of the page
- Under Account, click on “Account Access Management”
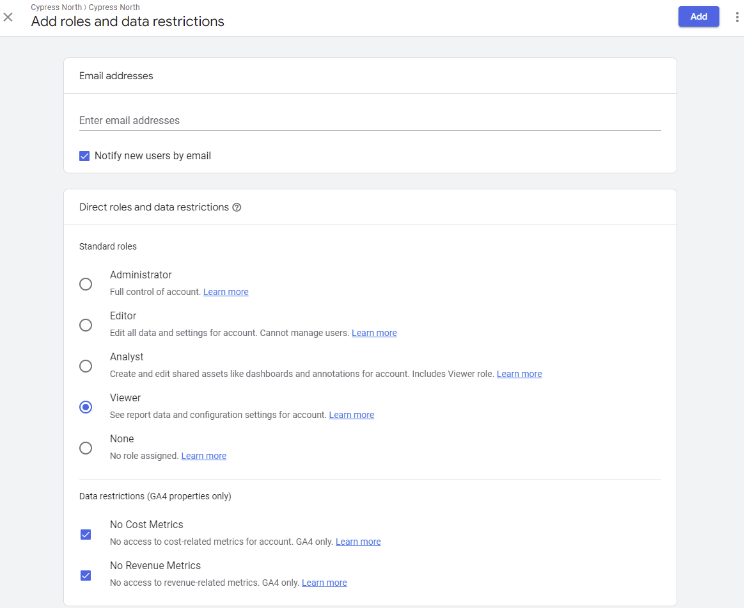
TIP: When you create your GA4 property, you can add and restrict users from cost and revenue metrics. This is especially helpful when giving prospective vendors access to your account.
GA4 Setup
Now that we addressed access management, let’s make a GA4 property!
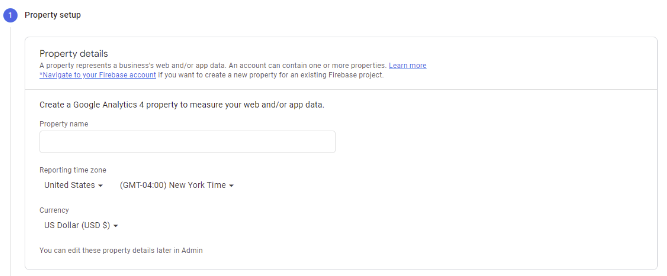
- Admin
- Click “Create Property”
- Name your property
- Example: GA4 - Business Name
- We like having “GA4” in front to make it easier for anyone looking for the property.
- We like having “GA4” in front to make it easier for anyone looking for the property.
- Example: GA4 - Business Name
- Reporting time zone
- Choose the time zone that applies to your business.
- Choose the time zone that applies to your business.
- Currency
- Choose the currency that applies to your business.
- Choose the currency that applies to your business.
- Business Settings (optional)
- This section is completely optional - the information provided here helps Google provide tailored recommendations to your business and industry.
- Choose a platform
- Choose between iOS (for iOS apps), Android (for Android apps), or Web (for websites)
- Choose what best applies to your business.
- I’ll use “web” as an example throughout this blog.
- Set your URL & Data Stream Name
- The data stream is a flow of data from your website or app to Google Analytics.
- Example: www.businessname.com
- “Business Name - Web”
- “Business Name - Web”
- Enhanced Measurement
- All auto-selected
- These track metrics such as page views, scrolls, outbound clicks, site search, video engagement, and file downloads. Normally, we toggle all of these metrics on to save from manual setup.
- These track metrics such as page views, scrolls, outbound clicks, site search, video engagement, and file downloads. Normally, we toggle all of these metrics on to save from manual setup.
- All auto-selected
- Choose between iOS (for iOS apps), Android (for Android apps), or Web (for websites)

- Connected Site Tags
- This section provides additional tagging settings like
- Cross-domain tracking
- Specify a list of domains for cross-domain measurement. This is helpful if your business has different domains that users travel between. This allows activity to be attributed to the same user as they travel across domains.
- Specify a list of domains for cross-domain measurement. This is helpful if your business has different domains that users travel between. This allows activity to be attributed to the same user as they travel across domains.
- Filtering out internal traffic (internal IP addresses)
- Define IP addresses that should be marked as internal, and excluded from your reporting.
- Define IP addresses that should be marked as internal, and excluded from your reporting.
- Set referral exclusions
- Specify any domains that should not be considered as referrals. Domains listed here will be reported as direct traffic rather than referral.
- Specify any domains that should not be considered as referrals. Domains listed here will be reported as direct traffic rather than referral.
- Session duration before timeout
- Set how long it takes before sessions expire due to inactivity. The default session duration is 30 minutes.
- Set how long it takes before sessions expire due to inactivity. The default session duration is 30 minutes.
- Cross-domain tracking
- This section provides additional tagging settings like
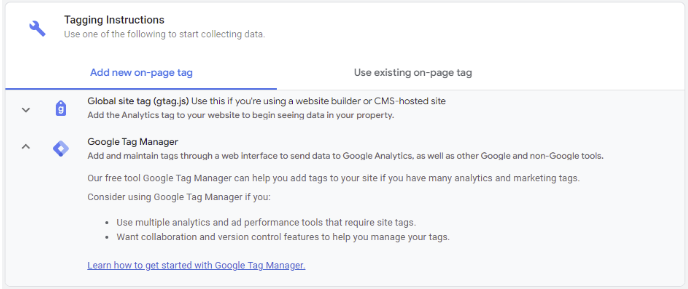
- Code Installation
- There are two ways to install the tracking code
- Global site tag (hardcoded on site)
- GTM (recommended)
- There are two ways to install the tracking code
TIP: It’s best to add the tracking code through Google Tag Manager for easier tracking and managing. Once GTM is installed, there’s no need to contact a developer to add additional tags and tracking pixels to your site.
- Validate Installation
- Test if traffic is coming into GA4 using real-time reporting and/or GA4’s DebugView.
Adjust Admin Settings
Now that you finished creating your GA4 property and validated the installation, make these small changes to your property to ensure you have all of the necessary data needed.
Data Settings
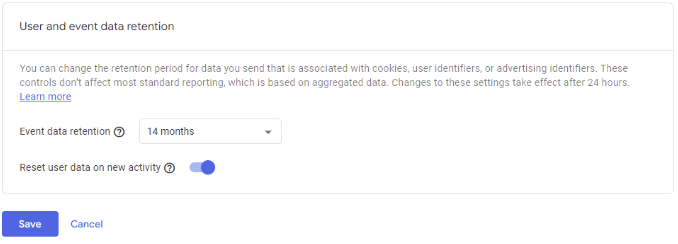
Data Retention
By default, the data retention period is set to 2 months. This means that any custom reports built in the Explore section can only report on the last 2 months of data. Changing this setting to 14 months will allow your custom reports to pull in the last 14 months of data. Default reports are not affected by this setting.
Attribution Settings
Reporting attribution model
One of the huge benefits of GA4 is flexible attribution modeling. The drop-down in this section lets you adjust between different attribution models without affecting the raw data - that means you can switch your attribution models back and forth as many times as you want. By default, it’s set to data-driven, but changing it will allow you to see conversion and revenue data attributed differently across the various models.
Below are the models that are available:
- Data-driven
- Last click
- First click
- Linear
- Position-based
- Time decay
You can find more information about attribution models here.
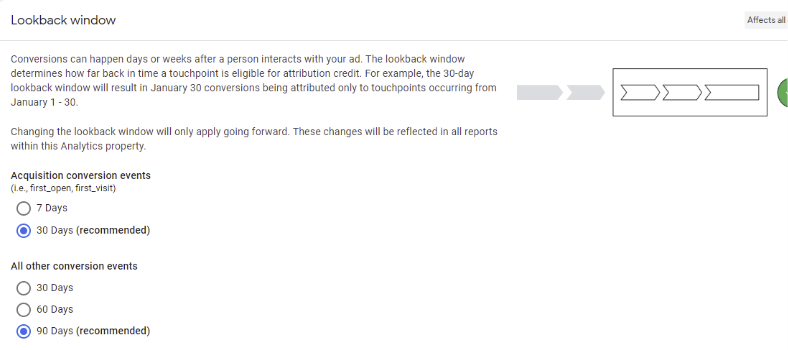
Lookback window
The lookback window determines the time frame a touchpoint is eligible for attribution credit. Changing the lookback window affects your entire data and only applies going forward. We usually keep the acquisition conversion events and all other conversion events to the recommended settings.
Product Linking
Create connections with Google Ads, Search Console, and other platforms to enable data to flow between products and your new GA4 property. For example, setting up a link with Google Ads will allow you to see campaign data in GA4 and import conversions to the ads account.
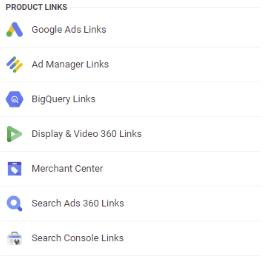
Enable Auto-Tagging for Google Ads
Keep this on. This unique tracking parameter lets GA4 report the details of each click from your Google Ads account.
Events, Conversions, & More
After updating the different data settings, it’s time to look into your events.
This is a good time to audit your events and decide what needs to be replicated from Universal Analytics to GA4, and what can be cleaned out.
TIP: Make sure the events you want to replicate aren’t already auto-collected. All events that are captured via enhanced measurement in the initial setup are auto-collected events. If you toggled these metrics on, these should not be replicated.
GTM
- Create event tags in Tag Manager using GA4 event tags
- Validate Event Data
- There are three different ways to validate events
- Within 24 hours, you can see events begin to populate in Configure > Events.
- Another way to check if the events are tracking correctly is to test in GA4’s DebugView (if using GTM).
- Lastly, you can go into Preview mode in GTM to check that your events are firing.
- There are three different ways to validate events

Conversions
- Go to Configure > Events
- Mark any of your events as a conversion using the toggle next to the event.
- Once you mark an event as a conversion, it will move into Configure > Conversions.
TIP: Google released an import feature to migrate goals from GA3 to GA4. We recommend bypassing this and creating your conversion events natively in the GA4 platform to ensure proper setup and tracking in the new data model.
Audiences
- Go to Configure > Audiences
- Replicate any audiences that you have in UA that you want to use in GA4, and consider any new audiences you may want to create.
Custom Dimensions
- Go to Configure > Custom definitions
- Add any custom dimensions that are used in event parameters in GA4 event tags.
- You’ll already see GA’s default event parameters listed. You’ll only need to register any custom parameters that you use in your GA4 event tags.
Example:
event name = form_submit
event parameter = form_name
You will see the event name “form_submit” appear in the Events section without any additional work required. However, the unique event parameter “form_name” will need to be added to the custom dimensions to begin using it in your reporting.
Pat yourself on the back because you’re done! Switching over to a new process is a little daunting but hopefully, these steps eased your mind.
Additional Resources
Curious about what will happen to your Universal Analytics data? Do you want to learn more about what to do before making the switch to GA4? Check out our Marketing O’Talk video about the next steps before getting started in GA4!
Or, if you still feel intimidated by GA4 and have any questions about the setup process or exporting your data from GA, we’re here to help! Contact us with any and all data or analytics questions.
Feel confident about taking on this project? Fill out the form below to download our free checklist so you can follow along while you set up GA4!
Download the Free GA4 Checklist
Related Resources

Is Your Digital Marketing Strategy Putting You at Risk? Understanding CCPA’s New Legal Precedent
Capital One’s privacy lawsuit highlights growing risks for marketers relying on standard tracking technologies. Here's what you need to know.

Using BigQuery to Overcome GA4 Data Retention Limits
Keep your GA4 data forever with BigQuery. Learn how to set up BigQuery to start storing raw GA4 data before it's gone for good.

Choosing the Right Digital Marketing Career Path as a New Marketer
Learn more about the different career opportunities in digital marketing by exploring the roles of SEO and PPC specialists. Gain insights into key skills, tools, and strategies to help you determine the best path for your professional career.

Why US Businesses Need to Prioritize Data Privacy Now
The U.S. doesn't have a comprehensive national data privacy policy in place, but that doesn't mean businesses aren't being impacted. Learn more about the state-level policies reshaping digital marketing strategy and compliance.
![Data - Blog - Google Collab [Background]](https://cypressnorth.com/wp-content/uploads/2024/03/Data-Blog-Google-Collab-Background-640x360.jpg)
How to Get Started Using Python for Data Analysis in Google Colaboratory
Learn how to use the free Google Colab tool and perform data analysis with Python programming language in this tutorial for digital marketers and data analysts.

How to Save Universal Analytics Data
All historical data from Google’s Universal Analytics will be deleted on July 1, 2024. Learn more about what your options are for backing it up before it’s gone for good.

Google & Apple Business Profiles: A Comprehensive Overview
Having an accurate & up-to-date business profile is very beneficial to any business. Read on to learn how to set these up on Google & Apple, what each platform offers, and some things to watch out for.

How to Create a High-Quality Email Sending List in HubSpot
The HubSpot lists tool allows you to create and edit lists of contacts, companies, or deals based on specific property values and attributes. This blog post will review the ins and outs of HubSpot lists and the different components of using and optimizing them for email marketing that works.

Is Google Analytics 4 a Tactical Move Away From Free Analytics?
There’s something fishy going on with the way that Google is handling GA4. To me, it’s playing out as a backdoor cash grab, hidden under a thin veil of a free and easy migration from UA.

How to Set Up Google Ads Automated Rules
Learn How To Set Up Automated Rules In Google Ads & When To Use Them In Your Account Automated rules in Google Ads are a feature that can make a digital marketer’s life a bit easier. Our agency uses automated […]

Data Lakes & Data Warehouses: What Are They? (& Why Your Company Probably Needs Both)
Data lakes and data warehouses have gained increased interest from organizations in recent years for their ability to support a single source of truth for data-driven decision-making across various departments. Understanding the strengths and applications of each is important not […]

Importing Campaigns from Google Ads into Microsoft Advertising: Everything You Need to Know
Learn How To Import Campaigns Into Microsoft & Common Pitfalls To Watch Out For Building out campaigns in both Google and Microsoft Ads shouldn’t have to take up your whole day. This article will walk you through a comprehensive step-by-step […]
Microsoft Clarity Benefits & Drawbacks: A Comprehensive Review
Learn more about Microsoft Clarity, and our favorite features from Cypress North’s power users Updated June 2024 -- It has been two years since this post was first published - time flies! Microsoft Clarity has changed substantially since this post […]

How To Change Your Google Analytics Attribution Model in GA4
One of the biggest changes to Google Analytics has arrived in 2022 - the ability to change your Google Analytics attribution models. This is a first for Google Analytics as this attribution model change will not just apply to a […]
Why You Should Set Up Google Analytics 4 Today
Let's face it. GA4 isn't GR8. Google Analytics 4 is a work in progress to put it kindly. However, in these final weeks of 2021 you have an opportunity to get GA4 installed and tuned up, giving your future self […]

23 Of The Best Resources For Starting A Digital Marketing Career
The best social media communities, podcasts, newsletters, and certifications for new digital marketers I didn’t know anything about digital marketing when I started as an intern at Cypress North earlier this year. Acronyms like SEO, CPA, and ROAS meant nothing […]

What to Include in a PPC Dashboard
Learn What Metrics to Include in PPC Reports. Then, Download Our Free Data Studio Dashboard Template! Let’s be real, pay per click advertising is all about data. What campaigns are bringing in the most revenue? What landing pages are converting […]

A Marketer’s Website Launch Checklist
SEO, Google Tag Manager Tracking, & Content Planning for a New Website There’s nothing quite like launching a beautiful, brand new website, but it is something that can have ugly consequences if not performed correctly. While marketers aren’t typically responsible […]

6 Google Ads Custom Columns to Help Uncover More Data
You may already know you can create custom columns in the Google Ads online interface. But, if you're anything like me, you may not always think about how you can leverage custom columns to surface essential Google Ads performance metrics, […]

How To See Audience Performace Across Campaigns With Google Ads Reports
Google Ads makes it really easy to see performance at the campaign or ad group level, but analyzing audience performance across multiple Google Ads campaigns is easier said than done. You're left wondering.... What's working well? What's not? Combining like-minded […]