Getting Started With Google Tag Manager

What is Google Tag Manager?
Google Tag Manager (GTM) is a tool that gives users a way to add code to a website without having to log in to the backend and manually add to the source code every time. This takes web development and coding skills out of the equation, and is an easy way for anyone to add and update tracking codes all in one place in a consistent fashion.
The Google Tag Manager code is the only code that needs to be manually added to the source code of the website you’re working with. Think of this as a container that is installed once, then gives you access to add or remove items right out of the container. Once installed, each code that is added within GTM will fire on any page that your GTM code is placed on (it should be added to every single page of the website - more specifics on installation to come!).
- Common codes that you might add with Google Tag Manager include:
- Google Analytics
- AdWords Conversion Codes
- AdWords Remarketing Code
- Bing UET Code
- Facebook Tracking Pixel
- Twitter Tracking Pixel
- Just about any other tracking code!
Beyond adding these codes, there are a handful of additional features that GTM has to offer. You can create tracking conditions that allow you to see things like how many people are viewing the informational videos on your website and how much of the video they are viewing. You could also track transaction and revenue information on your website and send the data to Google Analytics. Or, you can set up a condition that shows a user a retargeted ad after they spend a certain amount of money/time on your website. The possibilities are endless!
If you know what you want to accomplish or see, there is most likely a way to do it in GTM - you just need to learn how. That’s what we’re here for! Once you learn about the main components of GTM, how they work, and when to use them, you’ll be able to create the combinations that work for you in no time.
But first, why should you use Google Tag Manager and read this guide to help you do it?

The Benefits of Using Google Tag Manager
- It's A Time Saver
Not having to navigate through a website’s code or work with a developer to add or update every code to your website means that you’ll be able to implement and update your tracking quickly and efficiently. - No Advanced Coding Skills Required
You don’t need to be a web developer or know one to manage website tags through GTM. It uses a very simple interface that you can implement tags in without having to worry about messing anything up in the website’s code. - Everything All In One Place
You can log in to one place, and all of your codes from the platforms you use are right there in front of you. Adding all of your tags the manual way might mean jumping around from page to page in the backend of your website to add the codes where you need them. In GTM, you can tell it where and when to fire each code. - Uniformity
You can have all conversion codes from various networks fire on the exact same action. You don't have to worry about tracking codes located in different locations - one trigger can fire all of them at the same time. - Infinite possibilities!
The custom tracking options in GTM will give you insights into campaign performance and user behavior that is not available in Google Analytics alone or the platforms you use.
Ready to start using GTM to ramp up your marketing campaigns? Here’s how to get started.

Creating an Account
In order to set up a Google Tag Manager (GTM) account, you first need an existing Google Account. If you use Gmail or any other Google products, you’re all set and just need to sign in to GTM.
You’ll then be brought to this page, where you’ll be introduced to two things: Accounts and Containers.
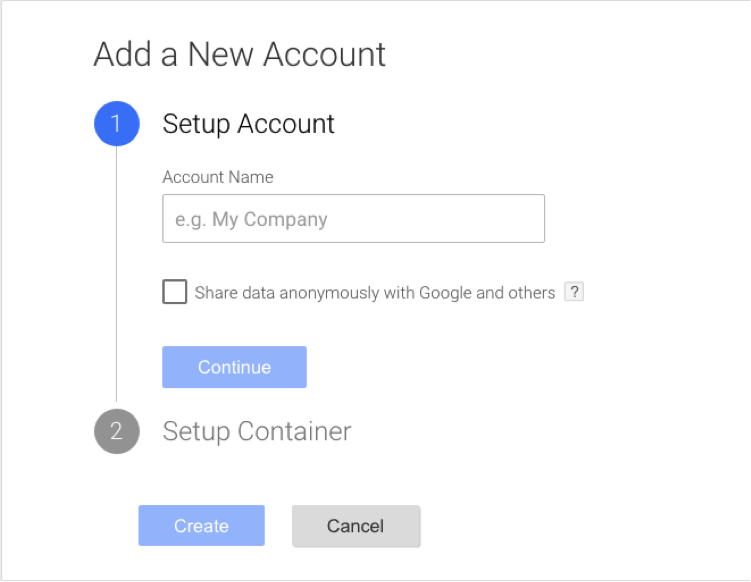
In the first step, you’ll set up your account. Here you will enter the name of the business or website that you’ll be using GTM for. You typically only need to create one Account per business, because most additional needs can be accommodated with containers within your account.
In the second step, you’ll set up your container. In the empty box, enter in the website URL or a descriptive name of the website that you’ll be implementing GTM on.
Finally, you’ll choose whether you’ll be using GTM on a website (Web) or an app (iOS or Android). You can only select one here, so if your app is compatible with both iOS and Android, you’ll need to create an individual containers for each within the same account.
Once you hit Save, you’ll be prompted with the Terms of Agreement. After you hit “Yes” to agree, your unique GTM code will pop up. This code will need to be implemented on every page of the website.

Implementation
To add the GTM code to your website, you’ll need to copy and paste the GTM code either from the original pop-up after you created your account, or navigate to Admin > Install Google Tag Manager if you clicked away from the box. This code will need to appear immediately after the openingtag on every page of the site.
If you work with a web developer, simply send them this code and let them know where it needs to be installed. If you’re working on your own, you’ll need a little familiarity with navigating around the backend of a website and source code. Here’s how the code can be installed:
- Log in to the backend of your website
- Copy the appropriate GTM code for the container you’re working with
- Paste the code after the openingtag in the source code of each website page
If you’re using WordPress, a Google Tag Manager plug-in can be installed that will accomplish this for you. While we don't use plugins to run GTM, there are many that exist (you'll want to fully vet them on your own):
Now that GTM is installed on your website, you’re ready to log in and start putting together the pieces for tracking success!
Understanding The Pieces
Before you start using GTM, it’s important to understand each component of it and how they work together. This will ensure proper set up, and give you the knowledge to put together customized and more advanced tracking strategies in the future.
Tags
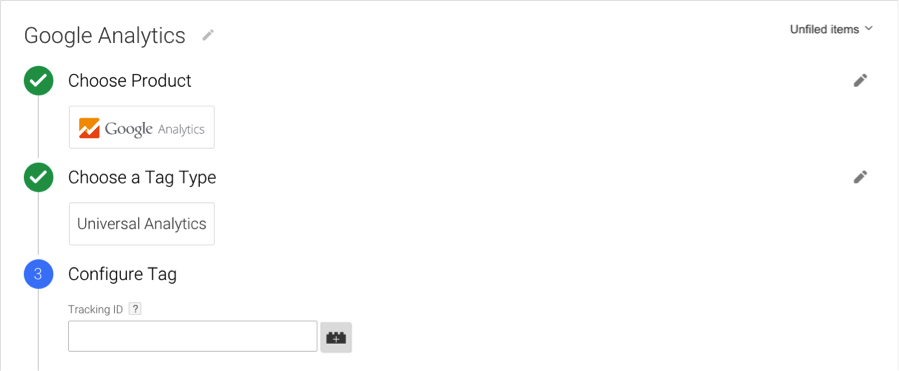
A Tag is a snippet of code that you would like to appear when a specific action takes place on your website. This could be conversion code from AdWords when a purchase is made, a Bing UET or Google Analytics code that should appear on every page of the site, AdWords remarketing code, or anything else. Really - if the product that you’re looking for is not offered, choose the Custom HTML Tag option to add just about anything else!

Not only does this house all of your codes from different products in one place, but also, many times you don’t even need to add the entire snippet of code. With Google Analytics, for example, you only need to add the Tracking ID.

Creating a Tag
Now that you understand what a tag is, here’s how to create one:
Click on Tags in the left-hand menu and select Tags. Click on New to create a new tag.
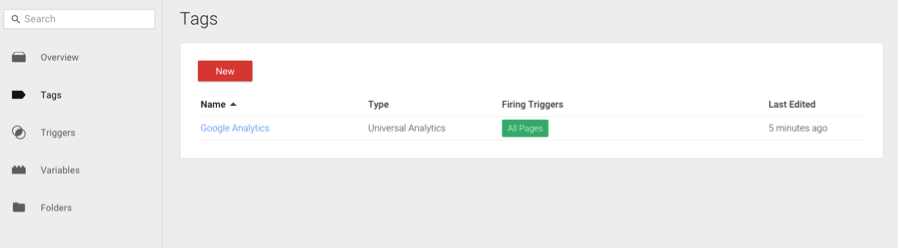
That will bring you here:
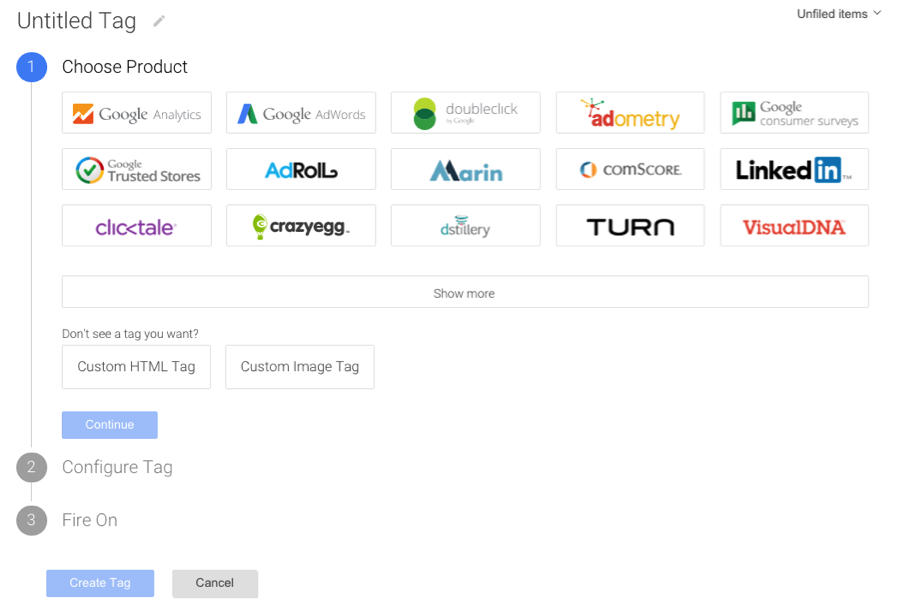
First, give your tag a name that clearly states what it’s for, so you can easily find what you’re looking for every time you’re in GTM.
Next, choose the product that the tag is associated with. If you can’t find the product that you need, no worries! You can select the Custom HTML Tag option and insert your code there.
Once you have that all set, you’ll choose where you want your tag to fire - this is where Triggers come in. If it’s a code that needs to appear on all pages of the site, like a Google Analytics code, you can simply select All Pages and be done.

If you’d like it to only fire on some pages or a particular page, like a Thank You page, select Some Pages, and you’ll be prompted to choose the page you’re looking for from Page View triggers that you already have set up. You can also select a click trigger, form trigger, or click More to select from any other existing Triggers that you have created.
If you do not have any Triggers set up yet, you have 2 options:
- Click More, and then click New to create a new Trigger
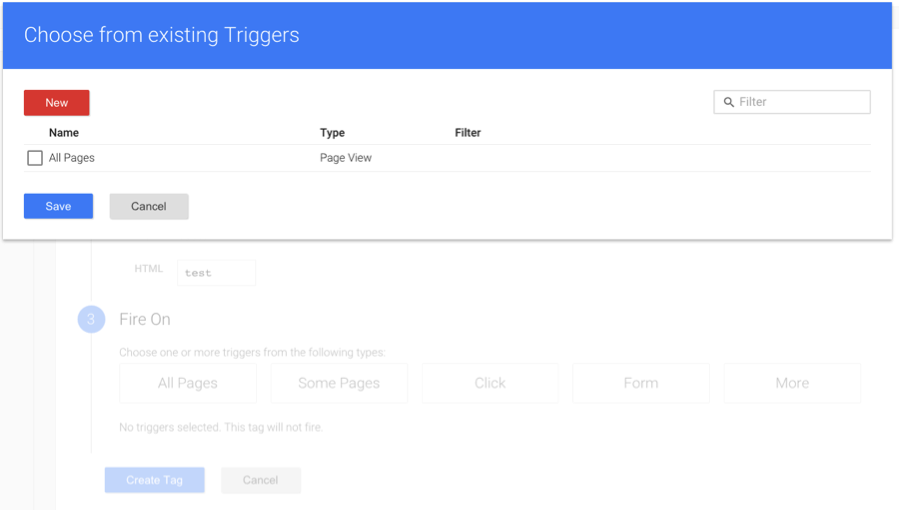
- Exit out of the Tag area, and go to the Trigger area to create a new trigger, so it is ready to be selected when you go back to create your tag.
Now that your tag is paired up with a trigger, click on Create Tag!
Triggers
As we touched on before, a trigger is where you can define what needs to happen in order for your tags to fire. Examples of this are a user landing on a specific page (Page View trigger), or clicking on a submit button after they’ve filled out a contact form (Click trigger). Although there are pre-made triggers such as these available, there is also the option to create a completely Custom Event if what you’re trying to accomplish is not available in the pre-made options.
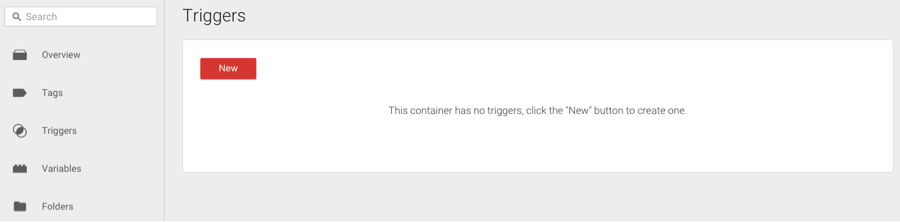
Creating a Trigger
To create a trigger, click on Triggers in the left-hand menu and then click New to create a new trigger.
That will bring you here:

Start by giving your trigger a name that is descriptive of what you’re creating it to do. This will make it easy for you to select the right trigger when you’re creating tags in the future.
Next, choose the event type. Being familiar with what each event type means will help you make the best selection:
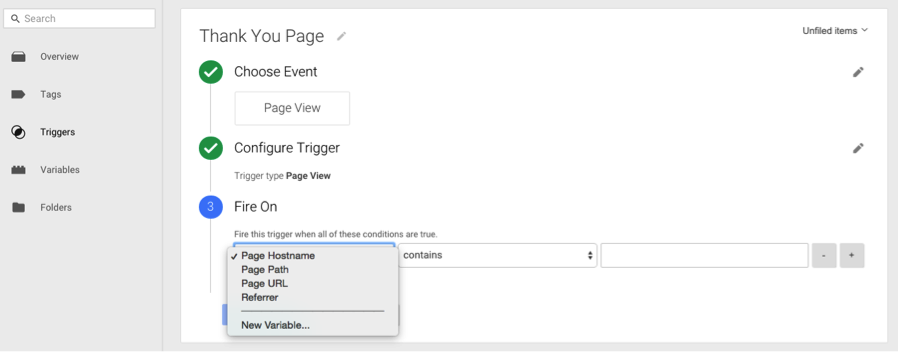
Page View: Trigger fires when a page loads. This can be configured to fire as soon as the page starts to load, or when it is fully loaded, called DOM ready. DOM ready is required when tracking dynamic values, such as e-commerce tracking through Google Analytics that is pulling in the value of each transaction. If you’re tracking a Thank You page or something similar, the Page View trigger type should suffice.
Click: Trigger is fired when a user clicks on a designated link or element on the website. These are useful when a Submit button does not lead to a separate page that can be tracked, but rather populates a “thank you” message the same page, for example.
Form Submission: Trigger is fired when a user successfully fills out a form on your website and submits it.
History Change: Trigger is fired when a URL fragment changes (anything following a # in a URL). If there are any clicks on a website that would lead to a URL fragment change, such as a link that takes the user to a different area of the same page, or making a section that causes dynamic information to populate, this trigger is for you!
Javascript Error: Trigger is fired when GTM recognizes a Javascript error on a page. Once this information is pulled into Google Analtyics, you can review the errors and fix them.
Timer: Trigger is fired at an interval of time and maximum number of times that you specify. Use this if you’d like to track more precise time-based metrics than Google Analytics allows.
Custom Event: If none of the above triggers suit your needs, you’re in luck! You can create a custom event to accomplish exactly what you want. Things get a little more complicated when creating a custom event, as several additional steps are required outside of creating the trigger itself. There are many step-by-step guides that friendly folks around the web have created to track a particular goal using custom events, so doing a simple search for what you a trying to track might bring you to the exact steps you need to take when creating a custom event. If not, understanding the different aspects of GTM and getting some practice working with it should set you on the path to put together any unique custom event.
Now back to creating that Trigger that we started with - after you’ve made your decision and chosen the best Event type that works for your needs, it’ll be time to configure your trigger. Depending on the Event that you chose, the options in this section will vary. Select the options that are best in line with the goals of your trigger and go ahead and hit Create Trigger!
Variables
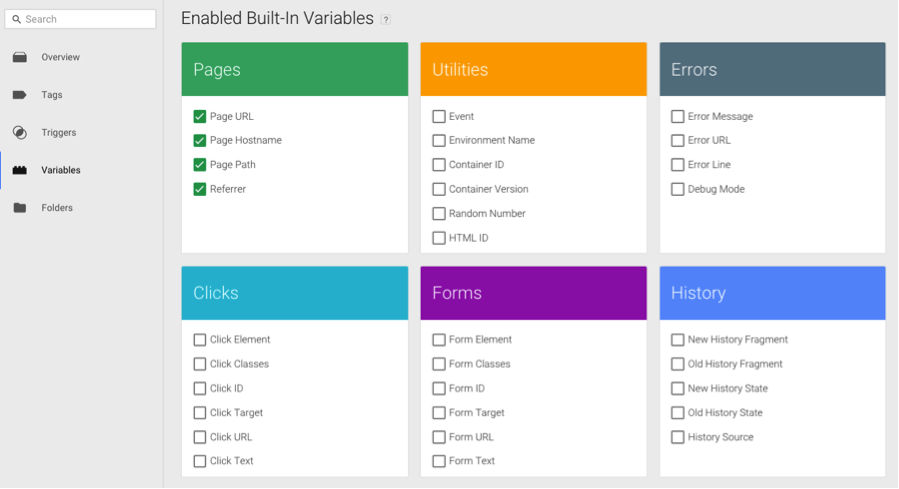
Defining variables is an additional step that you can take when creating triggers to control where your tags fire. For example, if you’re creating a Page View trigger, you can make your trigger more specific by defining what the URL, hostname, path or referrer is of the page that you are tracking.
In the Variables section in the left-hand menu, you’ll find a variety of pre-built variables provided by GTM. Here, you can select as many variables as you need, and they will appear as options when creating a trigger. In the example below, all of the variables under the Pages selection are selected.
Now, when you’re ready to create your extra-targeted Page View trigger, you’ll see all of the variables you selected show up (as long as you select Some Pages and not All Pages):
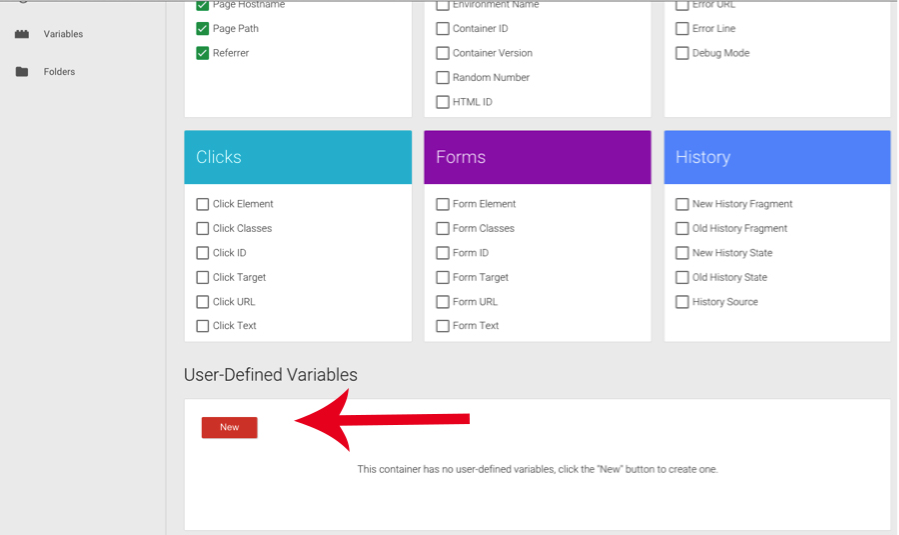
If the variable that you need is not pre-built, you have the option to create your own by selecting “New Variable…” in the menu shown above or navigating to the Variables section of GTM, and clicking New under User-Defined Variables.
The Data Layer
The data layer is where information is passed from your website to GTM. While it’s not always necessary to implement, it is recommended in order to maximize GTM’s capabilities for trickier conversions. It’s especially important when dealing with custom events and variables (it’s still possible to work with variables without the data layer, but it is necessary when working with custom events).
Using the data layer in tandem with GTM makes the information passing process seamless between your website and GTM. GTM is specifically designed to reference the data layer and look for any variables or information that you want it to, rather than leaving it up to GTM to scan an entire webpage for these items.
Implementing The Data Layer
To add the data layer to your website, the following code should be added to the head above the GTM container snippet and feature specific information related to an action. For example, after someone clicks on a quote request, you could fire the following:
<script>
dataLayer = [{
'eventType': 'quoteRequest',
'visitorType': 'high-value'
}];
</script>
Remember, the Data Layer simply helps you pass advanced information or flag a conversion on an advanced conversion type. If you are just trying to see if a user visited a page or stayed for a set period of time, you won't need the data layer at all. For full implementation on the Data Layer, browse through the official Google Developer's page and see the possibilities!
You’ve created all your tags and triggers! Now what?
- Use the Preview and Debug Tool. This tool allows you to check for any issues with your tags firing before you publish them. It can be found by clicking on the arrow next to Publish in the top right-hand corner.
 Once you hit Preview, visit the website that you’re checking. You’ll see this console of information appear at the bottom of the screen.
 There are a few different areas you can view through the options in the left-hand menu. Within those areas, you can find out how they apply to Tags, Variables and the Data Layer, by selecting each one in the top left area of the console.For a basic look at whether your tags are firing when and where they should, staying in the Summary area with Tags selected on the top will give you this information. If everything looks as it should, you’re good to go! If there is a tag that is not firing that should, or vice versa, double check the set up of your tags and triggers to make sure it’s all correct.Once you’ve troubleshot any issues and you’re happy with the way everything is set up, you can leave Preview mode back in GTM by clicking Leave Preview Mode:
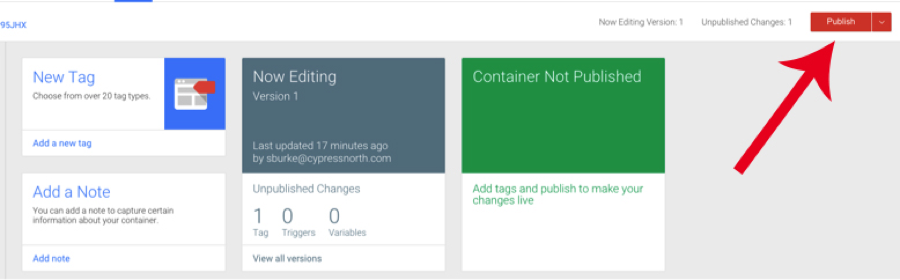
- Make sure you publish your changes! The changes you made in GTM will not go into effect until you hit the Publish button in the top right-hand corner of the screen.
- Install Tag Assistant. Tag Assistant is a free Chrome extension created by Google that lets you know if your tags are firing properly or not. One of the main reasons to use Tag Assistant in addition to the Preview and Debug Tool is that if there is an issue with one of your tags, Tag Assistant will provide detailed information as to what is going wrong and what you can do to fix it. In addition to alerting you of any errors, Tag Assistant also lets you know about any improvements that can be made to your tag set up. Having all of your tags set up in the most ideal way possible will ensure accurate tracking and data.

Conclusion
There you have it! You should now have the knowledge and marketing power to set up the tags you need to accomplish your goals and have the data available to show your clients, internal team, or to just have on hand for your own tracking purposes.
Have any questions about getting started with Google Tag Manager? Feel free to leave us a comment below.
Or, contact us if you don’t have time in your busy schedule to get started with GTM yourself. We can handle it for you!
Related Resources

5 Methods to View a Page as Googlebot
Can search engine crawlers access your content? If you’re not sure, check out these five methods to view your pages as Googlebot and other crawlers.

Is Your Digital Marketing Strategy Putting You at Risk? Understanding CCPA’s New Legal Precedent
Capital One’s privacy lawsuit highlights growing risks for marketers relying on standard tracking technologies. Here's what you need to know.

Using BigQuery to Overcome GA4 Data Retention Limits
Keep your GA4 data forever with BigQuery. Learn how to set up BigQuery to start storing raw GA4 data before it's gone for good.

3 Options for Multilingual Website Translation
Managing multilingual web content is challenging, and there are plenty of options available. Learn more about the solutions and how to find the right one for you.

Google Launches AI Mode: What it Means for the Future of Search
Google’s new AI Mode marks a major shift in its search strategy. Here’s how we expect it to transform the user experience and future of search.

13 Digital Marketing Predictions for 2025
Top Industry Voices Share Their 2025 Digital Marketing Trend Predictions As digital marketers, we know a new year brings new goals, new opportunities for growth, and new challenges. But a new year also brings plenty of change. Whether it’s advancements […]

Let's Put a Stop to Google Page Annotations
Google's Page Annotations will direct some visitors away from sites and back to search. We’re calling for an end to this practice.

Choosing the Right Digital Marketing Career Path as a New Marketer
Learn more about the different career opportunities in digital marketing by exploring the roles of SEO and PPC specialists. Gain insights into key skills, tools, and strategies to help you determine the best path for your professional career.

6 SEO Tips & Tricks We Learned at WTSFest 2024 in Philadelphia
Three of our digital marketers recently picked up some new tips, tricks, and best practices at the 2024 Women in Tech SEO Festival. Learn more about what we learned and how we’re applying it to our work.

Why US Businesses Need to Prioritize Data Privacy Now
The U.S. doesn't have a comprehensive national data privacy policy in place, but that doesn't mean businesses aren't being impacted. Learn more about the state-level policies reshaping digital marketing strategy and compliance.

How to Create a Looker Studio SEO Report Without Paid Connectors or Expensive Subscriptions
Effectively Measure Organic Traffic Performance With an Easy-To-Create Dashboard Measuring organic traffic performance is a key part of SEO. But with so many different metrics available to track, it can be challenging to know what data to look at when […]
![Data - Blog - Google Collab [Background]](https://cypressnorth.com/wp-content/uploads/2024/03/Data-Blog-Google-Collab-Background-640x360.jpg)
How to Get Started Using Python for Data Analysis in Google Colaboratory
Learn how to use the free Google Colab tool and perform data analysis with Python programming language in this tutorial for digital marketers and data analysts.

How to Save Universal Analytics Data
All historical data from Google’s Universal Analytics will be deleted on July 1, 2024. Learn more about what your options are for backing it up before it’s gone for good.

Is Google Analytics 4 a Tactical Move Away From Free Analytics?
There’s something fishy going on with the way that Google is handling GA4. To me, it’s playing out as a backdoor cash grab, hidden under a thin veil of a free and easy migration from UA.

Data Lakes & Data Warehouses: What Are They? (& Why Your Company Probably Needs Both)
Data lakes and data warehouses have gained increased interest from organizations in recent years for their ability to support a single source of truth for data-driven decision-making across various departments. Understanding the strengths and applications of each is important not […]

How to Get Started with GA4: A Step-by-Step Guide
Need help setting up GA4 for your company or client’s website? Look no further! This post provides a step-by-step process for creating GA4 properties and best practices to make sure necessary events are tracked and the data flowing into GA4 are accurate.

Testing Website Accessibility: Five Testing Tools & Methods To Identify Accessibility Issues
Is your site compatible with website accessibility guidelines? Use these tools to benchmark and identify improvement opportunities. Website accessibility is often overlooked, but it shouldn’t be. According to CDC estimates, 61 million adults in the United States alone live with […]

How To Change Your Google Analytics Attribution Model in GA4
One of the biggest changes to Google Analytics has arrived in 2022 - the ability to change your Google Analytics attribution models. This is a first for Google Analytics as this attribution model change will not just apply to a […]
Why You Should Set Up Google Analytics 4 Today
Let's face it. GA4 isn't GR8. Google Analytics 4 is a work in progress to put it kindly. However, in these final weeks of 2021 you have an opportunity to get GA4 installed and tuned up, giving your future self […]

23 Of The Best Resources For Starting A Digital Marketing Career
The best social media communities, podcasts, newsletters, and certifications for new digital marketers I didn’t know anything about digital marketing when I started as an intern at Cypress North earlier this year. Acronyms like SEO, CPA, and ROAS meant nothing […]